


2025/07/14Views(22240)Reviews(0)
I. Target Audience
Business Owners, Operators, Management
II. Feature Introduction
SellerSpace's Sub-Account feature is designed for company sellers and individual sellers with multiple team members. It supports multi-marketplace, multi-user operations, allowing for separate and independent management of each user's assigned stores.
Main Account:
Generally used by company owners or management to centrally manage all stores.
Key Permissions:
- Centrally manage all sub-accounts, up to 99 sub-accounts can be created
- Set and assign different roles to sub-accounts
- Enable or disable sub-accounts
- Modify sub-account passwords and account information, such as email, phone number, notes, etc.
- Assign stores managed by sub-accounts, supporting adding, removing stores, and modifying the default marketplace
Special Notes:
- If the main account unauthorizes a store, the corresponding sub-account will also be unauthorized
- If the unauthorized store is the default marketplace for a sub-account, the default marketplace will be automatically and randomly set to another assigned marketplace. If there are no other assigned marketplaces, this sub-account will be disabled
- After creating a sub-account, the first marketplace is automatically set as the default marketplace. The default marketplace can be manually modified
Sub-Accounts:
Generally used by operations personnel to independently manage and operate assigned stores.
Key Permissions:
- Belong to the main account and are centrally allocated and managed by the main account. Usage permissions are consistent with the main account
- Support being assigned various roles, which are centrally set and assigned by the main account
- Support independently modifying login passwords
Permission Restrictions:
- No permission to create sub-accounts
- Cannot purchase plans or obtain coupons
- Cannot set the default marketplace
III. Usage Scenarios
- Single-store/multi-store, multi-person independent management and operation
IV. Operation Guide
1. Creating Sub-Accounts
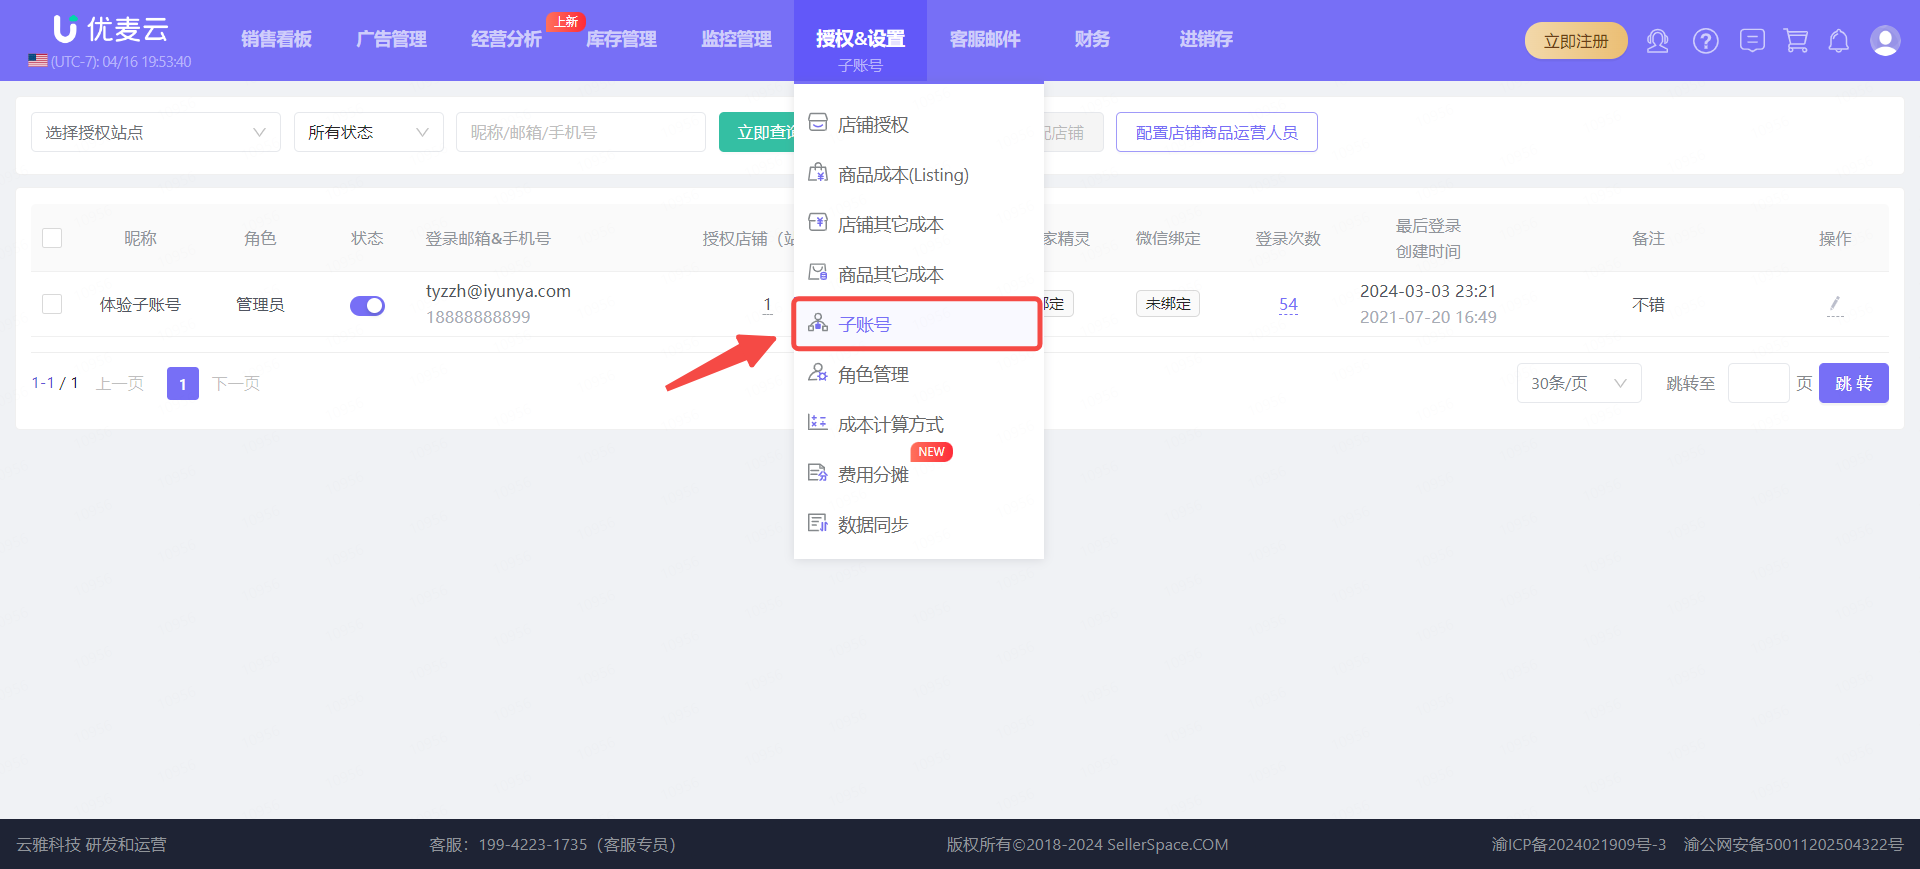
1.1 Log in to the main account backend, select: Authorization & Settings - Sub-Accounts, to enter the Sub-Account feature page;
 +
+
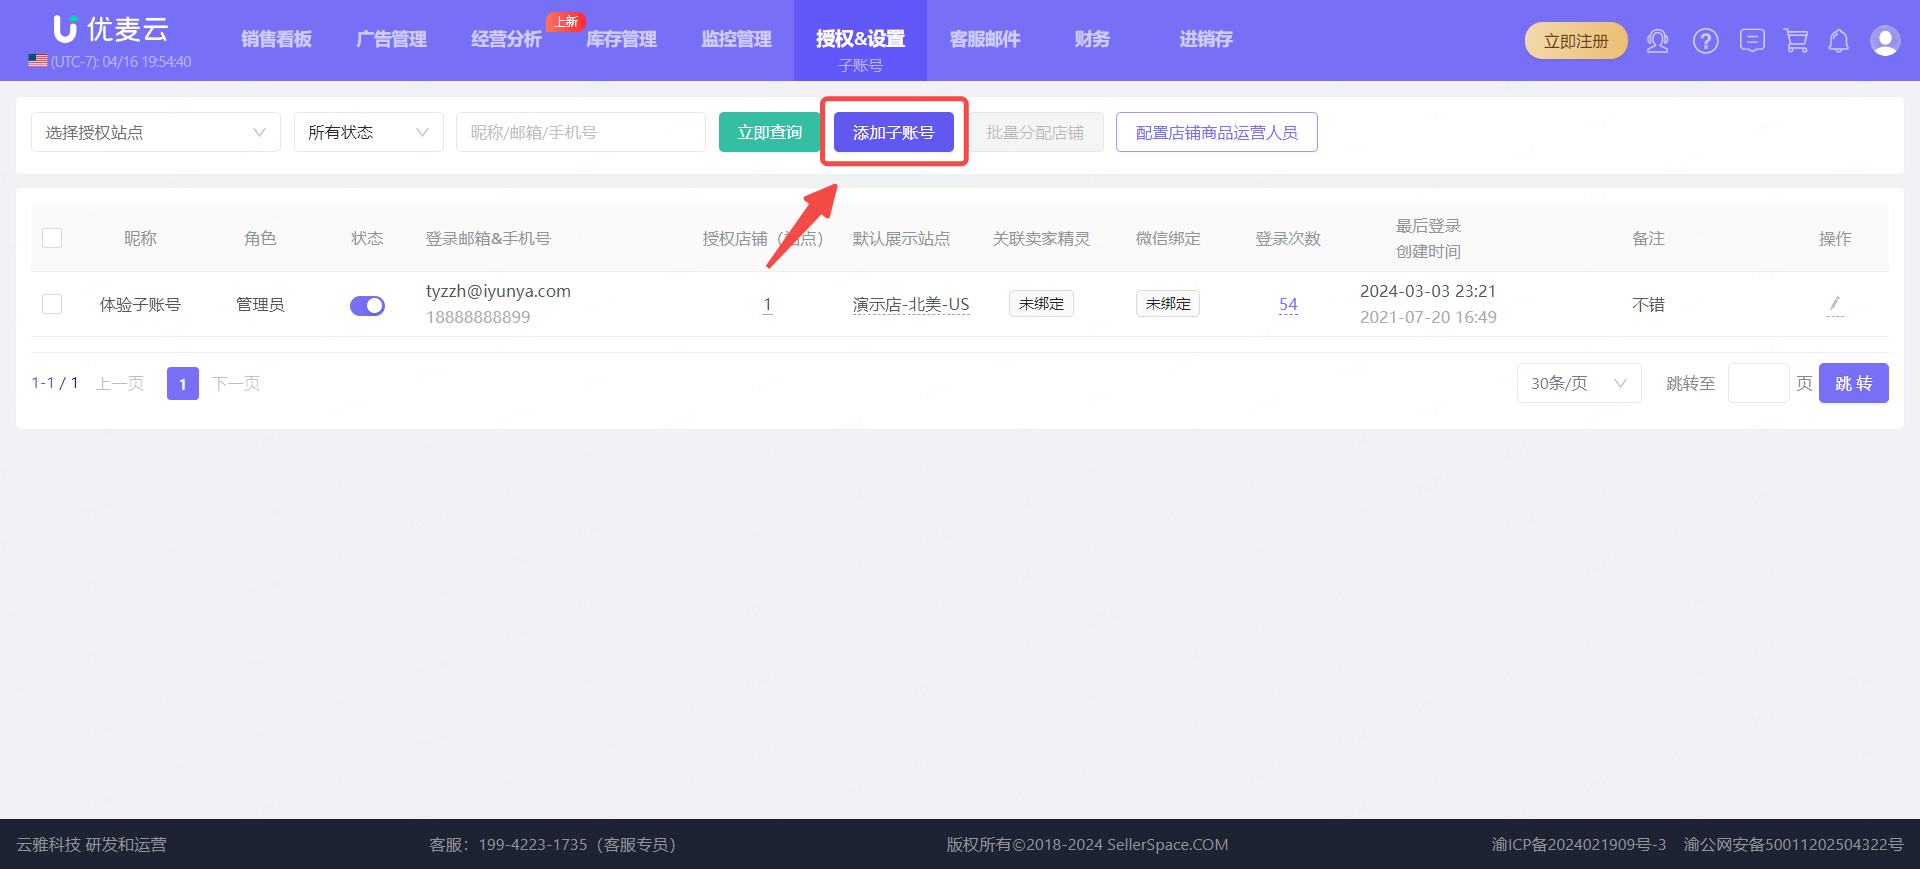
1.2 Click [Add Sub-Account] to enter the settings page;
 +
+
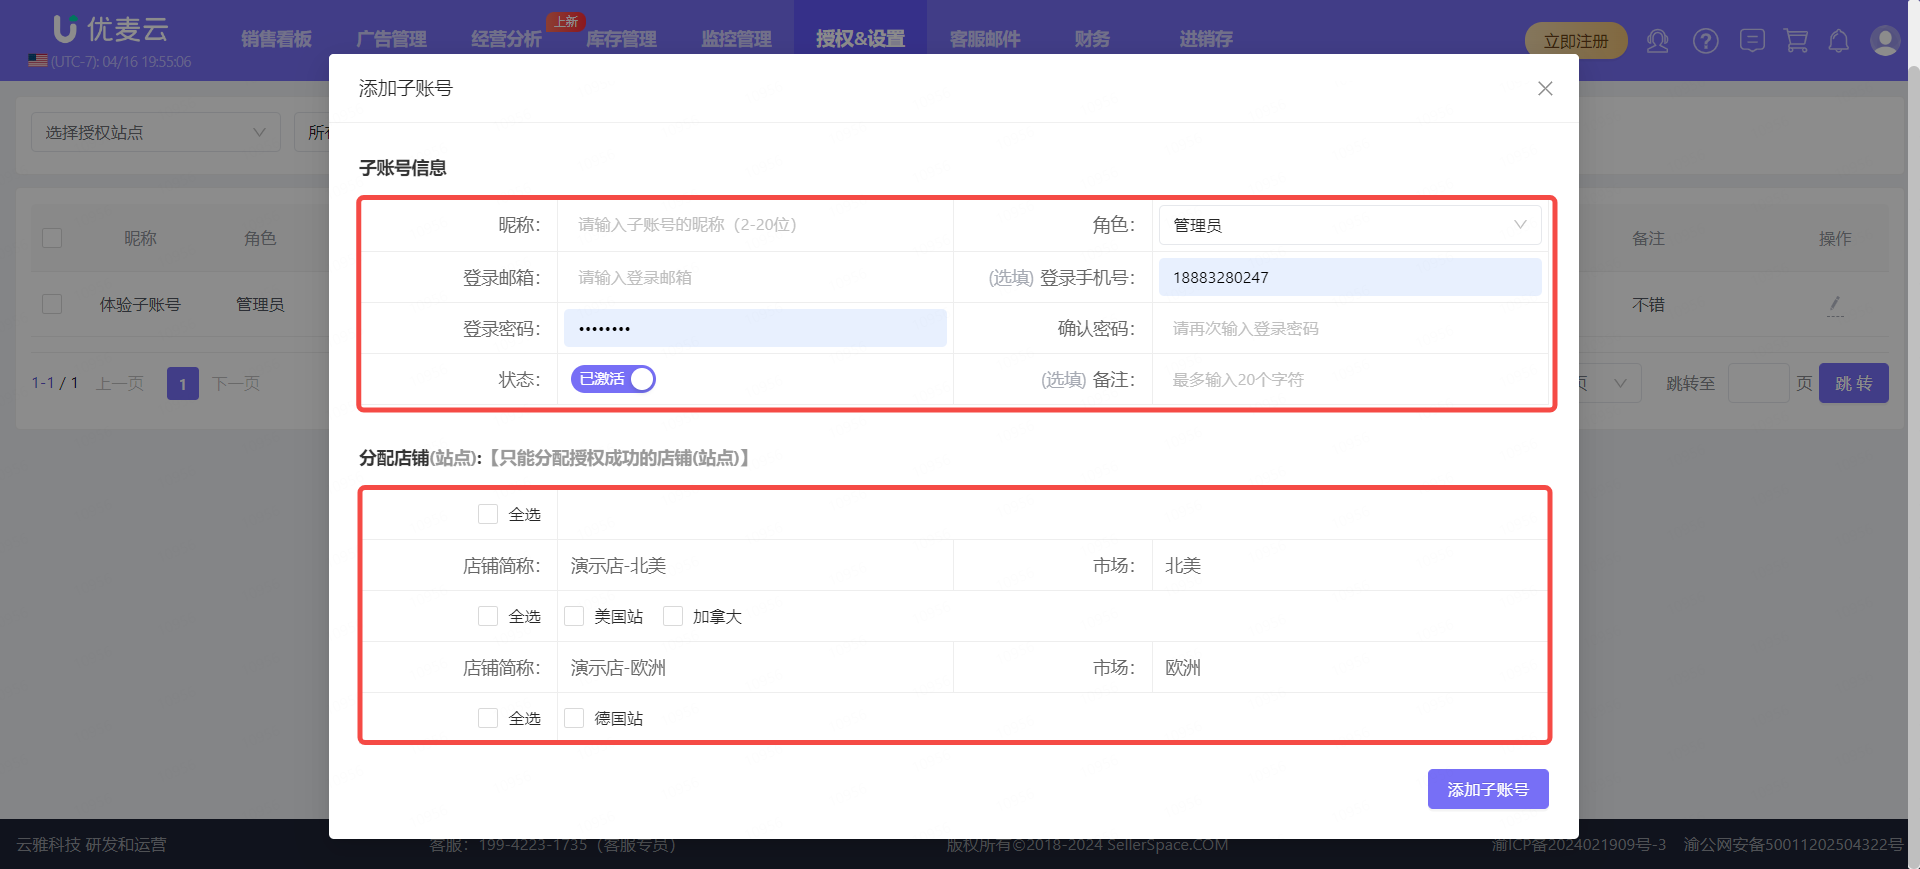
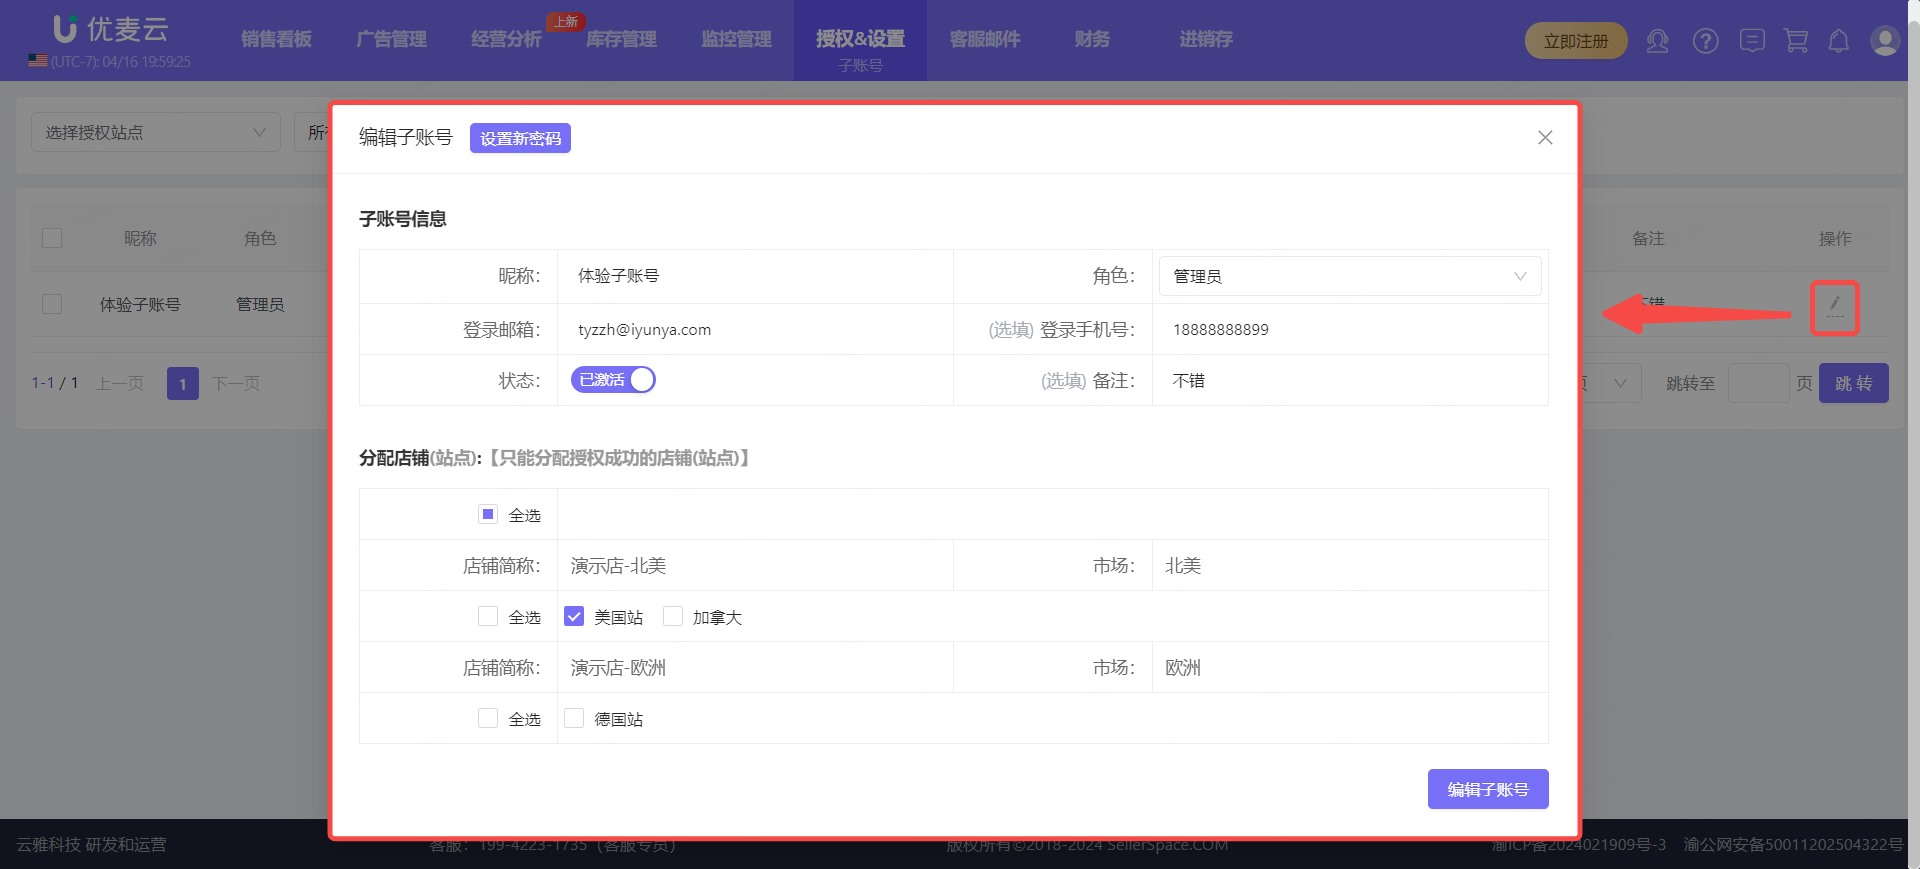
1.3 Fill in the corresponding sub-account information: Nickname, Login Email, Login Phone Number (optional), Login Password, Notes (optional),
Select the role of the sub-account (Click to see how to create different roles),
Assign the marketplaces and stores managed by the sub-account,
After confirming everything is correct, click [Create Sub-Account] to complete the creation.
Note:
1. When creating a sub-account, the main account needs to have authorized the corresponding marketplace stores in advance. It does not support assigning unauthorized marketplace stores.
2. The phone number and email for the sub-account need to be ones that have not been registered with SellerSpace.
 +
+
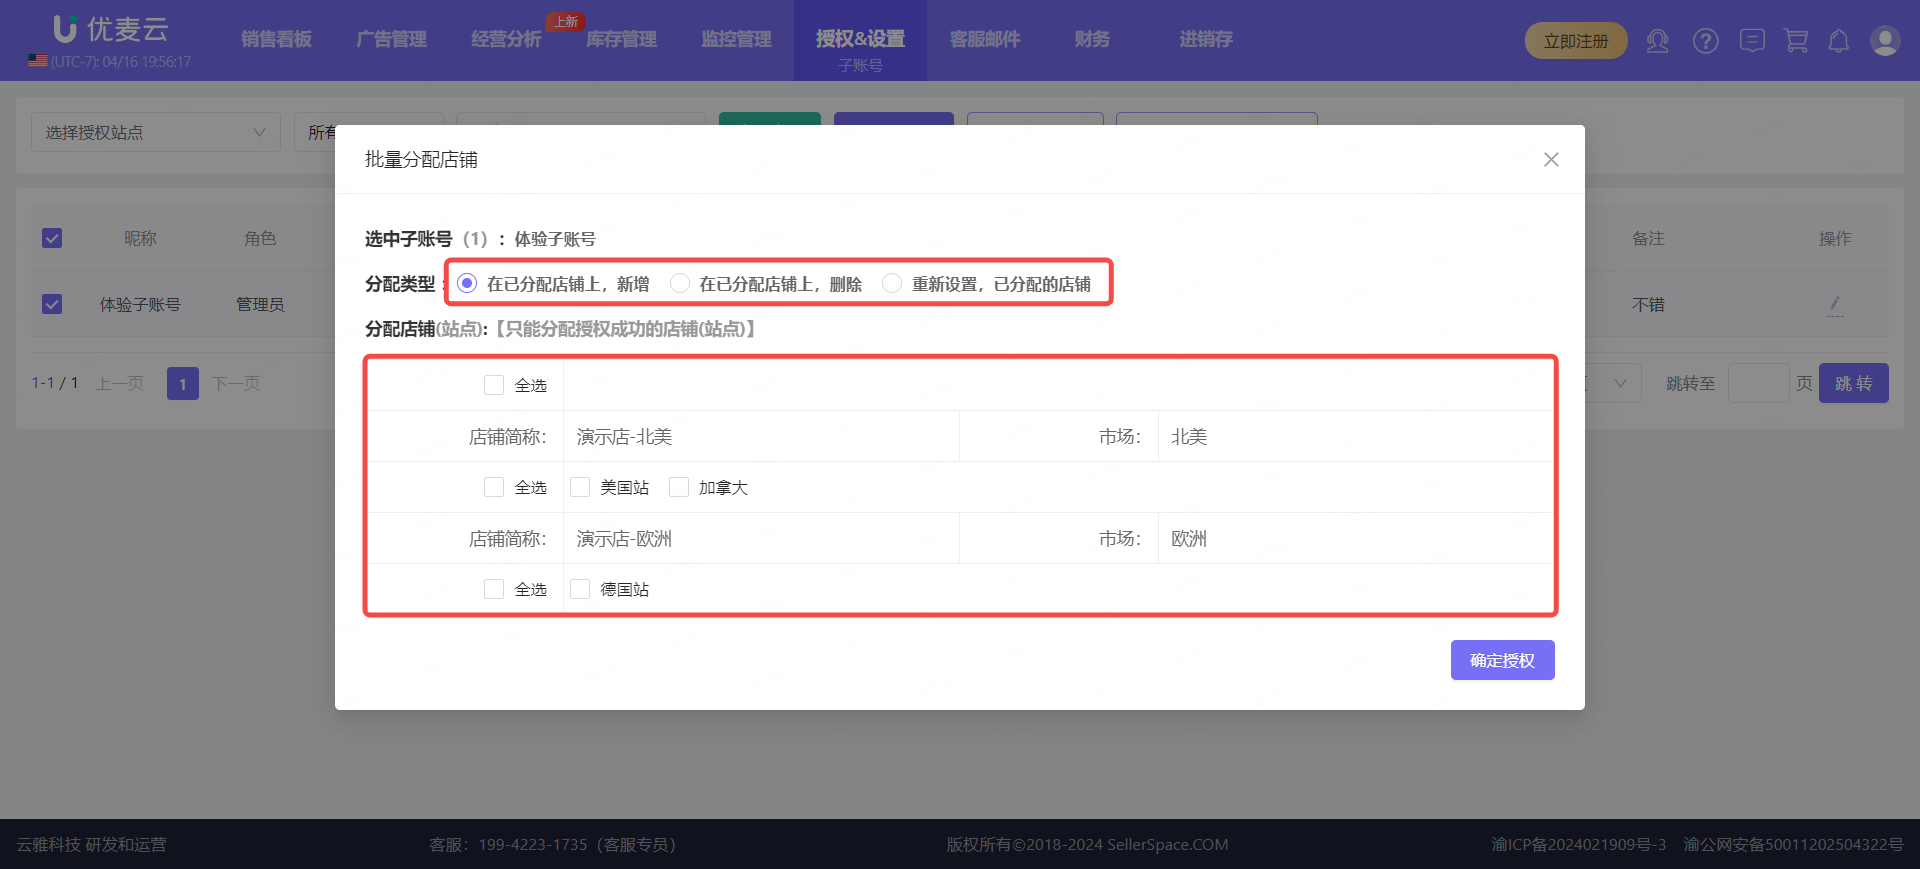
2. Batch Assigning Stores (Optional)
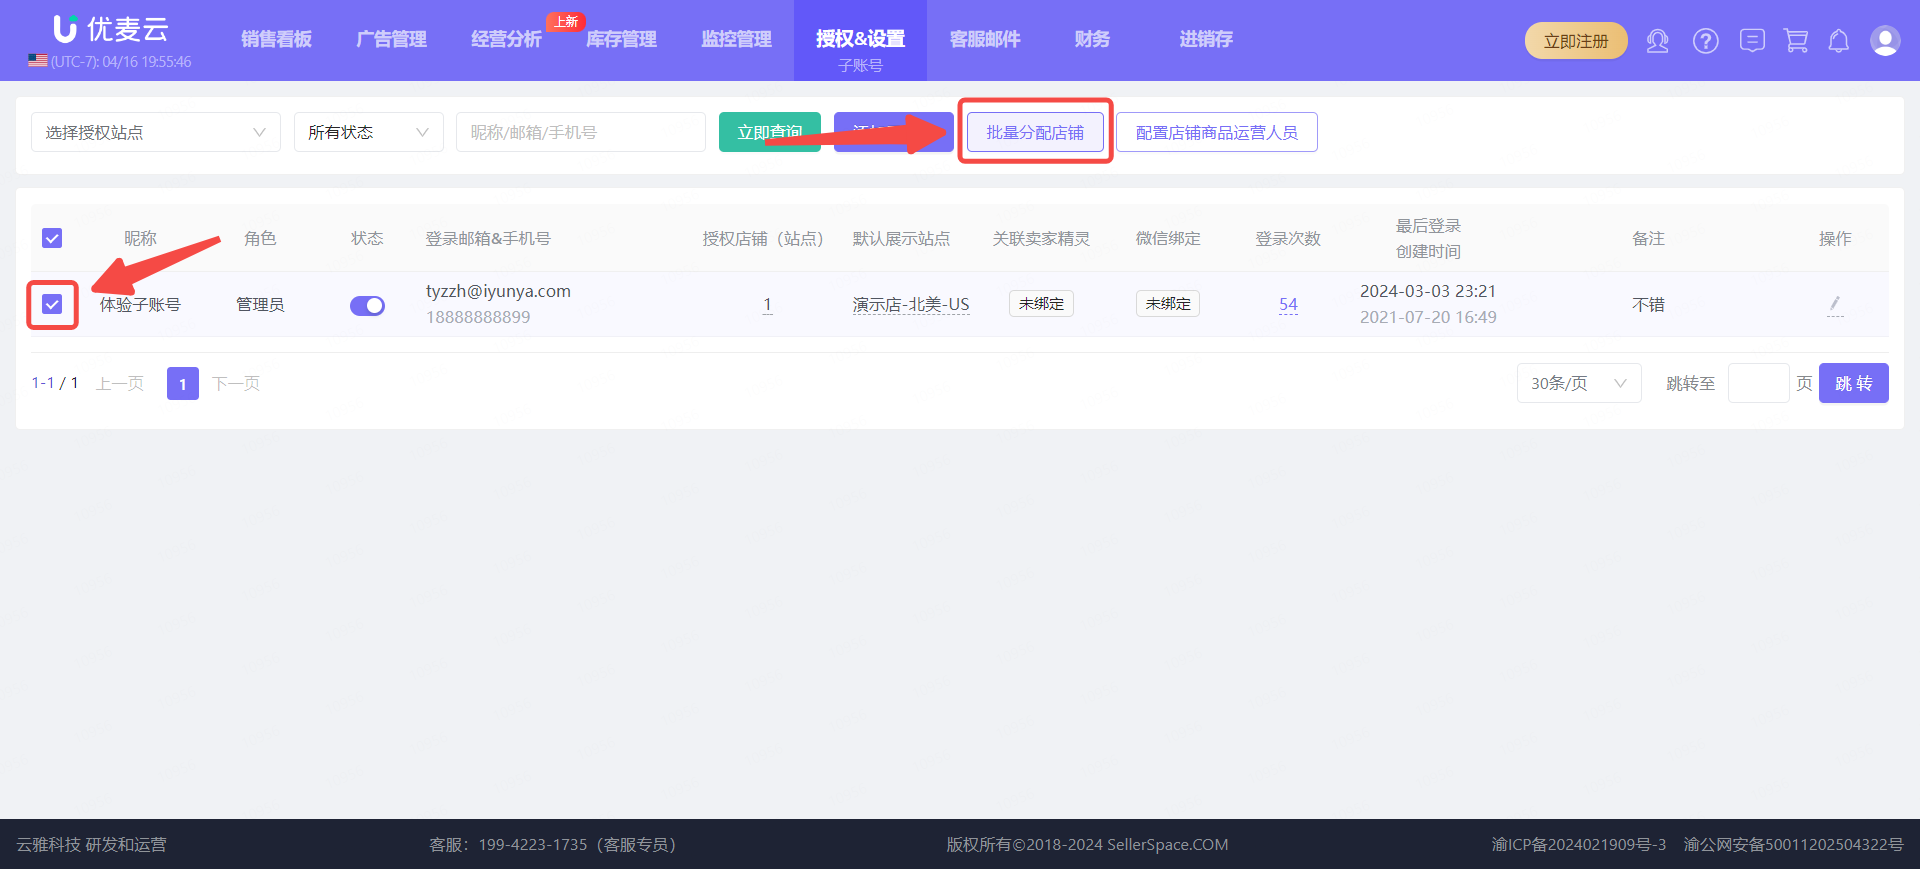
If multiple sub-accounts manage the same stores, we can first create the sub-account information and then batch assign stores to them.
Supports: [Add to Already Assigned Stores], [Delete from Already Assigned Stores], and [Reset, Already Assigned Stores].
2.1 Check the sub-accounts to be batch assigned on the left, and then click [Batch Assign Stores] to enter the batch operation page;
 +
+
2.2 Select the operation to be batched,
[Add to Already Assigned Stores] means adding new marketplace stores to the sub-accounts on top of the original assigned marketplace stores;
[Delete from Already Assigned Stores] means deleting the assigned marketplace stores from these sub-accounts;
[Reset, Already Assigned Stores] means clearing all assigned marketplace stores from these sub-accounts and re-adding marketplace stores, which is a reset operation;
 +
+
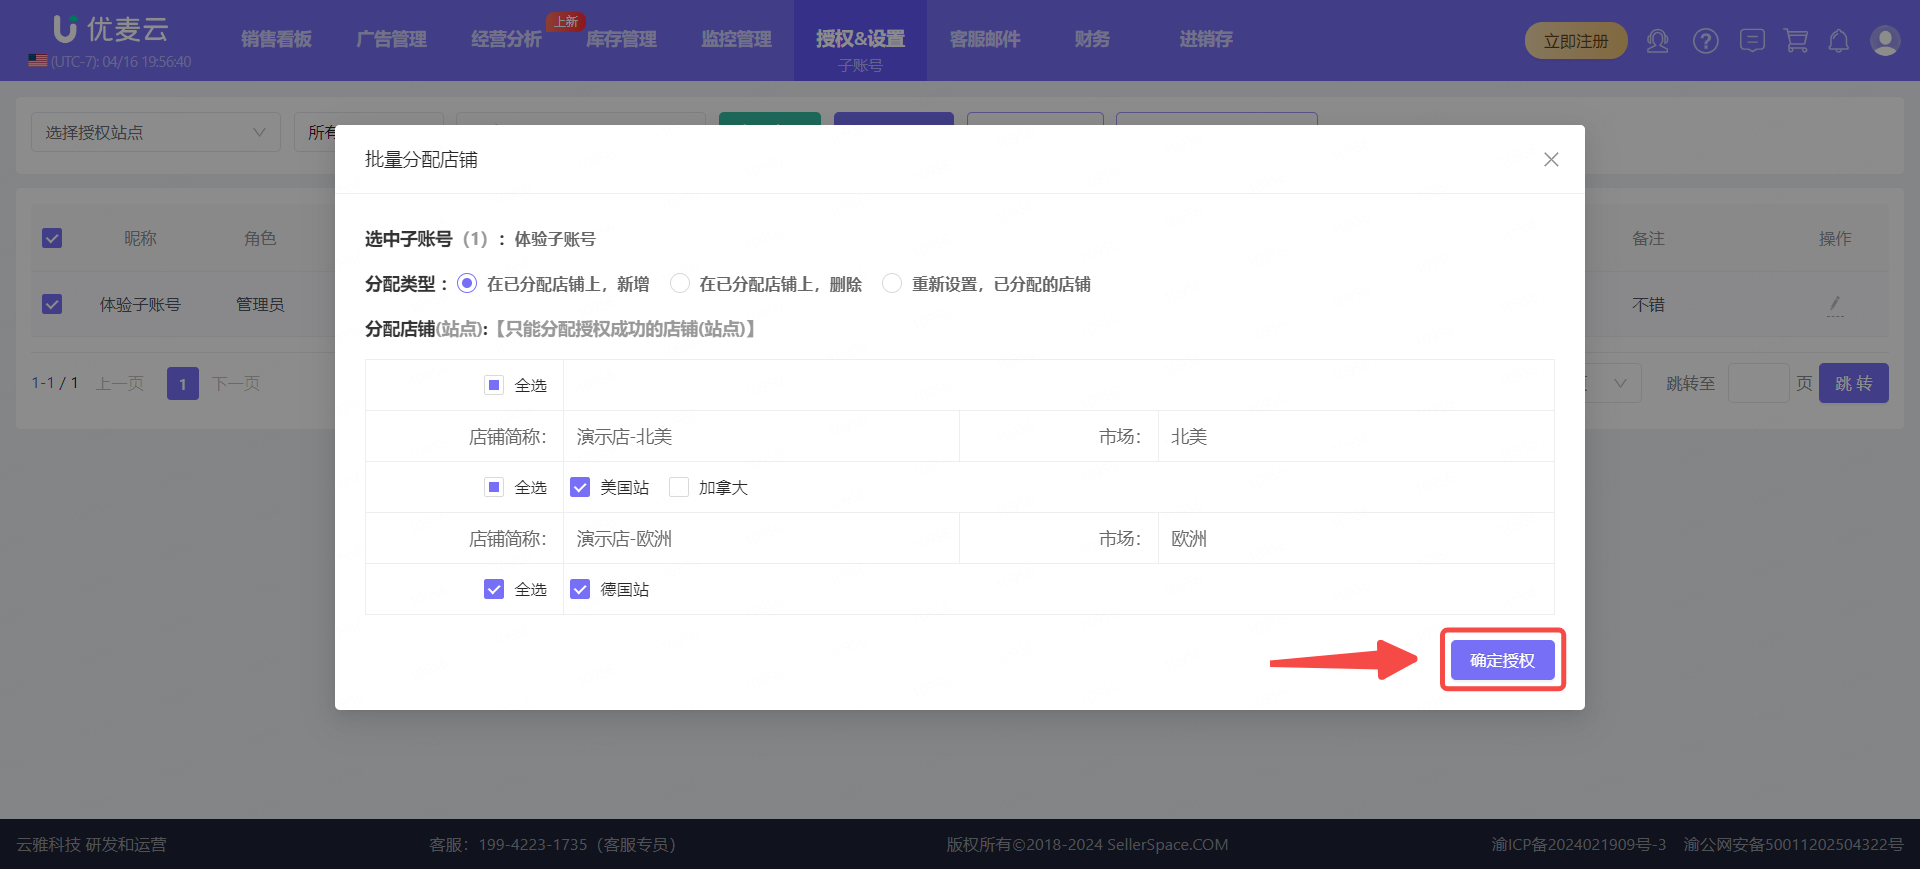
2.3 After selecting the corresponding operation, check the corresponding authorized marketplace stores, and click [Confirm Authorization] to complete the batch store assignment operation.
 +
+
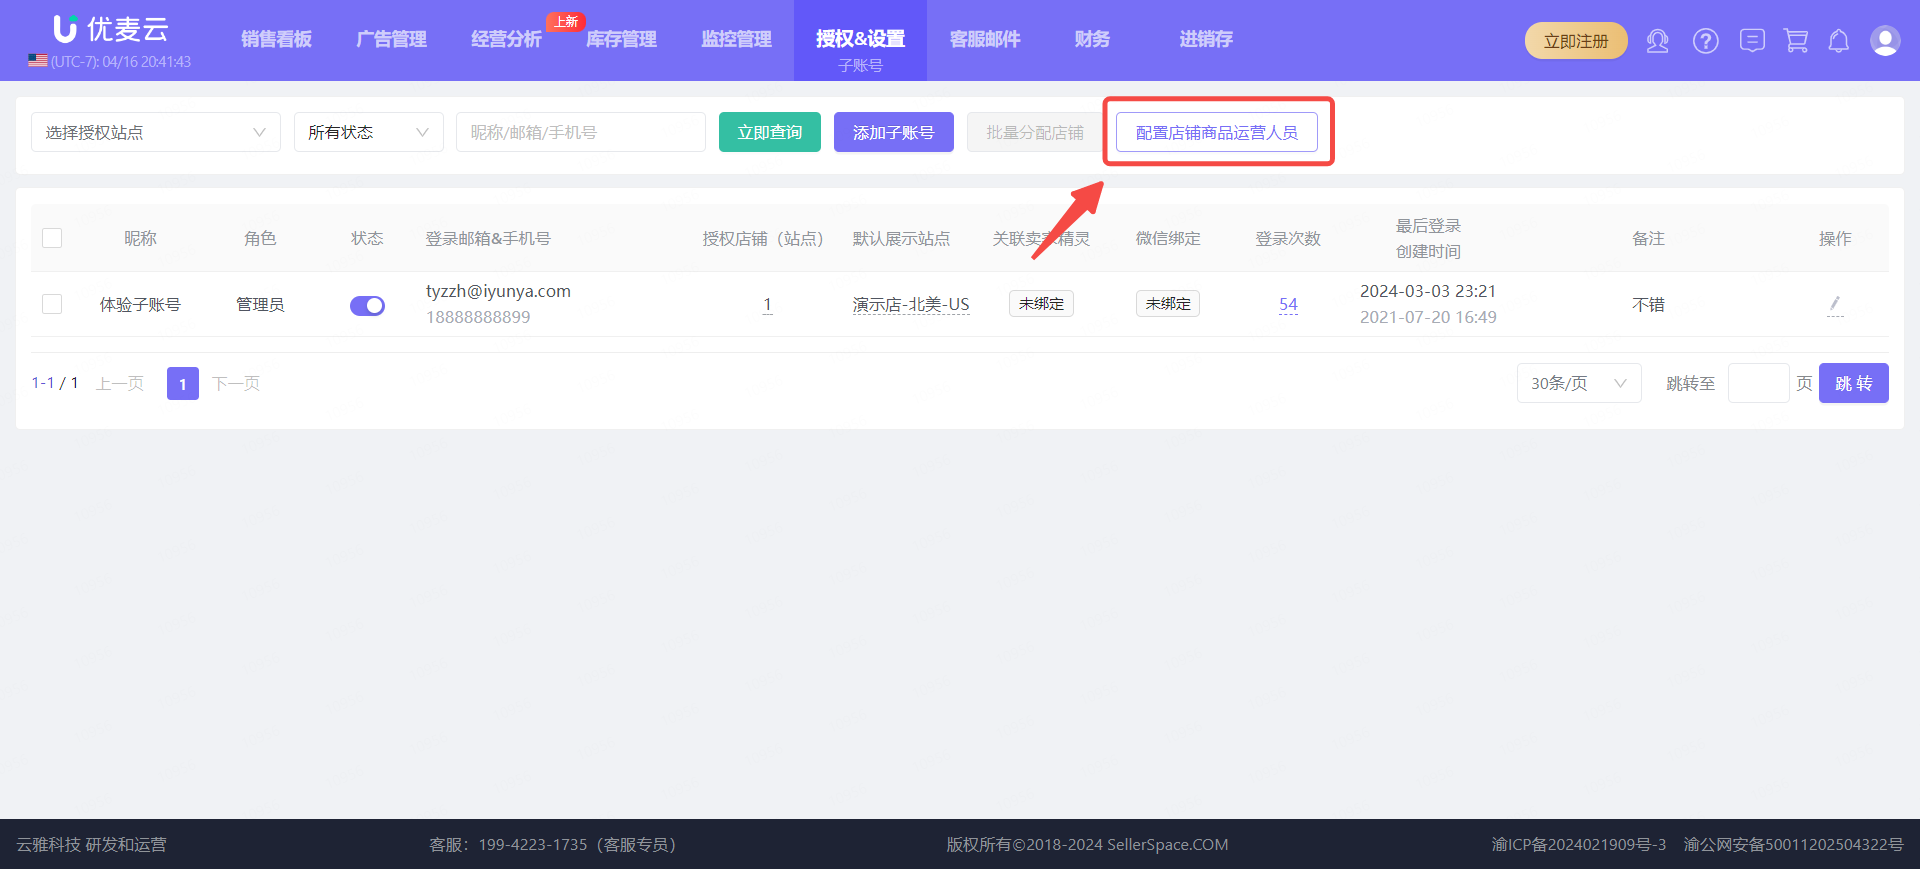
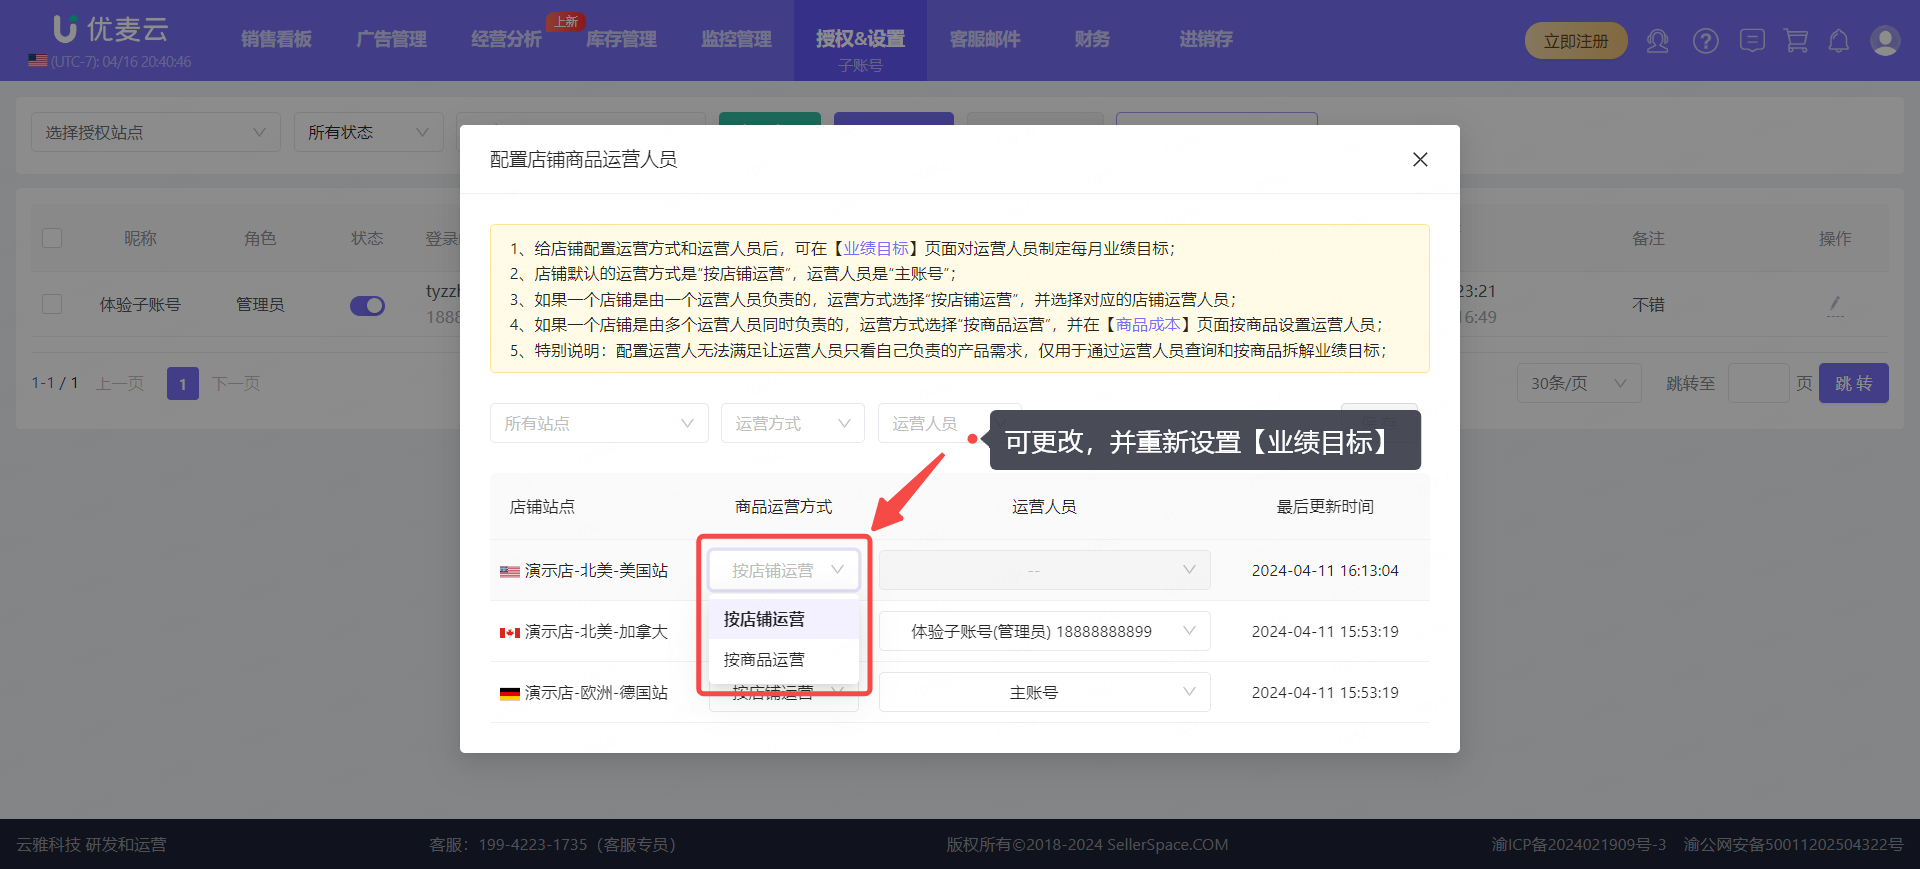
3. Configure Store Product Operators (Performance Targets)
This feature is related to the [Performance Targets] feature. By configuring store product operators, it helps them more clearly set performance targets, such as: which sub-account (operator) manages which stores, or setting the store to [Operate by Product], where different sub-accounts (operators) manage different products within one store.
Click the [Configure Store Product Operators] button to enter the settings page.
 +
+
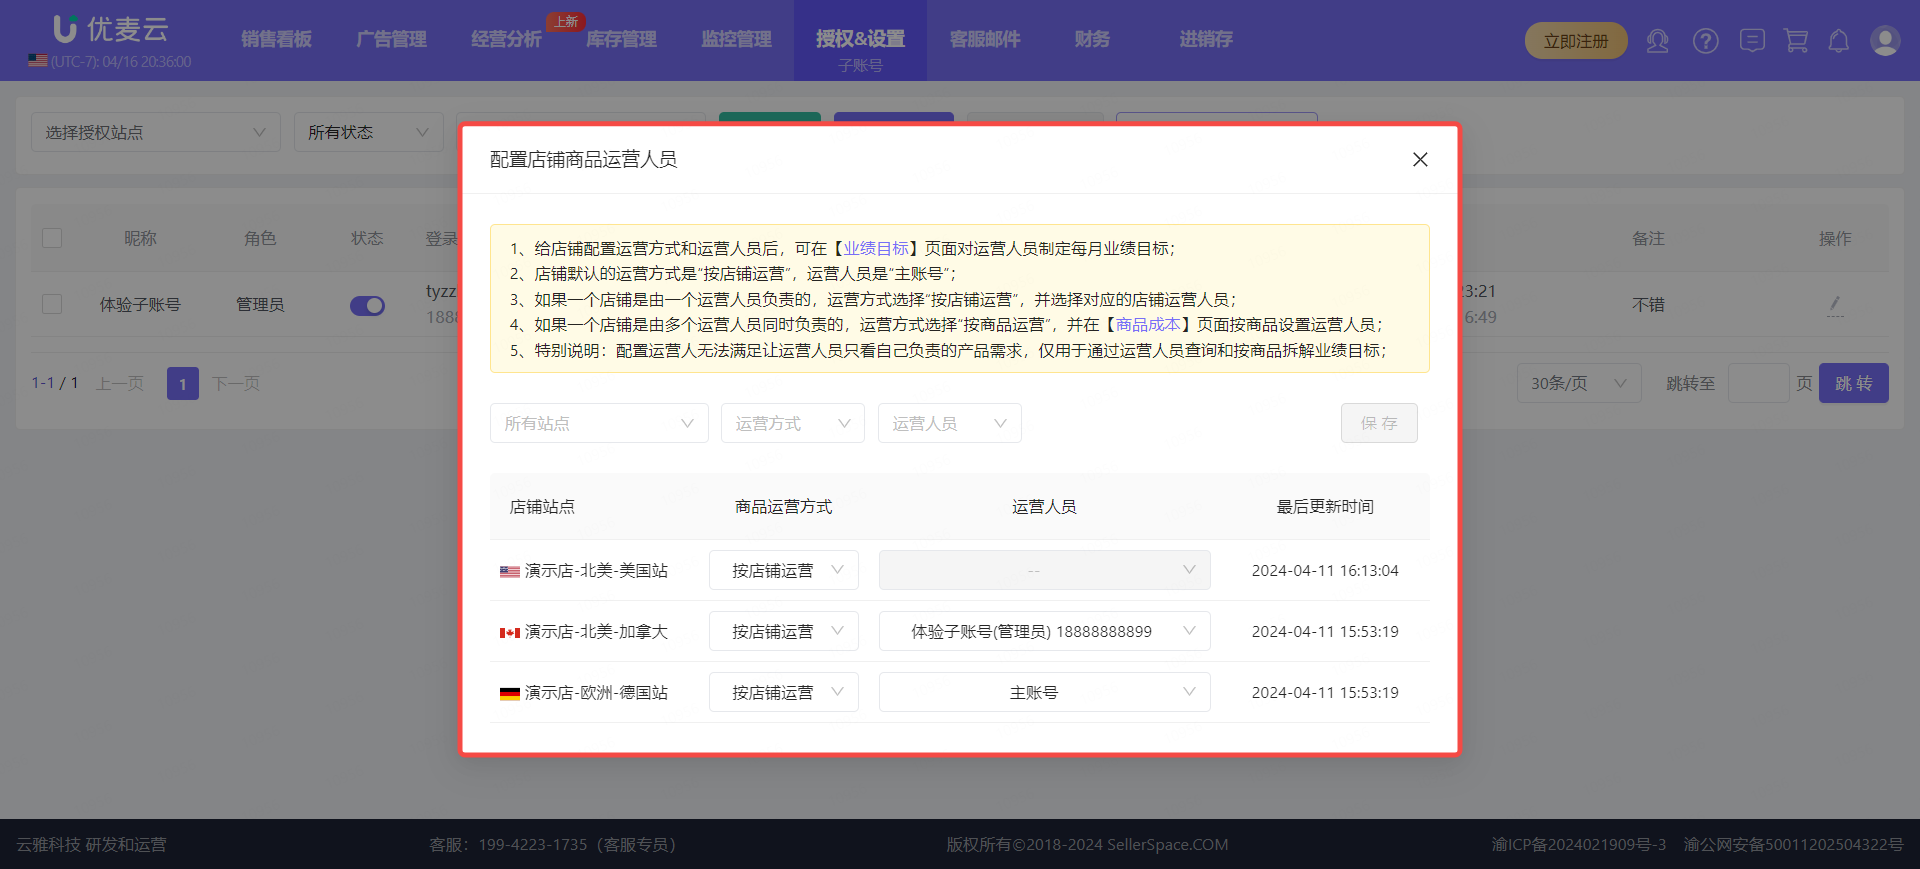
On the "Configure Store Product Operators" page,
Follow the prompts above, filter out the stores that need to be configured, set the corresponding operation method and operators for the stores, and save.
Tips:
1. The default operation method for a store is "Operate by Store", and the operator is "Main Account"
2. If a store is managed by one operator, select "Operate by Store" for the operation method and select the corresponding store operator
3. If a store is managed by multiple operators at the same time, select "Operate by Product" for the operation method, and set the operators by product in the [Product Cost] feature
4. Special Note: Configuring operators cannot fulfill the requirement of allowing operators to only see the products they are responsible for. It is only used for querying by operator
 +
+
It is important to note here if there is a change in the operation method, such as changing from "Operate by Store" to "Operate by Product", or vice versa.
 +
+
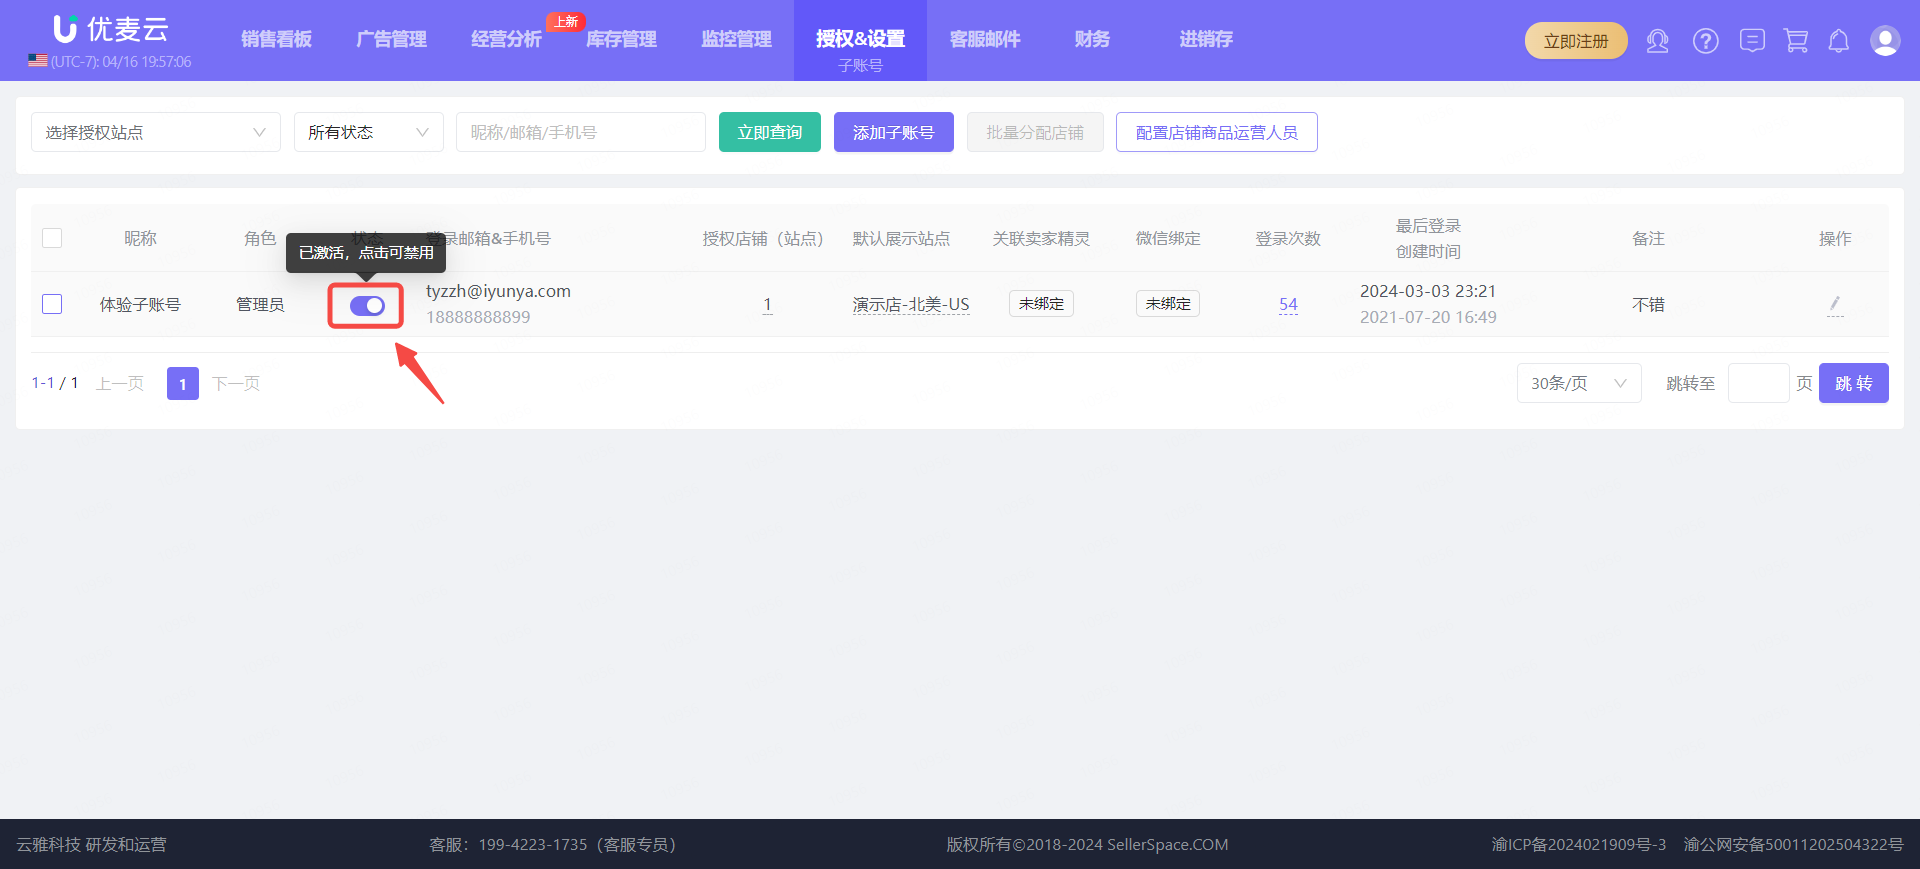
4. Managing Sub-Accounts
We can centrally manage the created sub-accounts, operate to enable or disable sub-accounts, view and modify sub-account information, etc.
Note: Sub-accounts do not support deletion! If our sub-accounts are no longer used or need to be used by someone else, you can choose to disable them or modify the sub-account information, such as: phone number, email, account name, managed stores, etc.
4.1 Enabling and Disabling Sub-Accounts
Click the enable/disable button to enable or disable the corresponding sub-account;
 +
+
4.2 View the Number and Details of Authorized Stores
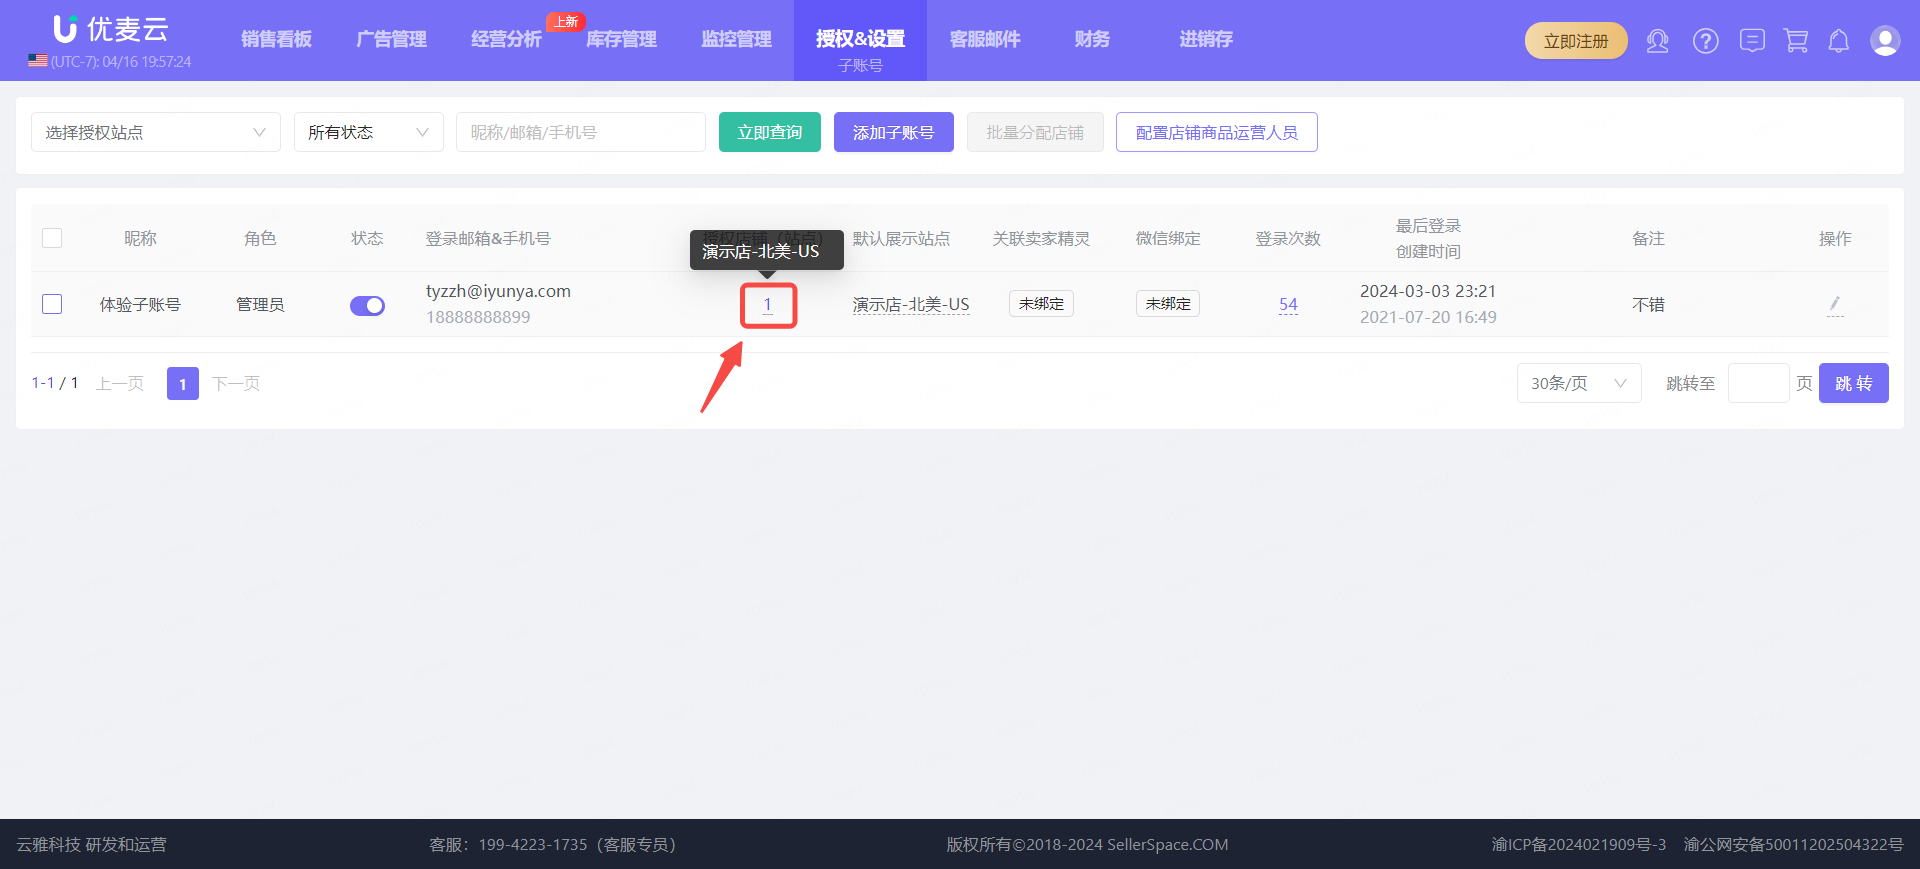 +
+
4.3 Modify the Default Marketplace for Sub-Accounts
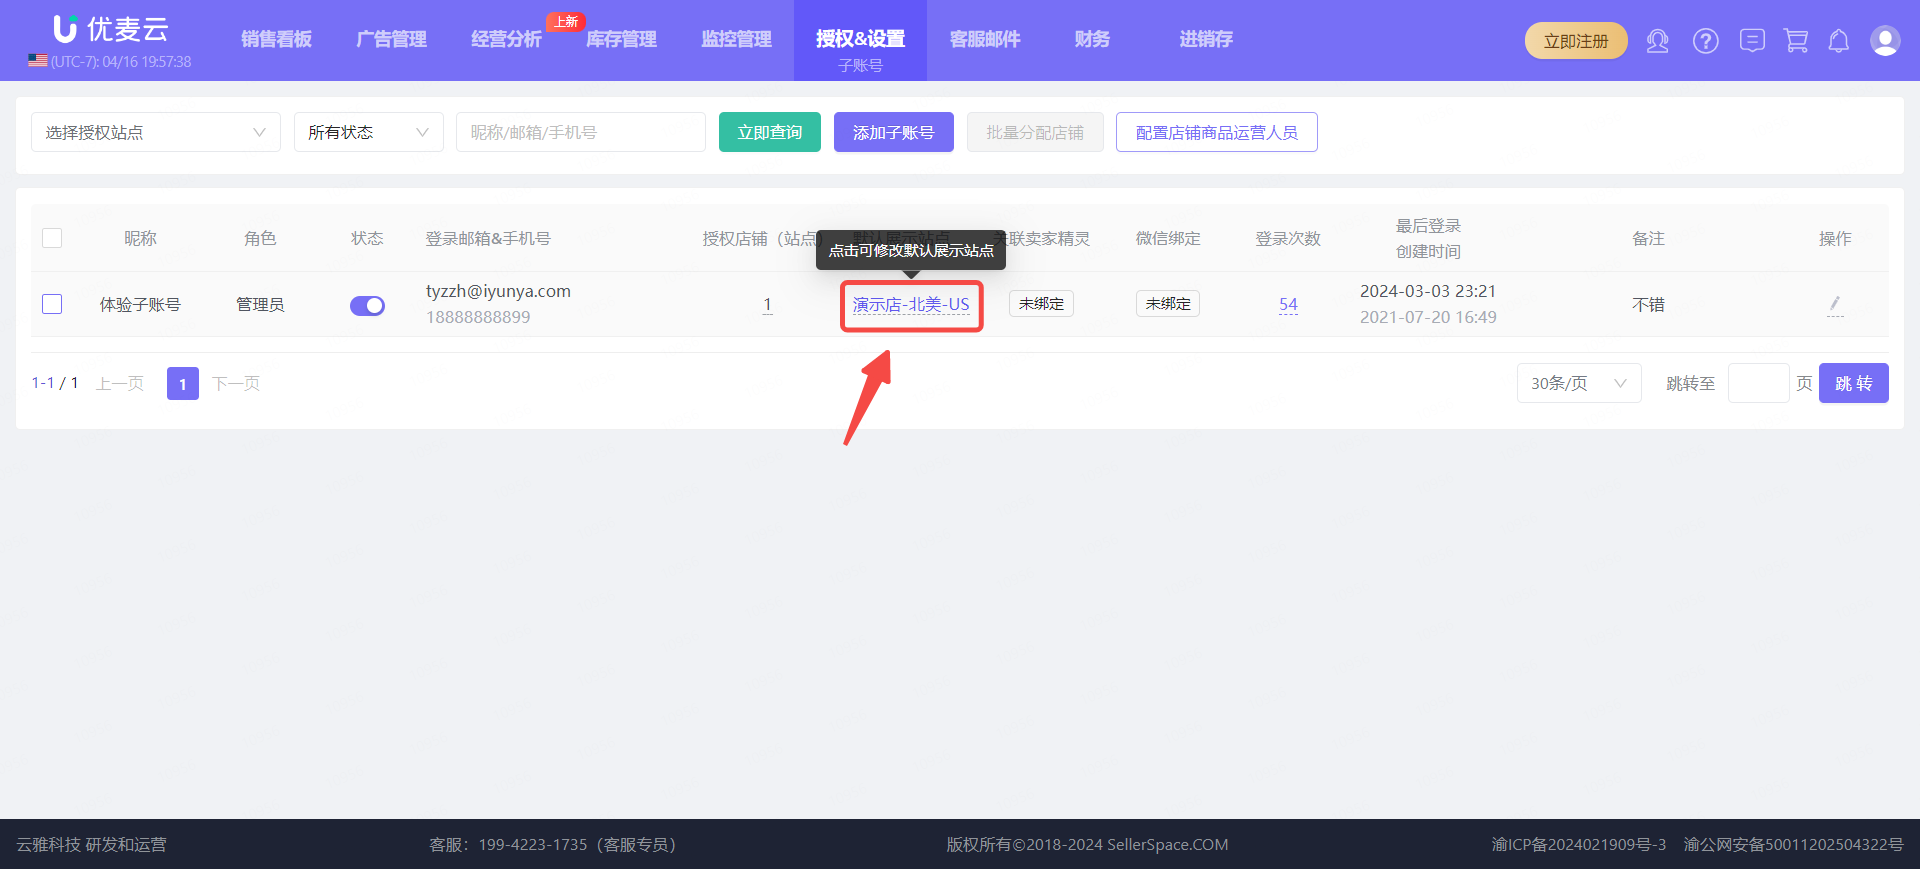 +
+
4.4 Centrally Modify Sub-Account Information: Role, Password, Nickname, Login Phone Number, Login Email, Notes, Assigned Marketplace Stores, etc.
 +
+
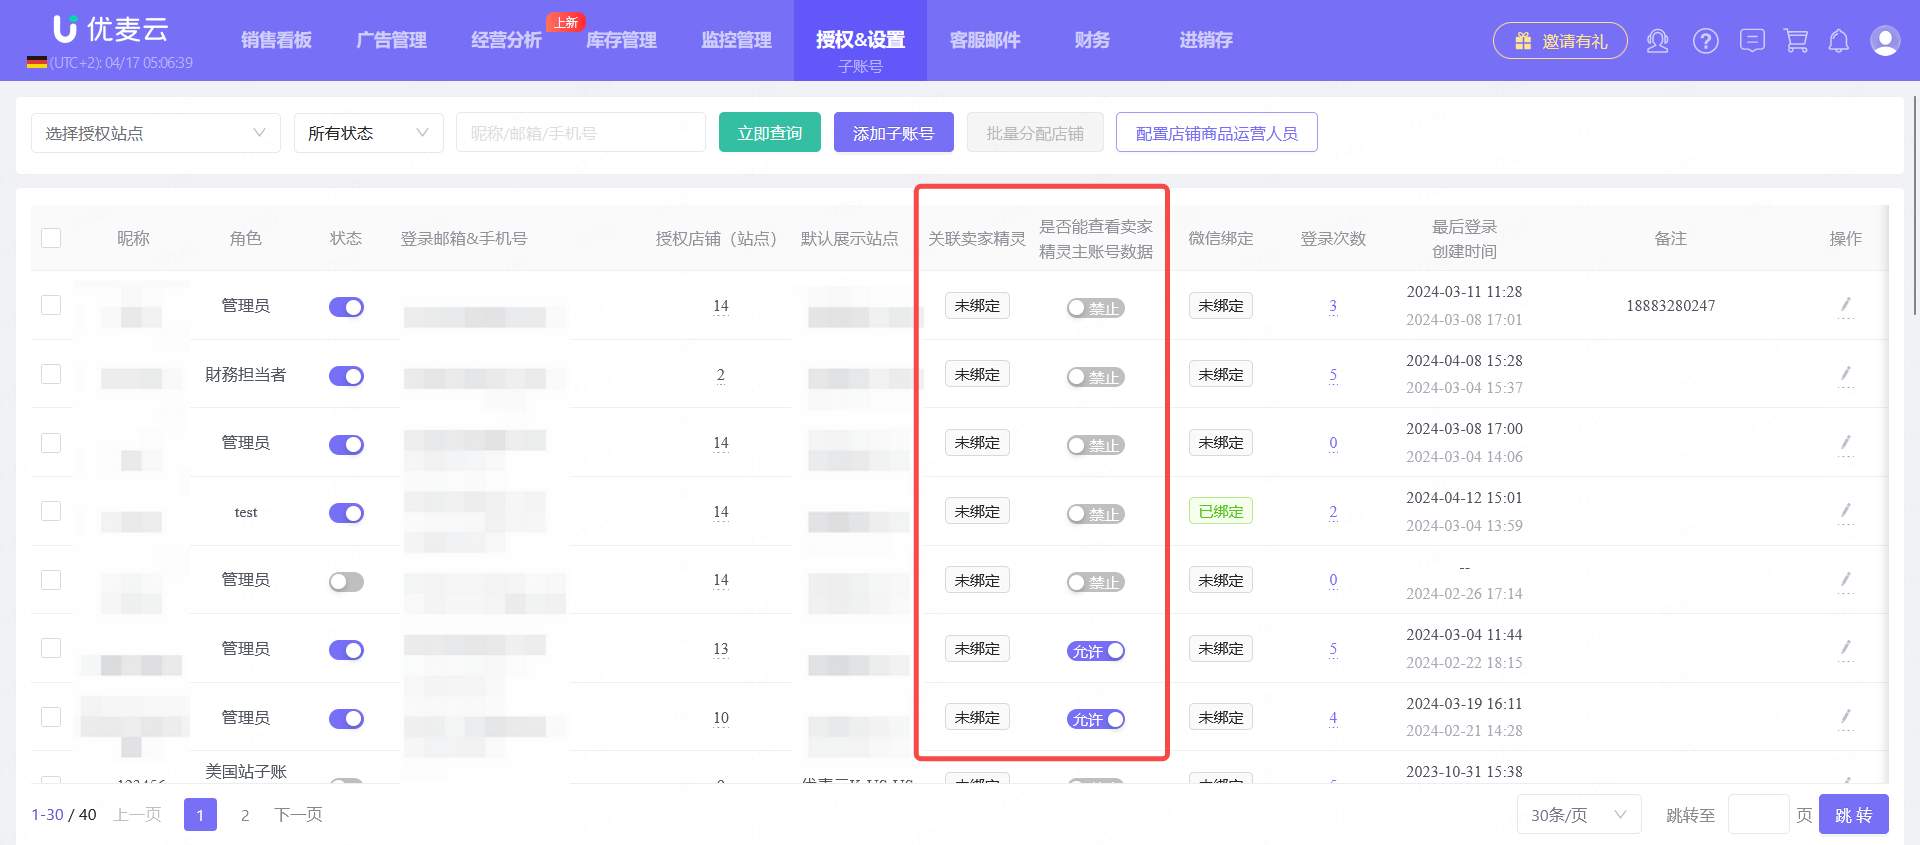
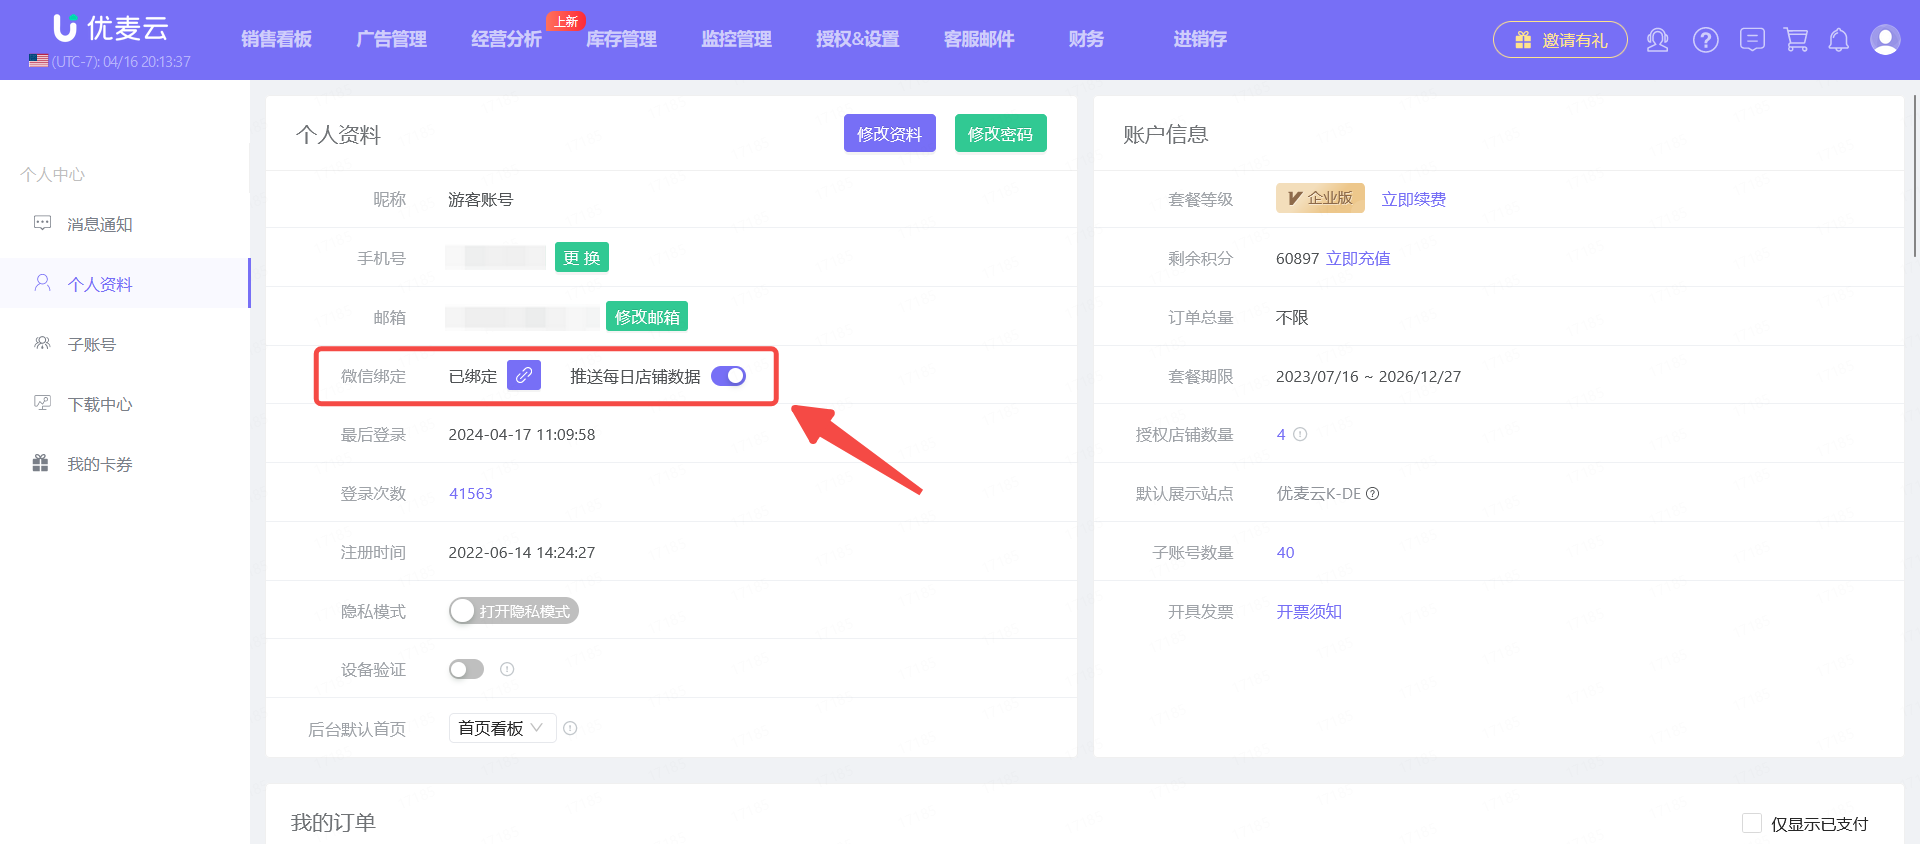
4.5 “Link SellerSpirit Account” and “Share Main Account SellerSpirit Data”
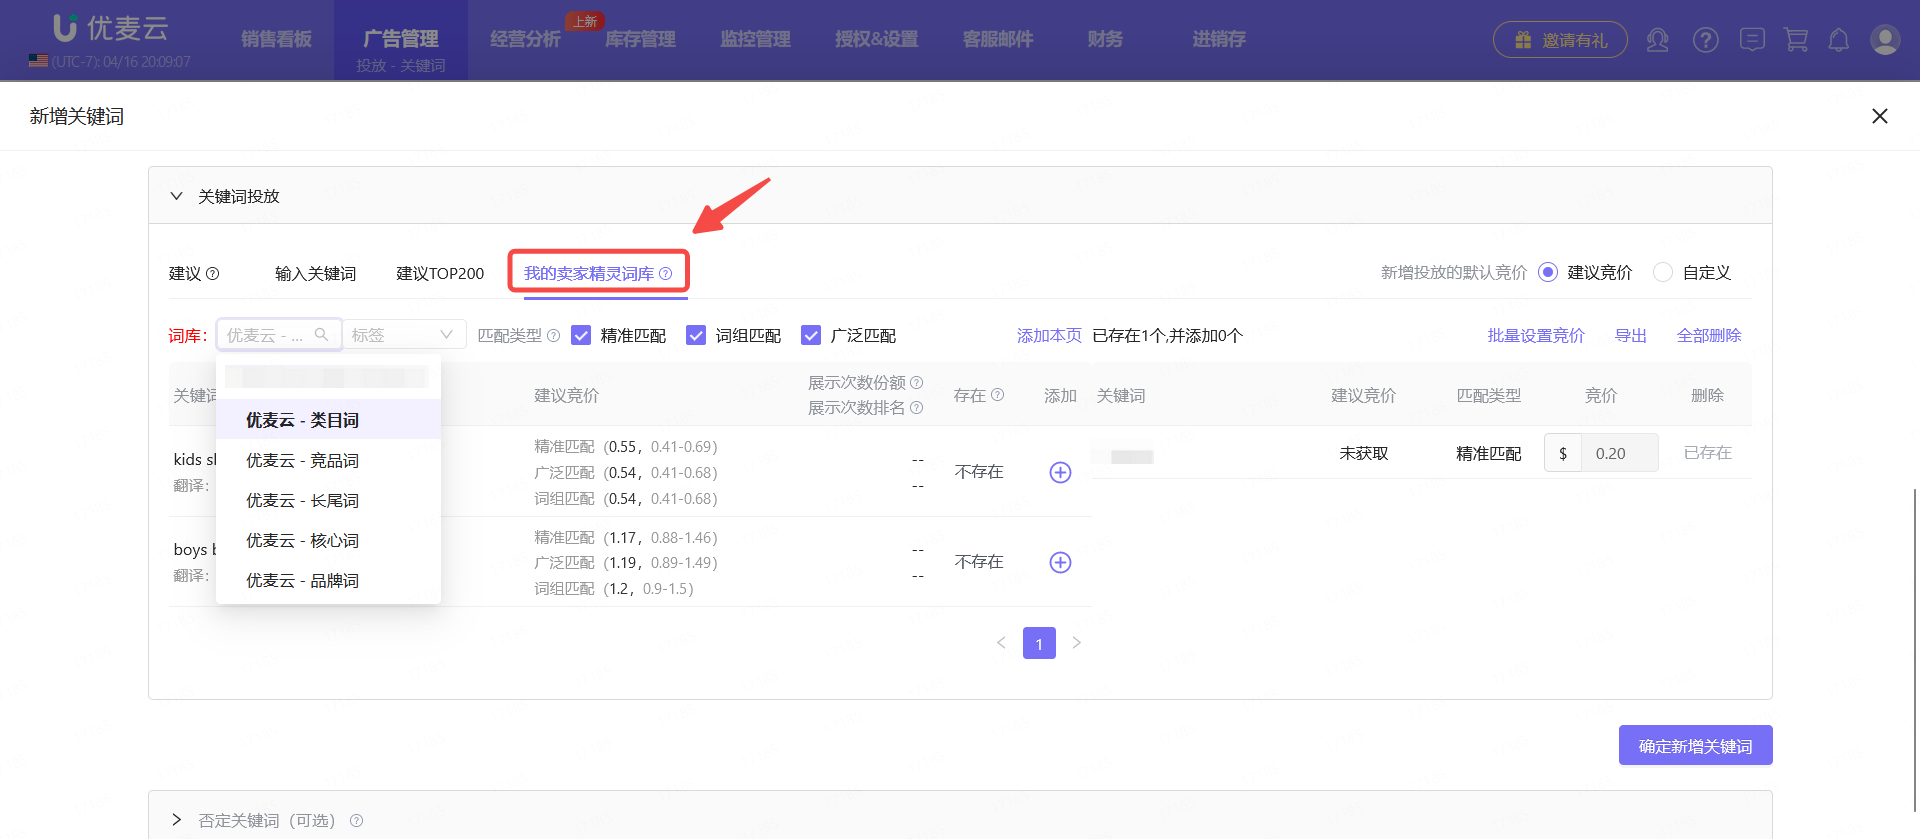
The “Link SellerSpirit Account” setting is for the联动 setting of the new advertising feature "SellerSpirit Keyword & Product list". Sub-accounts can also link and bind different SellerSpirit accounts to connect and obtain keyword and product list data from that account, making it convenient to apply to our advertising.
If a sub-account is not bound to a SellerSpirit account, the main account can also choose to share the SellerSpirit account data bound to the main account.
 +
+
New Advertising Feature: SellerSpirit Keyword & Product list
 +
+
 +
+