


2025/07/14Views(46753)Reviews(0)
SellerSpace's Ad group module in the advertising system automatically synchronizes all Ad group data from your stores. You can completely bypass Amazon Seller Central and perform all analysis and maintenance operations related to Ad groups directly within SellerSpace.
Ad groups belong to campaigns. Under one campaign, you can create multiple Ad groups (except for Sponsored Brands campaigns) to target keywords, products, and categories for advertising. This multi-dimensional approach exposes your products and helps you acquire more traffic and conversions.
I. Data Source
Data for all Ad groups in your store is automatically synchronized through the official Amazon API.
II. Synchronization Frequency
1. Approximately 2-3 hours after successful authorization, advertising data from the last 60 days is automatically synchronized, and Ad group data is updated every 3-4 hours.
2. After the initial 60-day data synchronization is complete, advertising data from the last 2 days is updated approximately every 30-60 minutes, and advertising data from the last 3-60 days is updated daily, based on Amazon's advertising attribution window.
Special Notes:
1. If you modify Ad group information in Amazon Seller Central, such as Ad group names, bids, or statuses.
The system will not update in real-time. Changes made in Seller Central will be synchronized once on the first access to the SellerSpace ad management page each day, and then every 6 hours thereafter, unlike campaign data which updates approximately every 30-60 minutes.
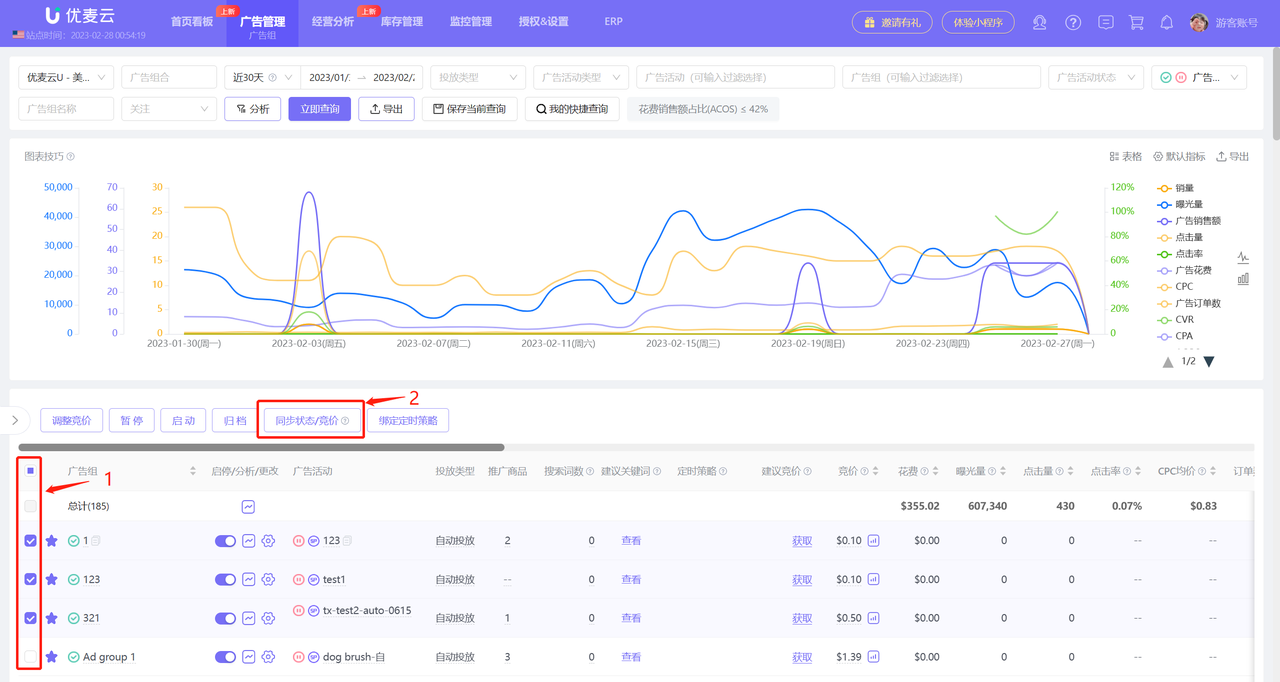
If you have made adjustments to campaigns in Amazon Seller Central, you can manually synchronize the information promptly. Operation path: Ad Management -> Ad groups -> Synchronize Status/Bid.
 +
+
2. If you add new Ad groups, promoted products, keyword targeting, or non-keyword targeting in Amazon Seller Central.
The system will not synchronize updates immediately. Updates will only occur when the ad object receives impressions.
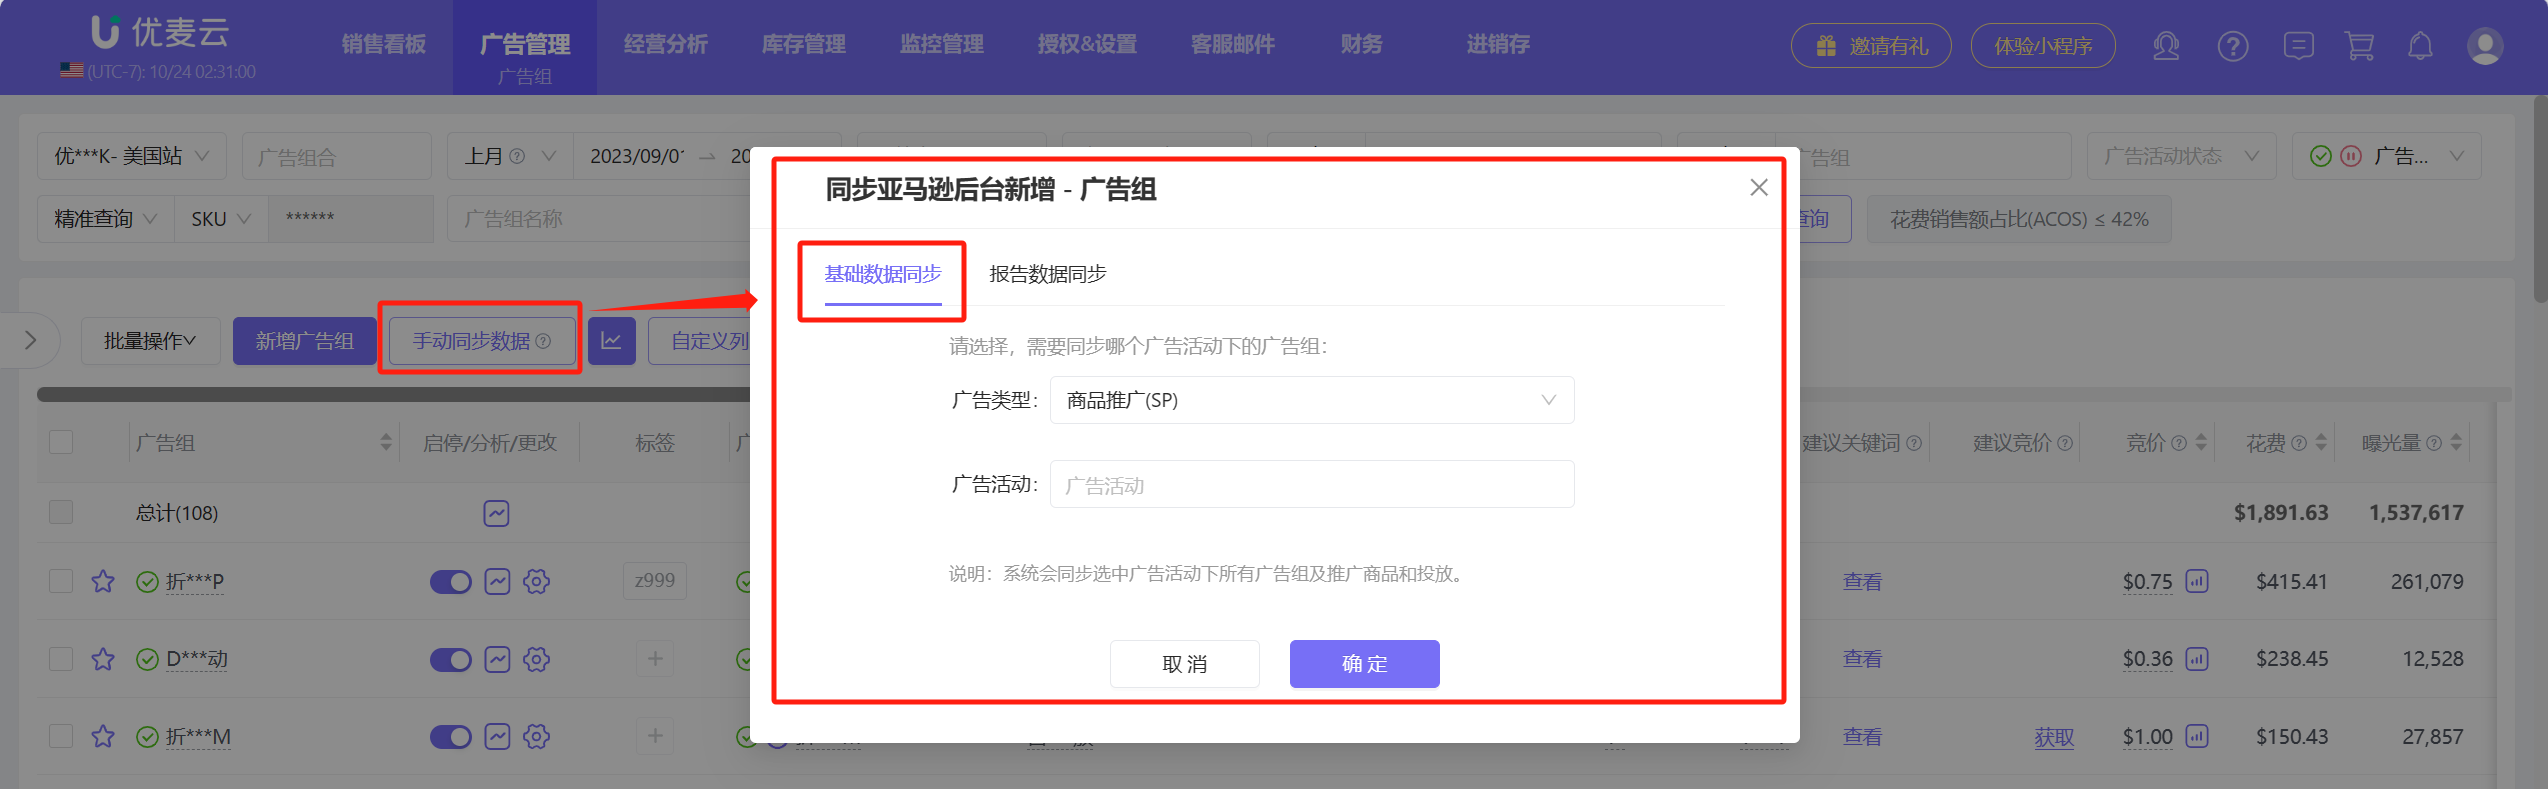
If you have added new campaigns in Amazon Seller Central, you can manually synchronize the information promptly. Operation path: Ad Management -> Ad groups -> Manual Data Synchronization -> Basic Data Synchronization.
 +
+
Furthermore, due to Amazon's advertising attribution window, advertising data may still fluctuate within 60 days after it occurs.
The system does not synchronize historical data in real-time, so discrepancies may exist when viewing non-real-time advertising data.
You can manually synchronize historical advertising data through "Report Data Synchronization."
 +
+
Special Notes: Each marketplace allows a maximum of 3 manual synchronizations per day, with a minimum interval of 30 minutes between each synchronization.
3. If you authorized your store first and then activated advertising, you may encounter situations where advertising data is not found. In this case, you can click 【Refresh】 here to refresh the advertising data.
You can also view the latest update time of the advertising data here.
 +
+
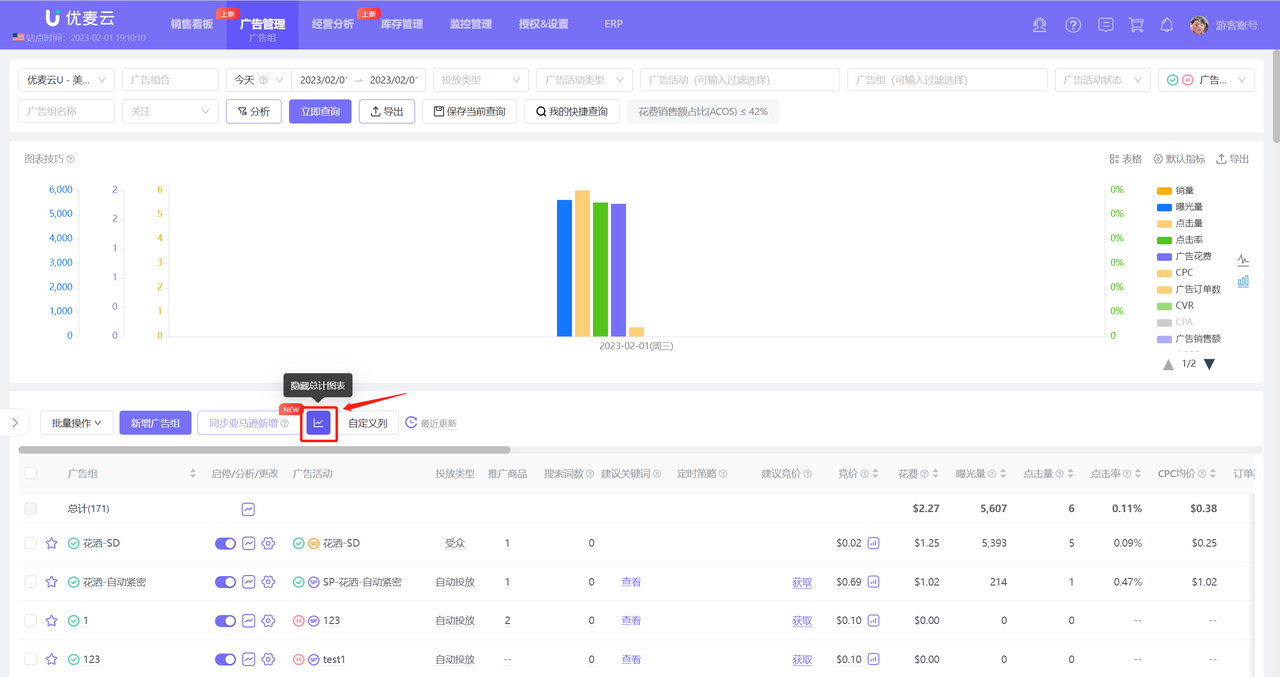
4. Click the line chart icon to hide or display the total chart.
 +
+
III. Adding Ad groups
Only Sponsored Products and Sponsored Display ads support creating Ad groups. Sponsored Brands ads are directly targeted when creating campaigns. Before creating a new Ad group, you need to create a campaign in advance (click to see how to create a campaign), and then choose to create a new Ad group under that campaign.
3.1 Creating a New Ad group - Sponsored Products
Sponsored Products is a cost-per-click advertising solution that allows you to promote the products you sell through ads that can appear in highly visible placements on Amazon.
Its campaigns have two targeting strategies: Automatic targeting / Manual targeting. Ad group settings will vary slightly depending on the campaign's targeting strategy.
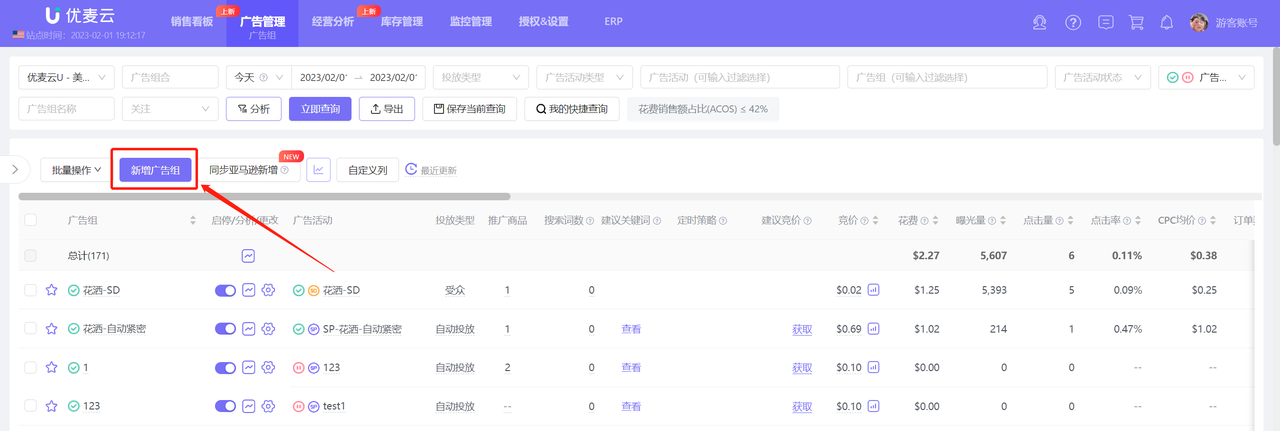
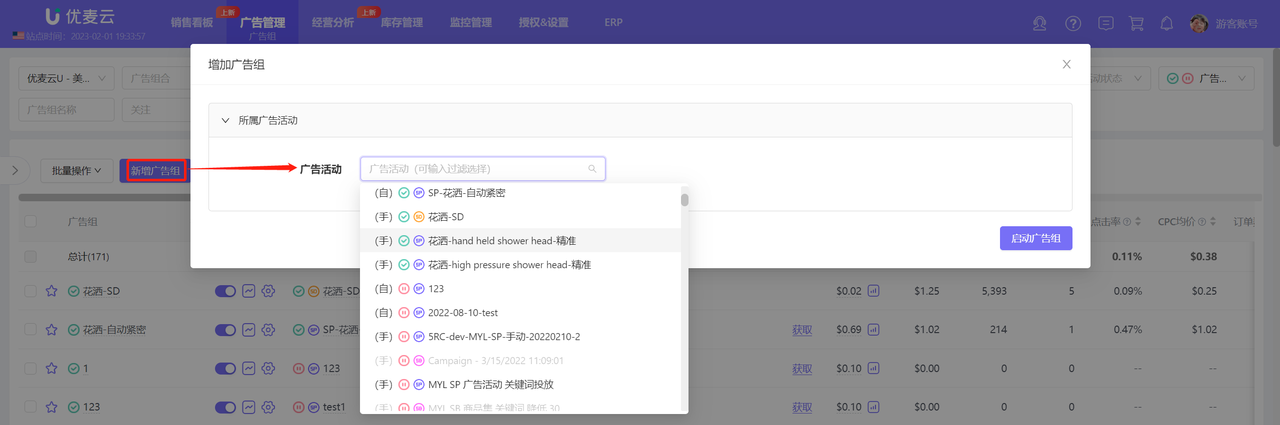
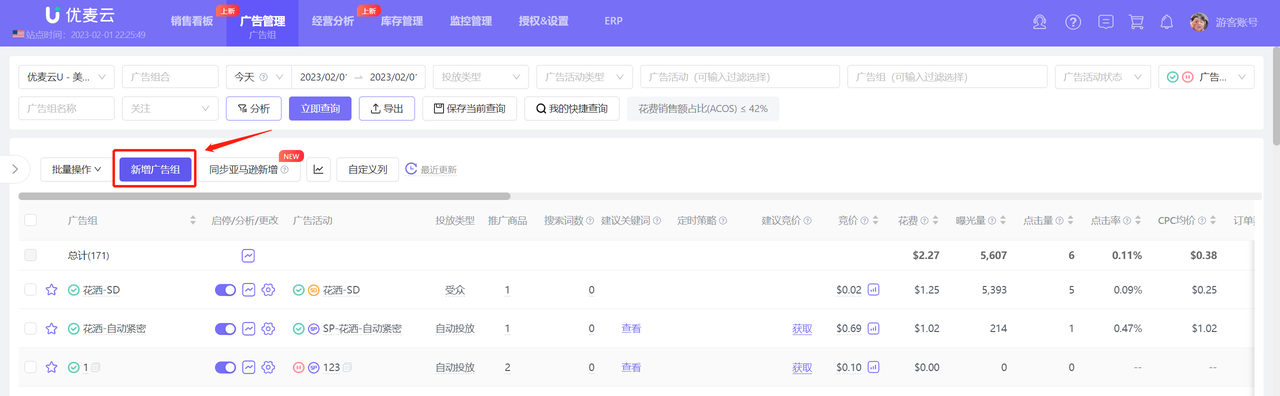
Click the 【Add Ad group】 button on the left to enter the new Ad group page;
 +
+
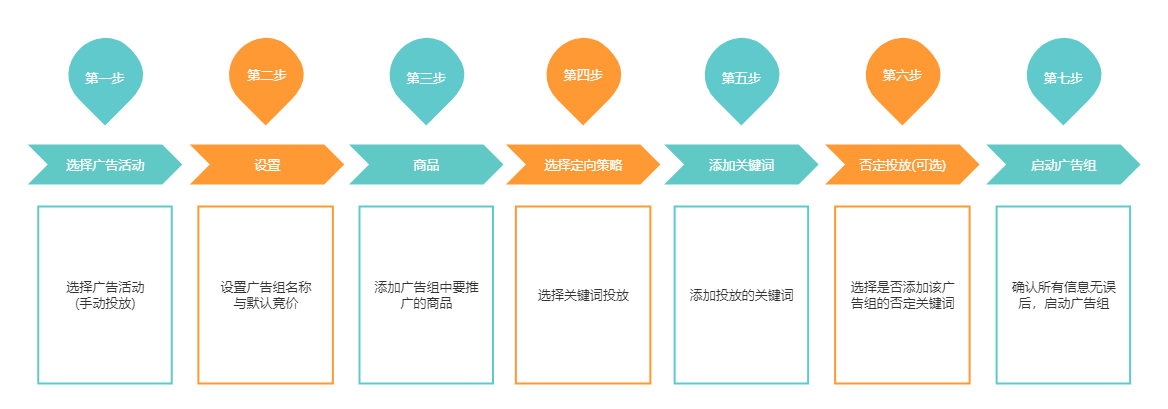
3.1.1 Creating an Automatic Targeting Ad group
Automatic targeting Ad groups include 4 match types: Close Match + Loose Match (keywords), Substitutes + Compliments (ASINs).
After setting up, the Amazon advertising system will automatically match buyer search terms through these four match types, pushing promoted products to buyers' search results pages to gain impressions.
 +
+
1) Select Campaign (Automatic Targeting)
Enter the Add Ad group page,
Select the automatic targeting campaign to which you want to add an Ad group;
 +
+
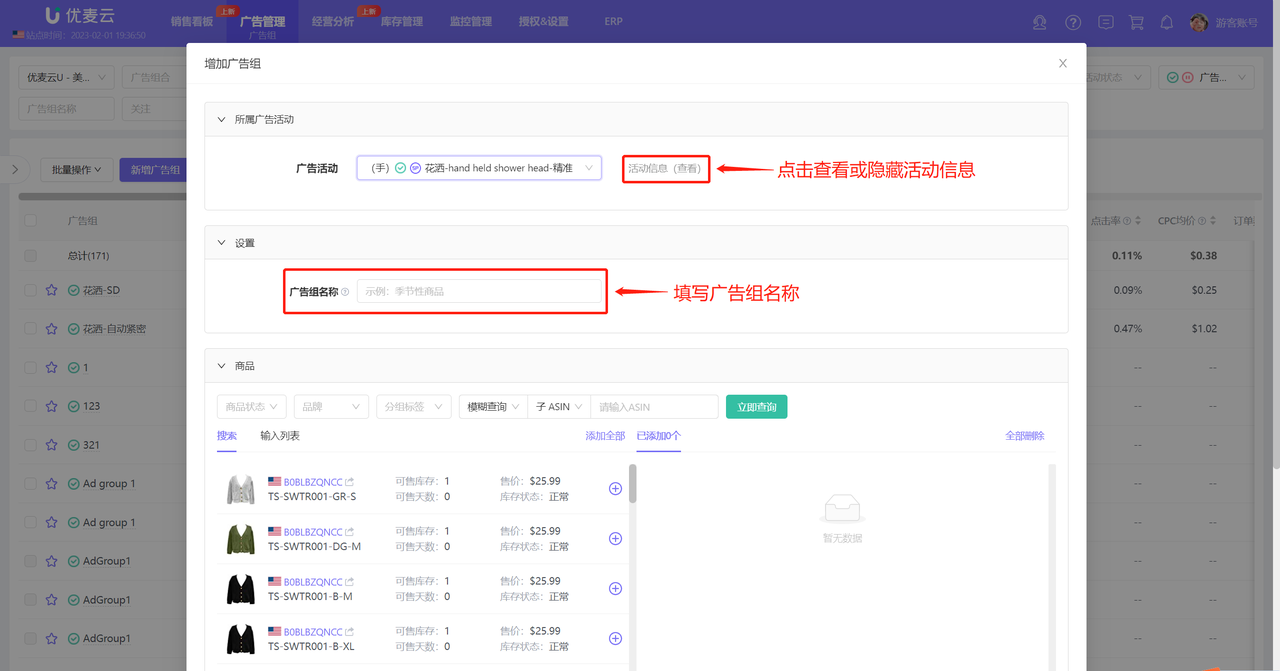
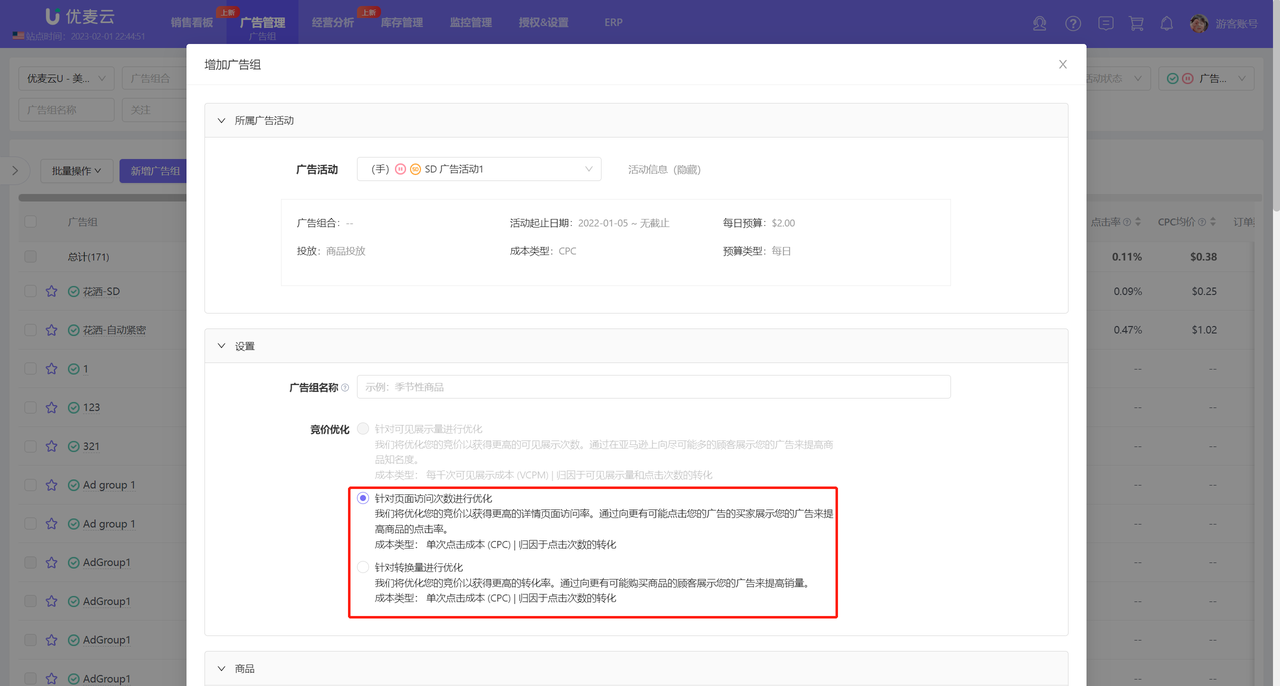
2) Set Name and Default Bid
After selecting the campaign,
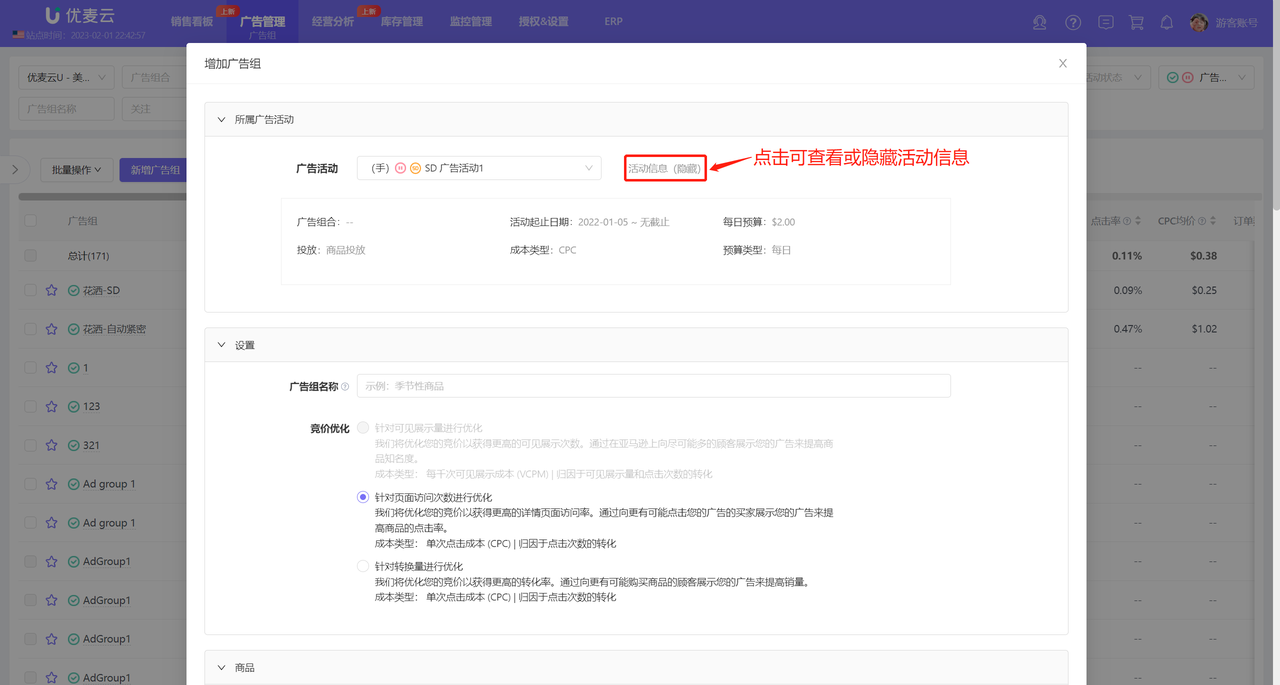
Click 【Campaign Info】 on the right to view the campaign information,
Set the Ad group name and the corresponding default bid.
Tips: After setting the default bid, all four match types in this Ad group will use this bid. You can also choose to set different bids for them later (set bids by targeting group).
 +
+
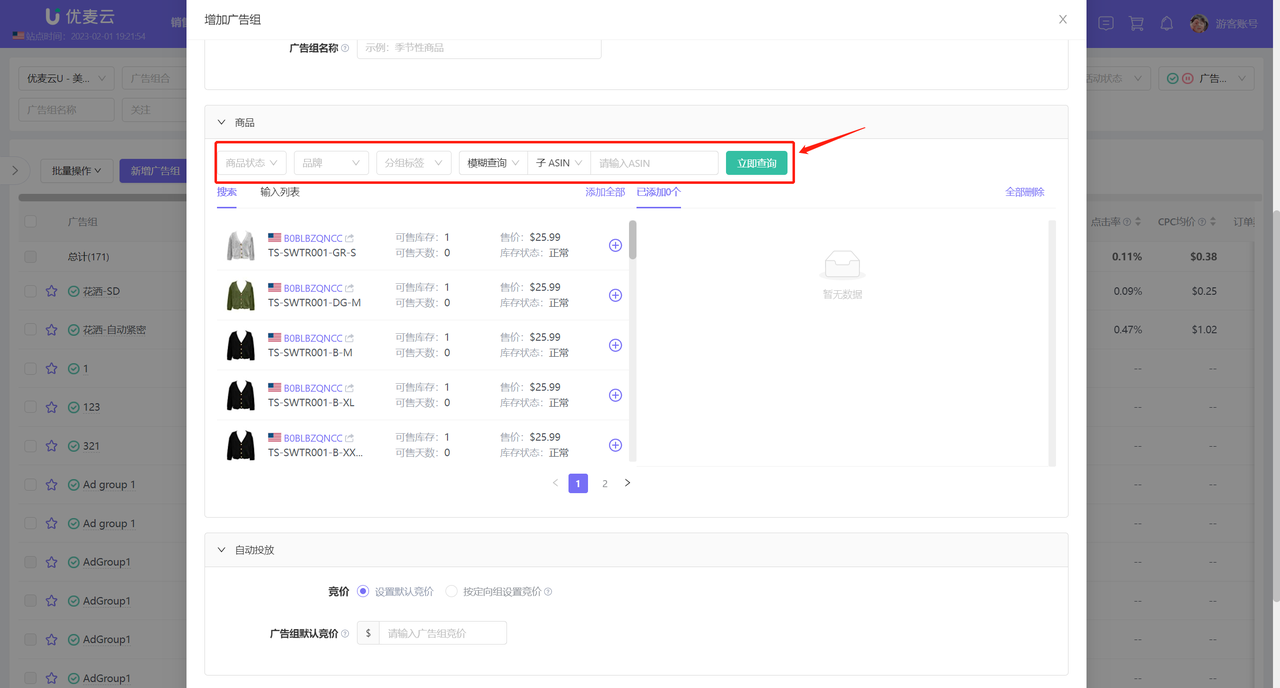
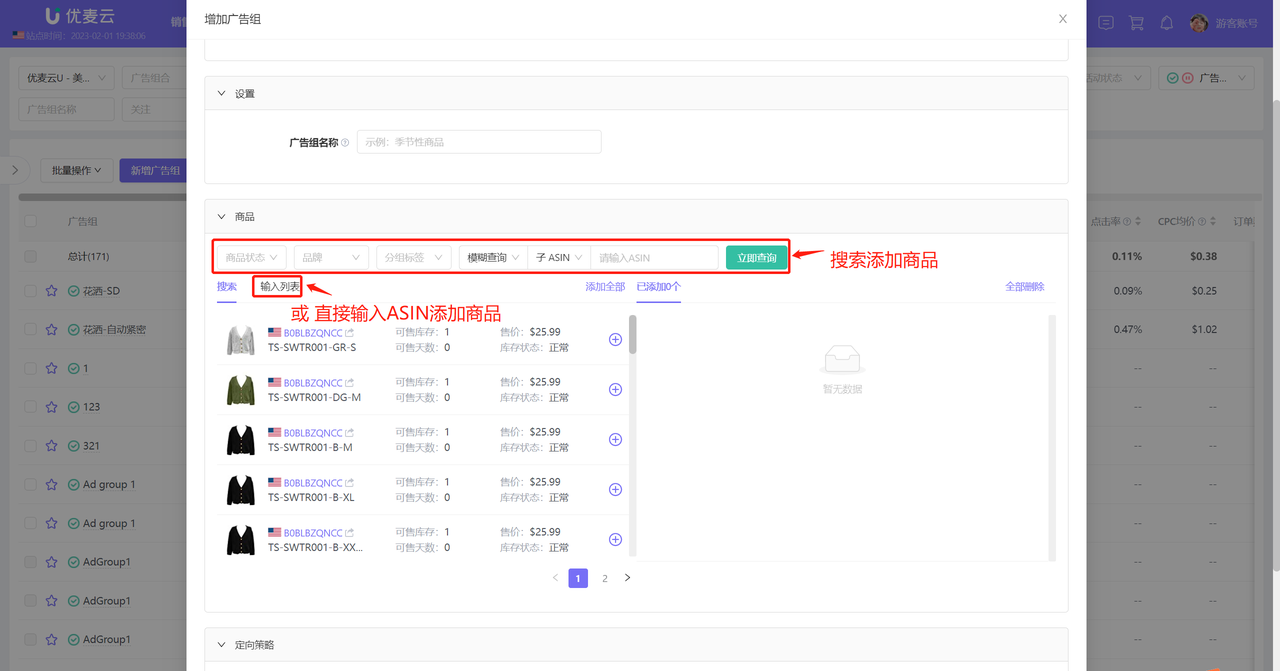
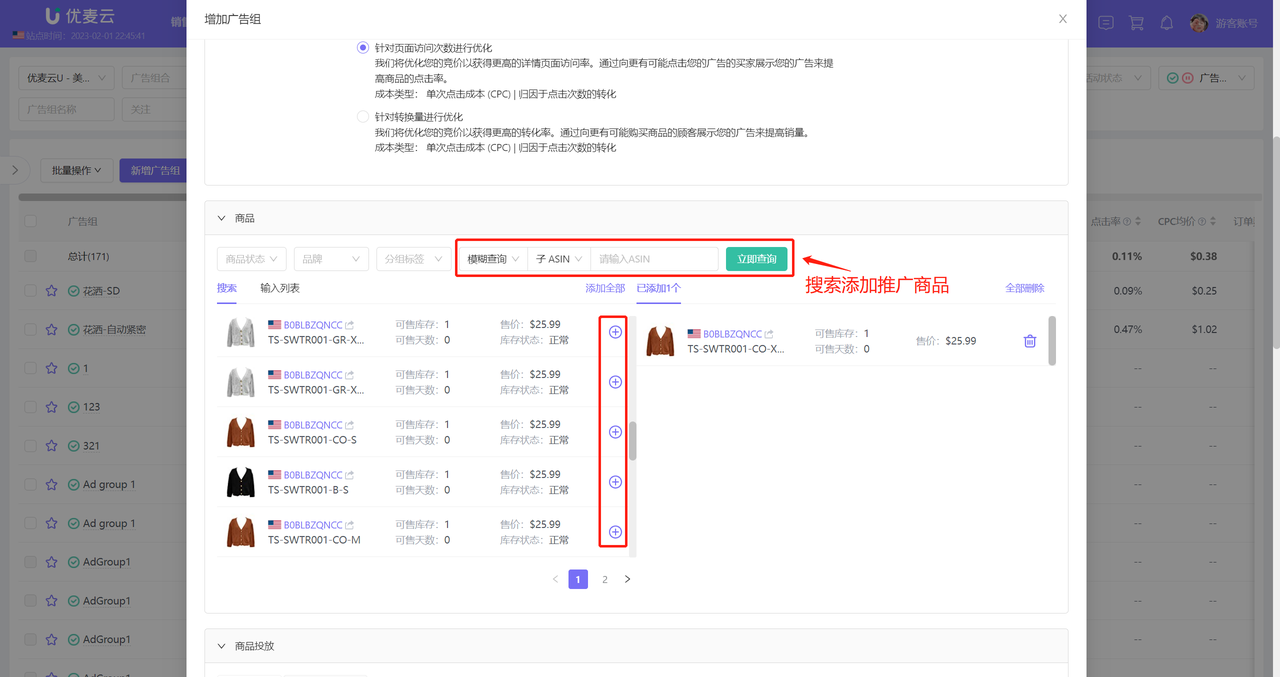
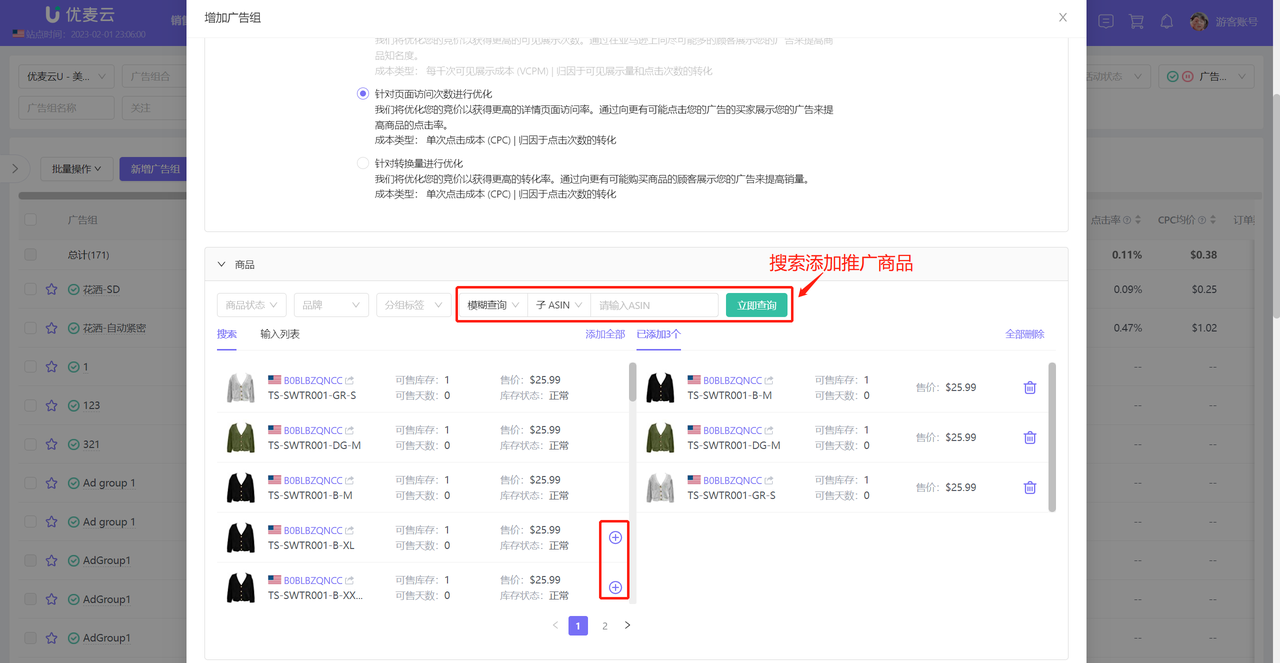
3) Add Promoted Products
After setting the Ad group name and default bid,
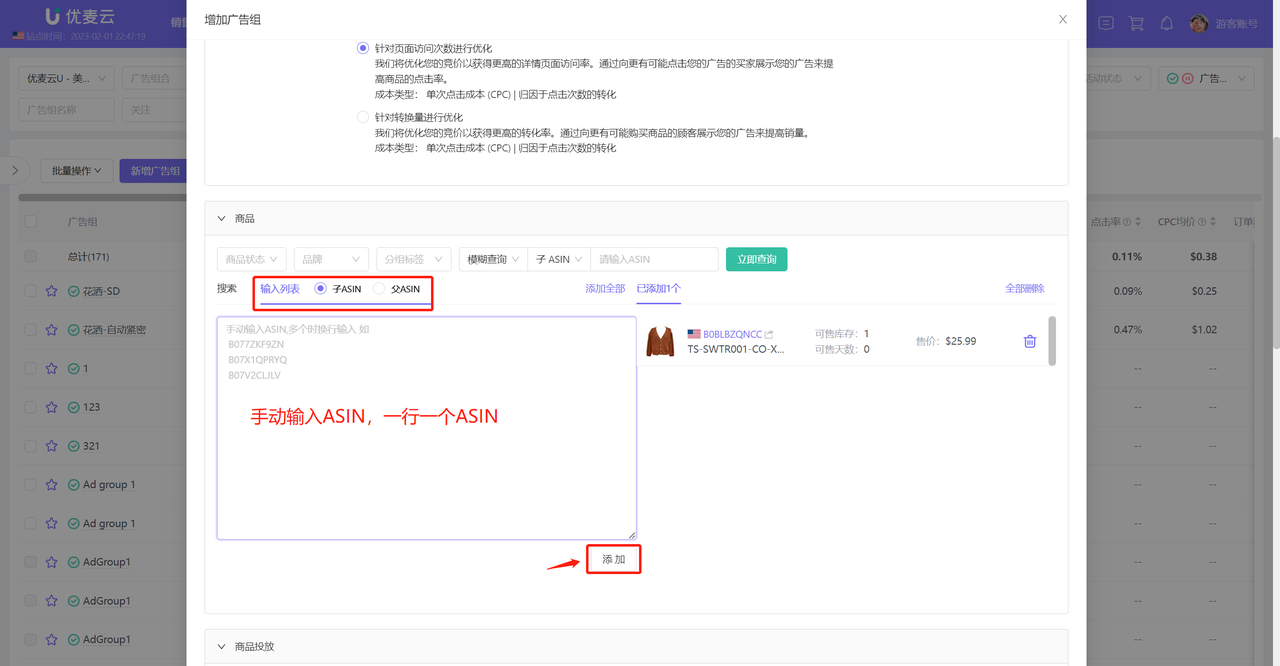
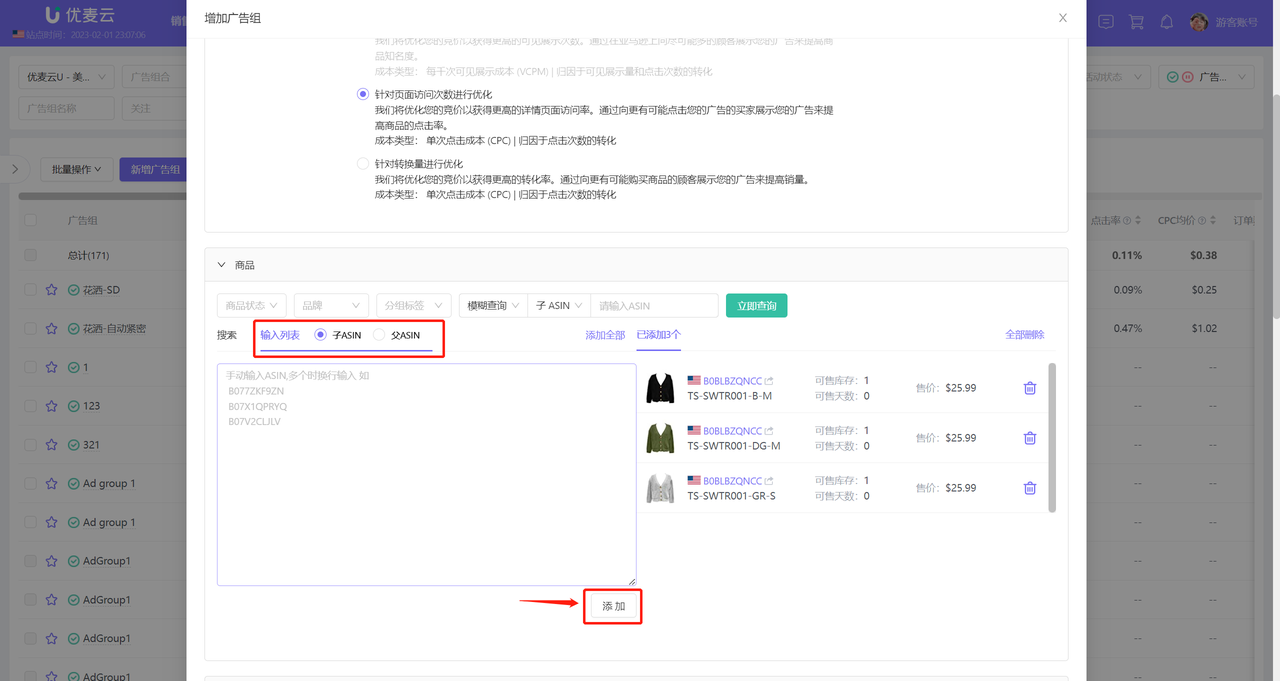
Add promoted products by searching or bulk entering product ASINs.
Add ad products by searching:
 +
+
Bulk enter ASINs to add ad products:
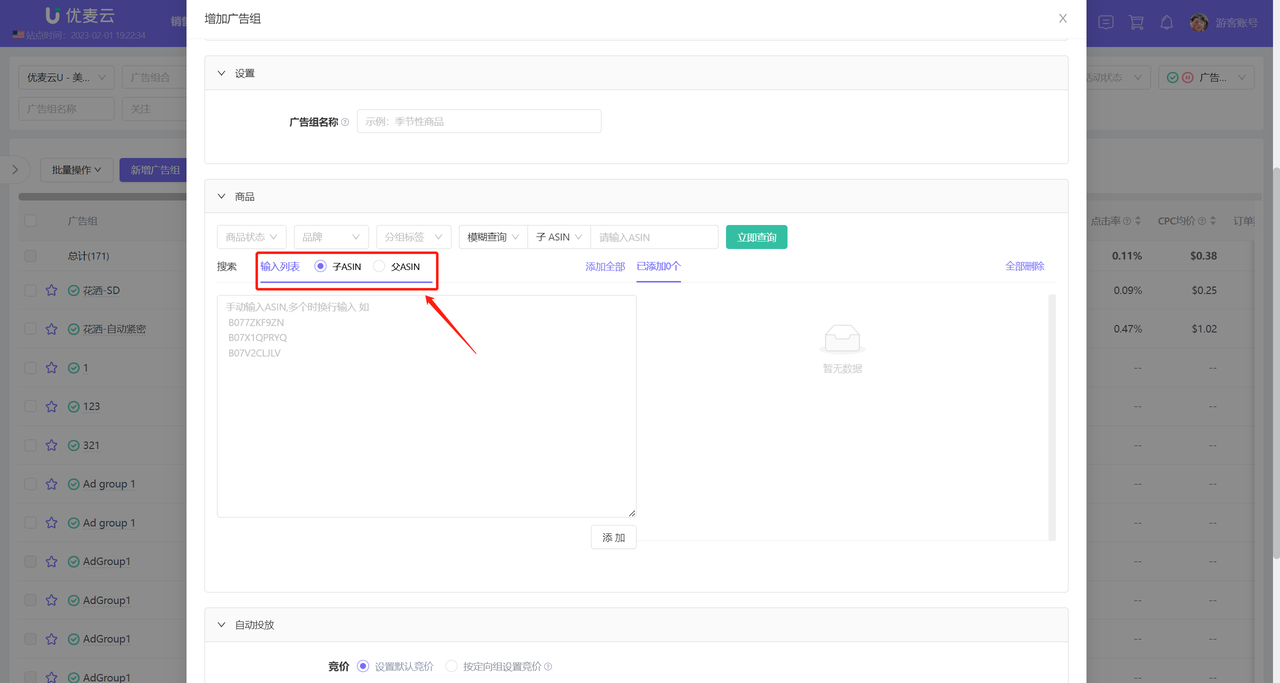 +
+
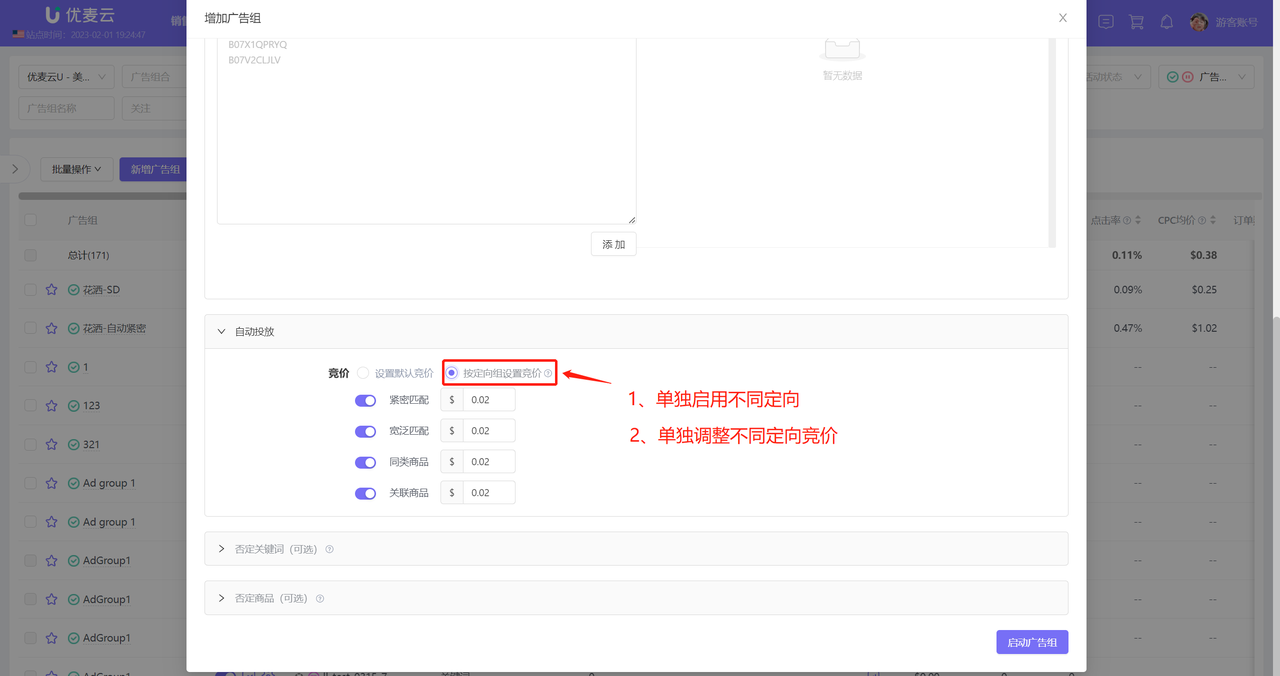
4) Set Bids by Targeting Group (Optional)
You can choose to set ad bids separately by targeting group. When enabled, you can individually Enable/Pause these four match types and set different bids for them to utilize your budget more effectively.
Note: Bids set by targeting group have a higher priority than the default bid.
 +
+
5) Add Negative Targeting (Optional)
You can choose to add negative keywords and negative products for this Ad group. After adding negatives, Amazon will not target your Ad group's products for the negative keywords and products.
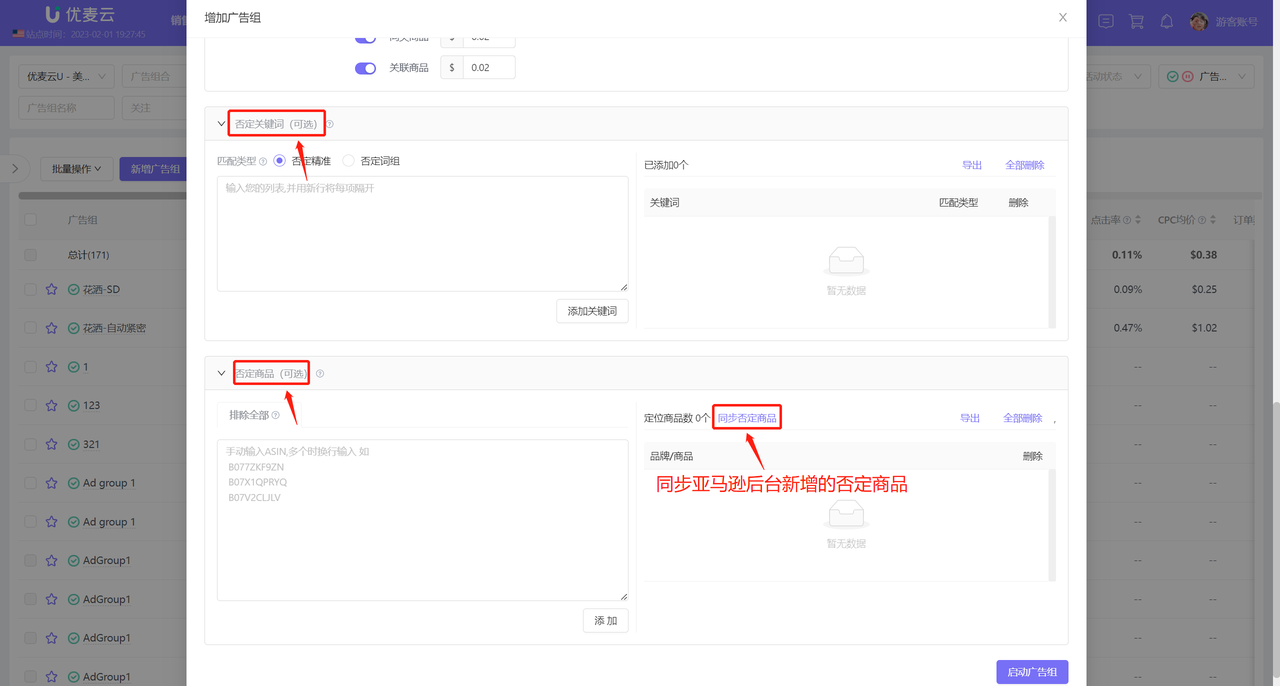 +
+
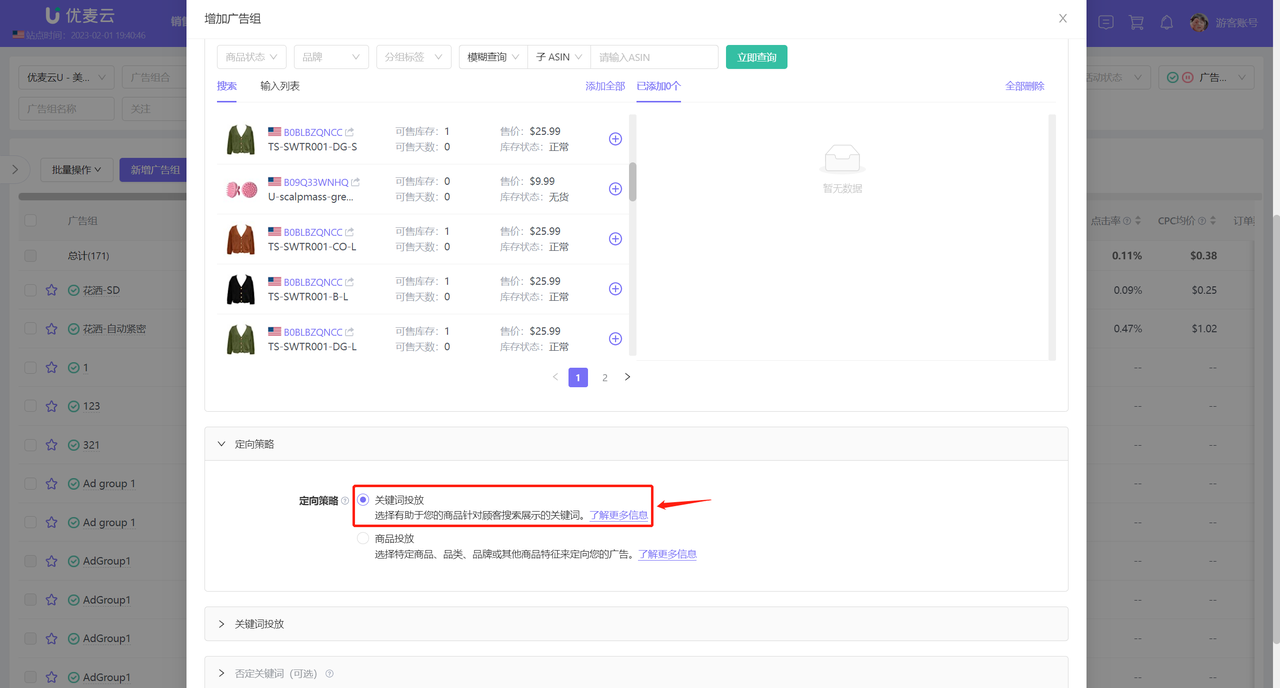
3.1.2 Creating a Manual Targeting Ad group
Manual targeting Ad groups include two targeting strategies: Keyword Targeting + Product Targeting (Category Targeting / ASIN Targeting)
After setting up, Amazon will target your ads based on your targeting strategy, such as matching buyer search keywords or targeting related product detail pages, etc.
The first three setup steps are basically the same as automatic targeting.
Targeting Strategy - Keyword Targeting:
 +
+
Targeting Strategy - Product Targeting:
 +
+
1) Select Campaign (Manual Targeting)
Enter the new Ad group page,
Select the manual targeting campaign to which you want to add an Ad group;
 +
+
2) Set Name and Default Bid
Set the Ad group name and default bid,
 +
+
3) Add Promoted Products
Add promoted products by searching or bulk entering product ASINs.
 +
+
4) Select Targeting Strategy and Set Corresponding Targeting (Including Negative Targeting)
Targeting Strategy: Keyword Targeting
Keyword targeting refers to placing your products on the search results page for that keyword.
Keyword Targeting Setup Steps: Select Keywords -> Confirm Keywords (set corresponding bids or delete/add) -> Add Negative Keywords (optional) -> Launch Ad group
 +
+
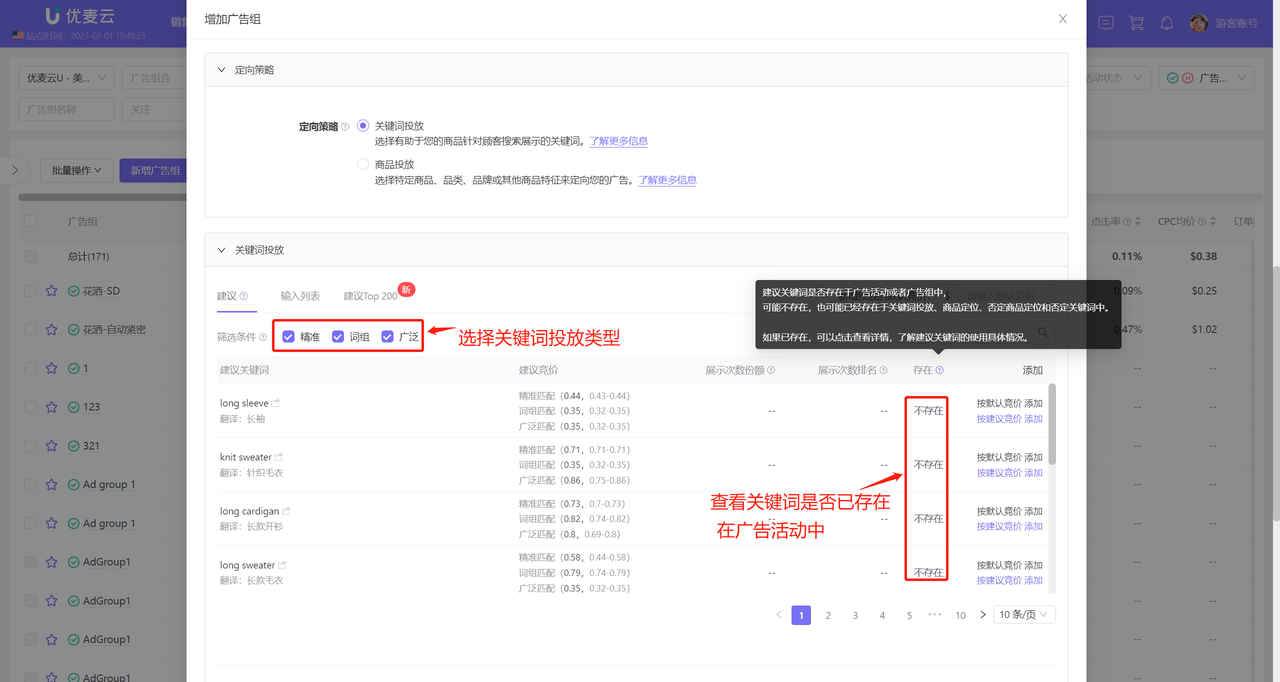
When adding manual ad keywords, you can add system-suggested keywords, or manually bulk enter keywords, or choose to add Amazon's recommended top 200 keywords;
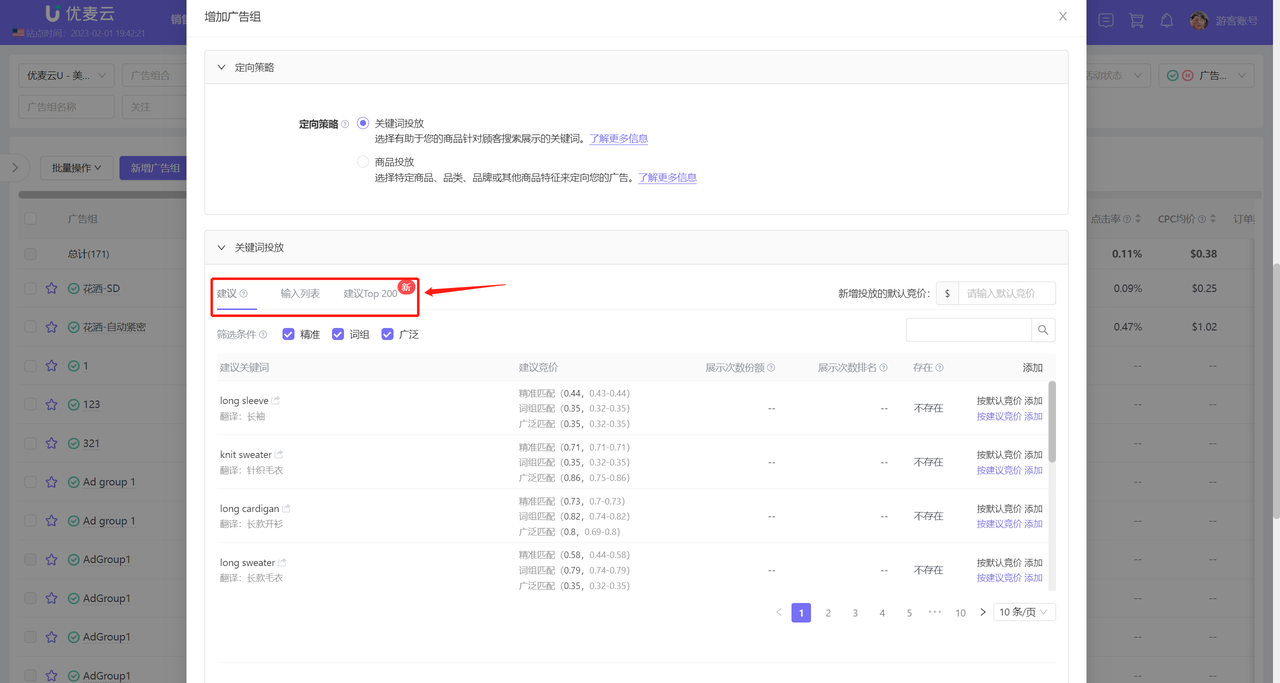 +
+
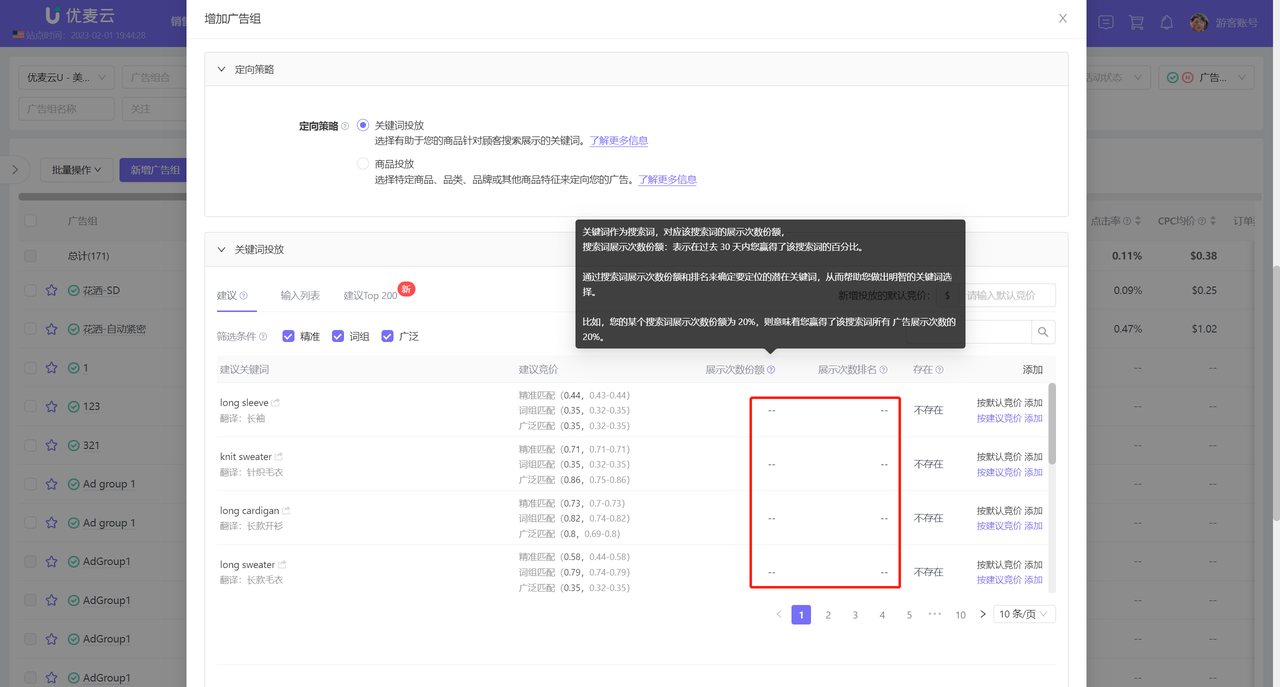
After selecting the corresponding keyword source, you can also view and analyze the keyword's impression share and rank on Amazon to determine whether to target the keyword;
 +
+
Add System-Suggested Keywords: Select 【Suggested】 to choose suggested keywords matched by the Amazon system based on the added promoted product information;
 +
+
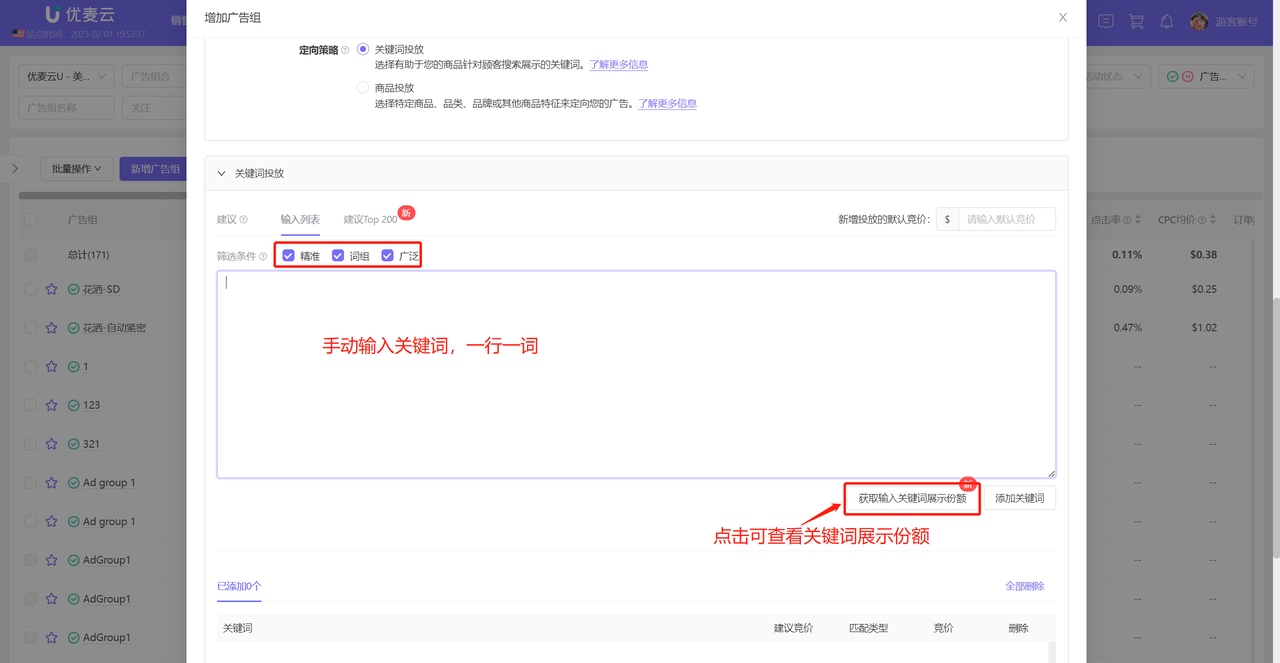
Manually Bulk Enter Keywords: Select 【Enter List】 to manually enter the keywords you want to target;
 +
+
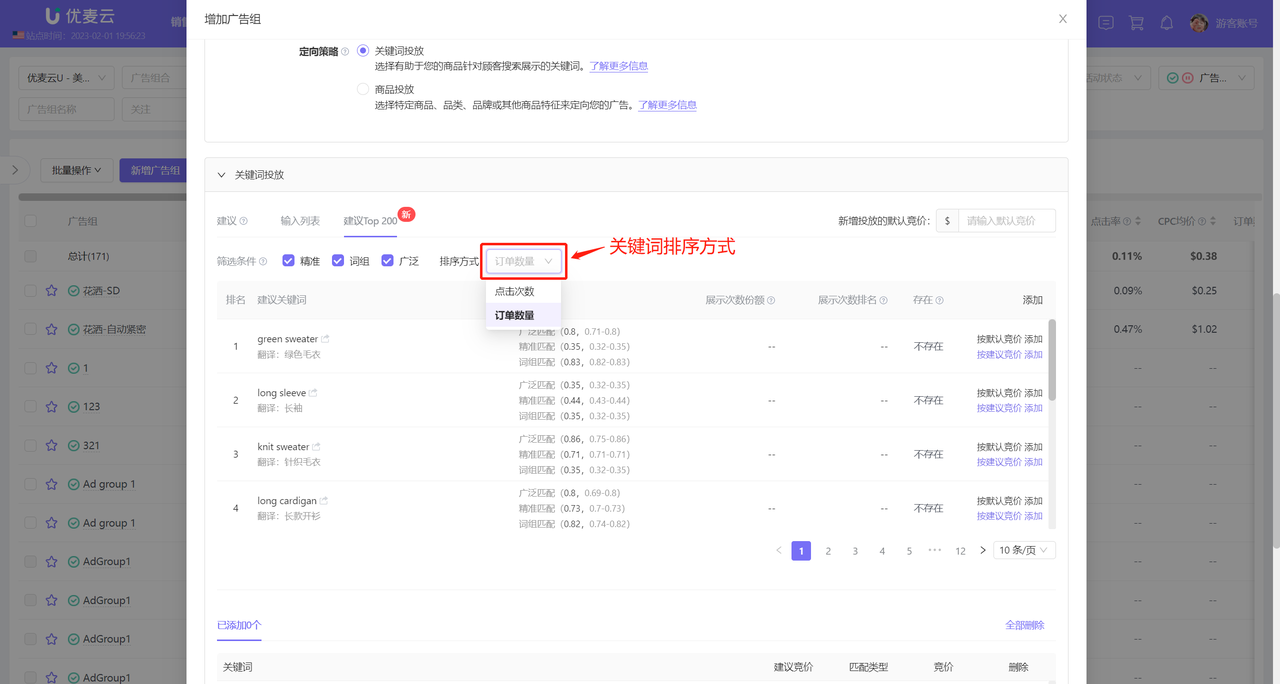
Choose to Add Amazon Recommended Top 200 Keywords:
Amazon will match the top 200 keywords with comprehensive performance based on the products you choose to advertise. These keywords are highly referential for your targeting, and you can choose to target these keywords to increase your ad revenue.
 +
+
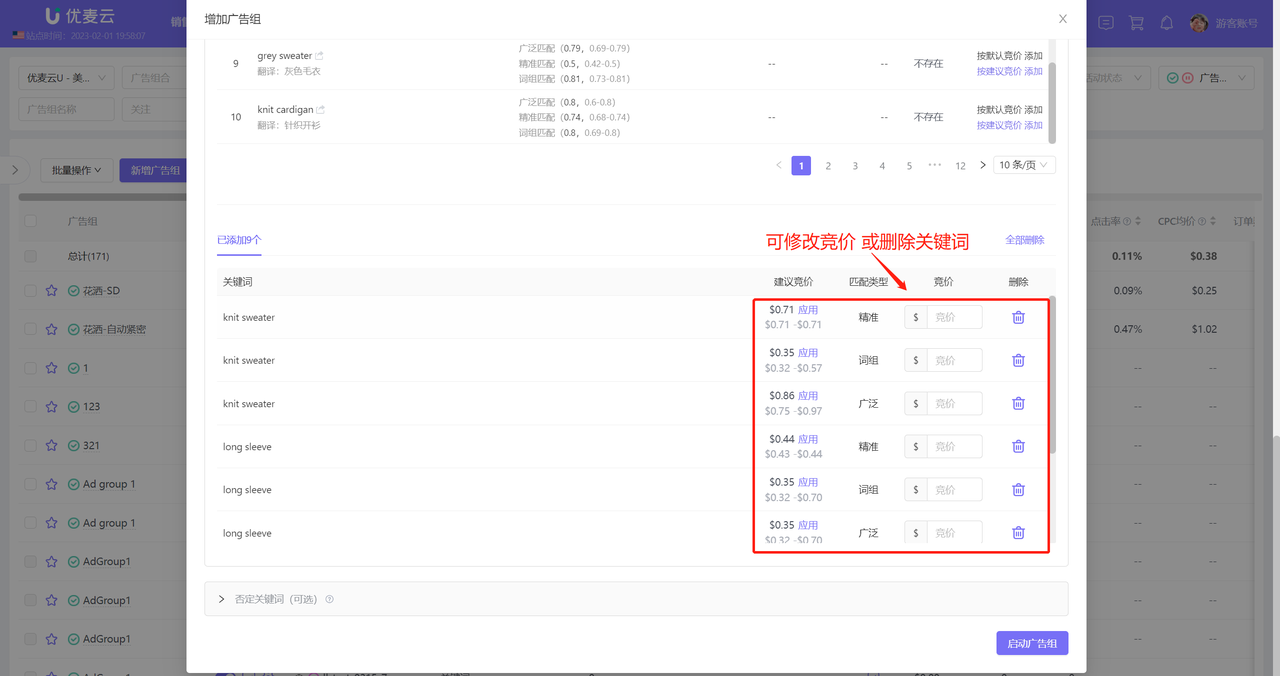
Confirm Added Keywords:
Supports setting bids separately for keywords of each match type and deleting added keywords.
Tips: Bids set here have a higher priority than the Ad group's default bid.
 +
+
Add Negative Keywords:
You can choose to add negative keywords for this Ad group. After successful addition, Amazon will not target your ads for these keywords;
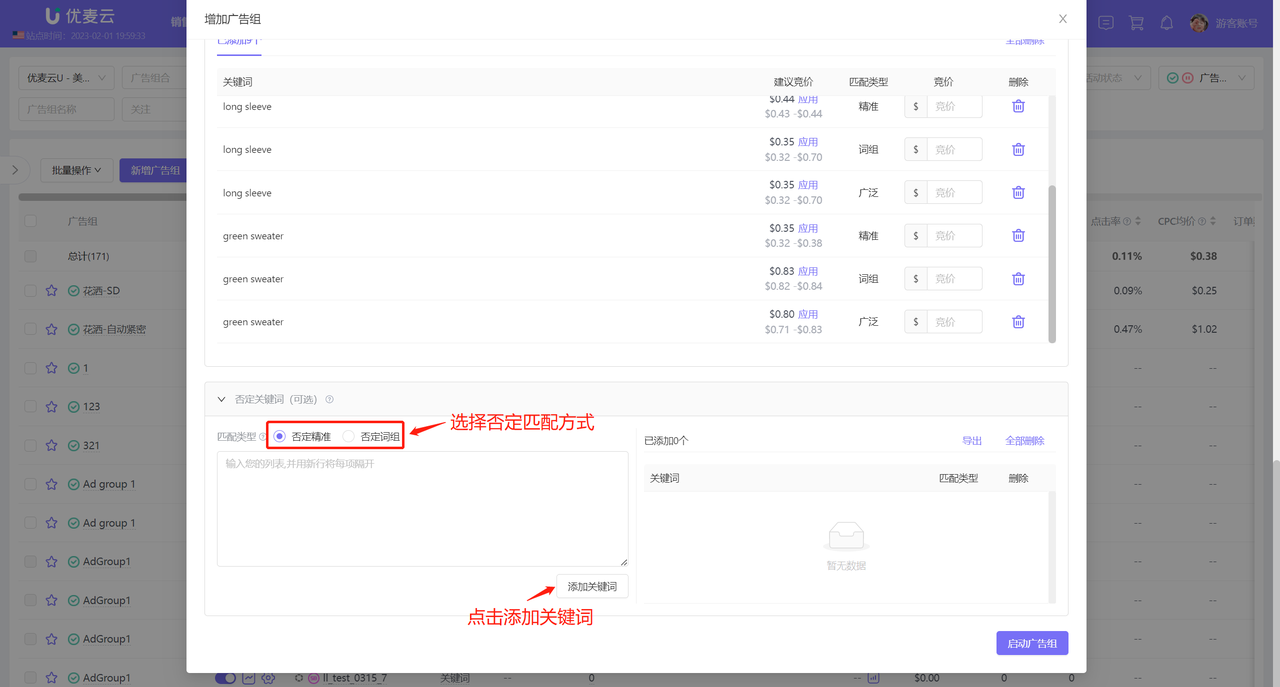 +
+
After confirming that the information is correct, click 【Launch Ad group】 to complete the creation.
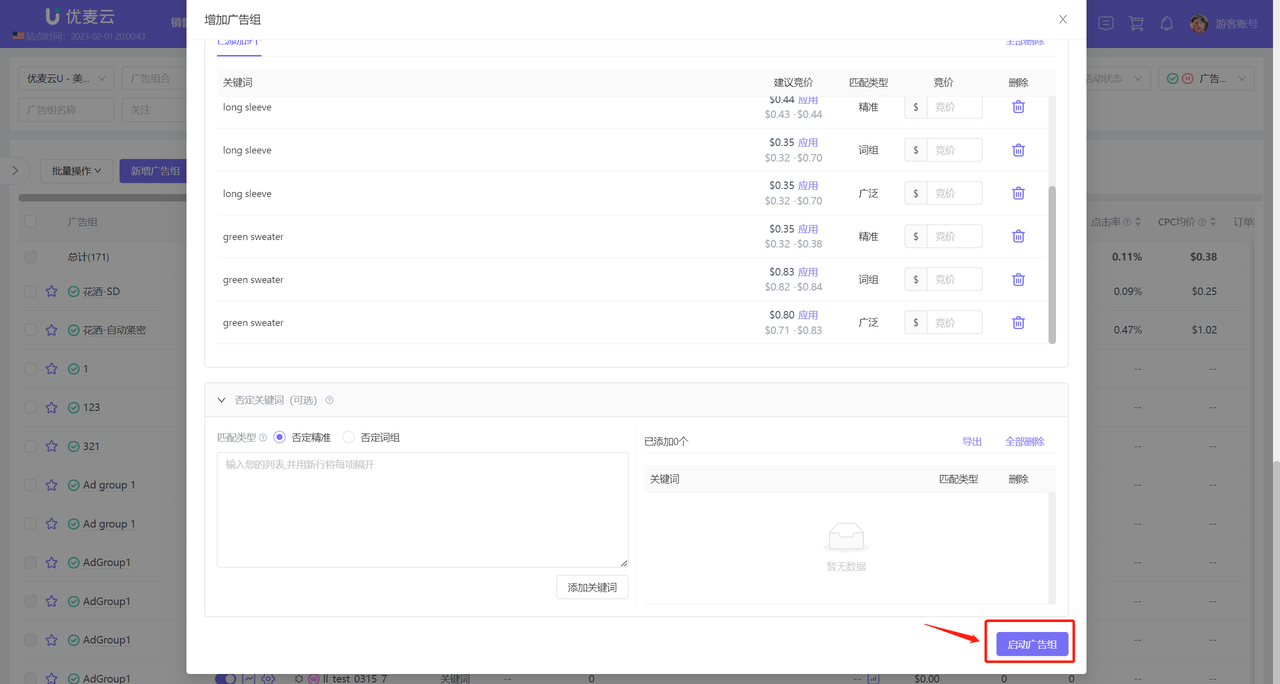 +
+
Targeting Strategy: Product Targeting (Category Targeting / ASIN Targeting)
Product targeting refers to placing your products on a certain category or product detail page of a specific ASIN.
Product Targeting Setup Steps: Select Category or ASIN -> Confirm Targeting Information (set bids and delete added targeting) -> Add Negative Product Targeting -> Launch Ad group
 +
+
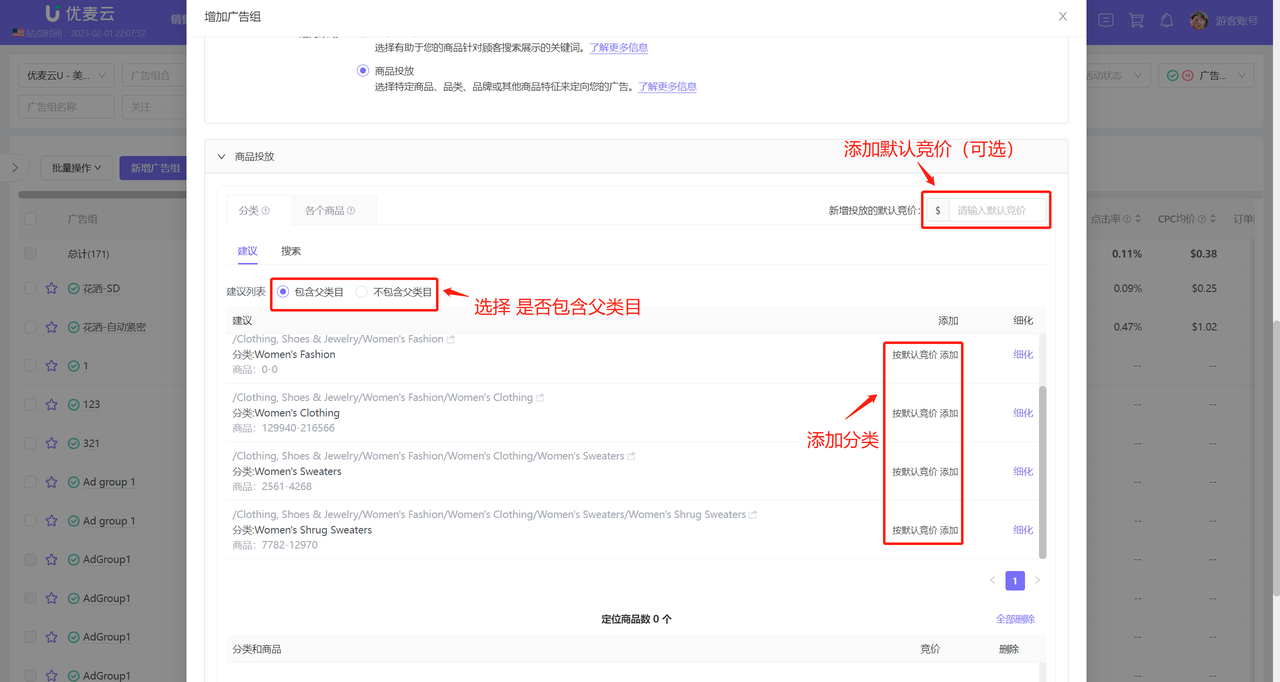
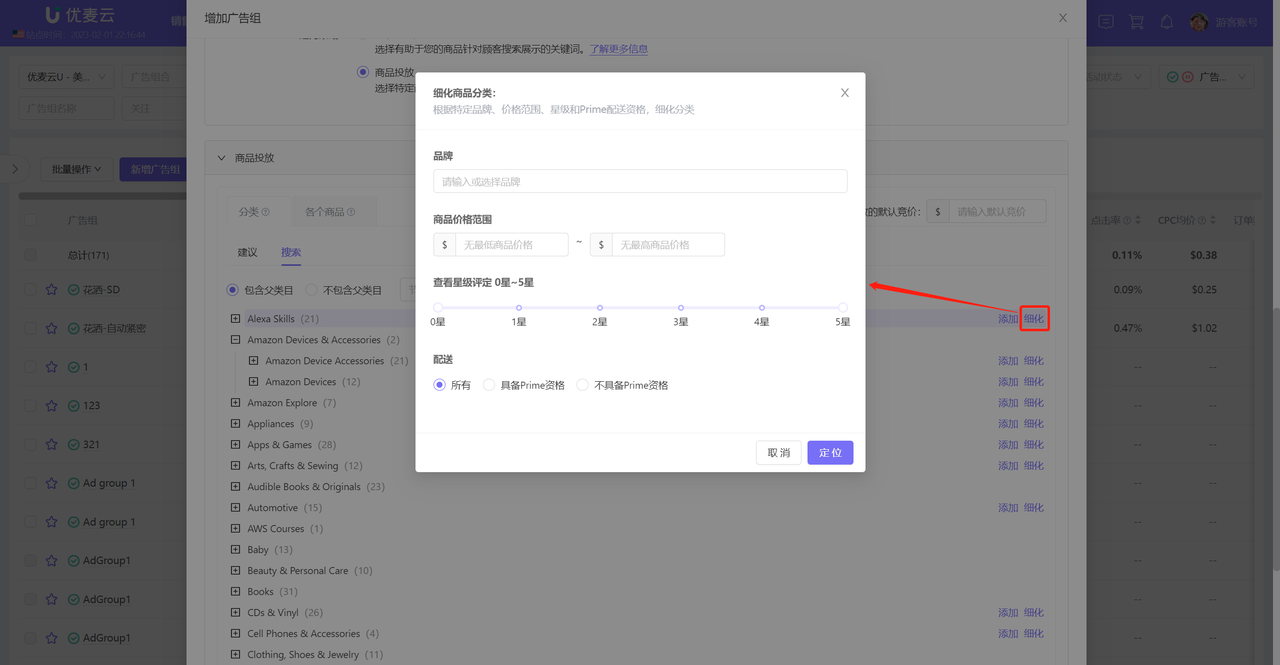
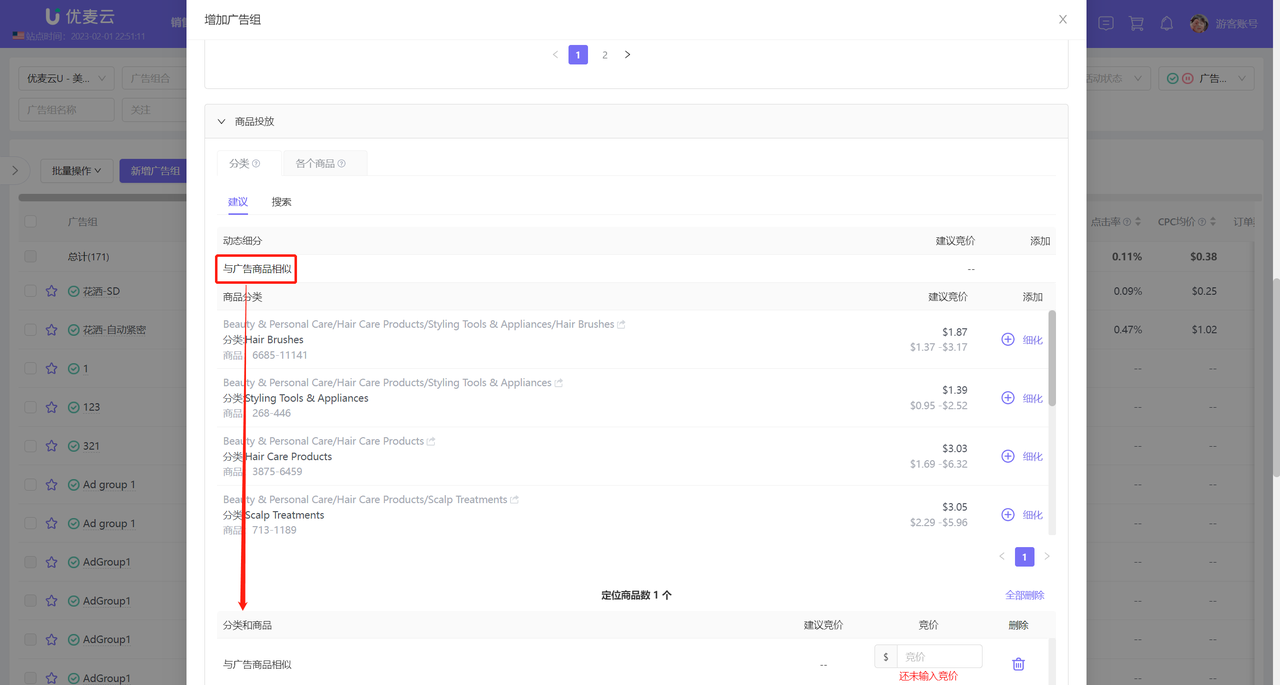
Add Category Targeting:
Category targeting has two adding methods: Amazon Suggested Categories or search to add a category.
Amazon Suggested Categories: Refers to relevant categories intelligently recommended by Amazon based on the promoted products you added. When you don't have a target category, you can try adding suggested categories.
Select 【Suggested】, click the add button on the right side of the category to add the suggested category;
When adding category targeting, you can choose 【Include Parent Category】 or 【Exclude Parent Category】 in the suggestion list:
 +
+
You can also click 【Refine】 to further refine the targeting scope of the category.
 +
+
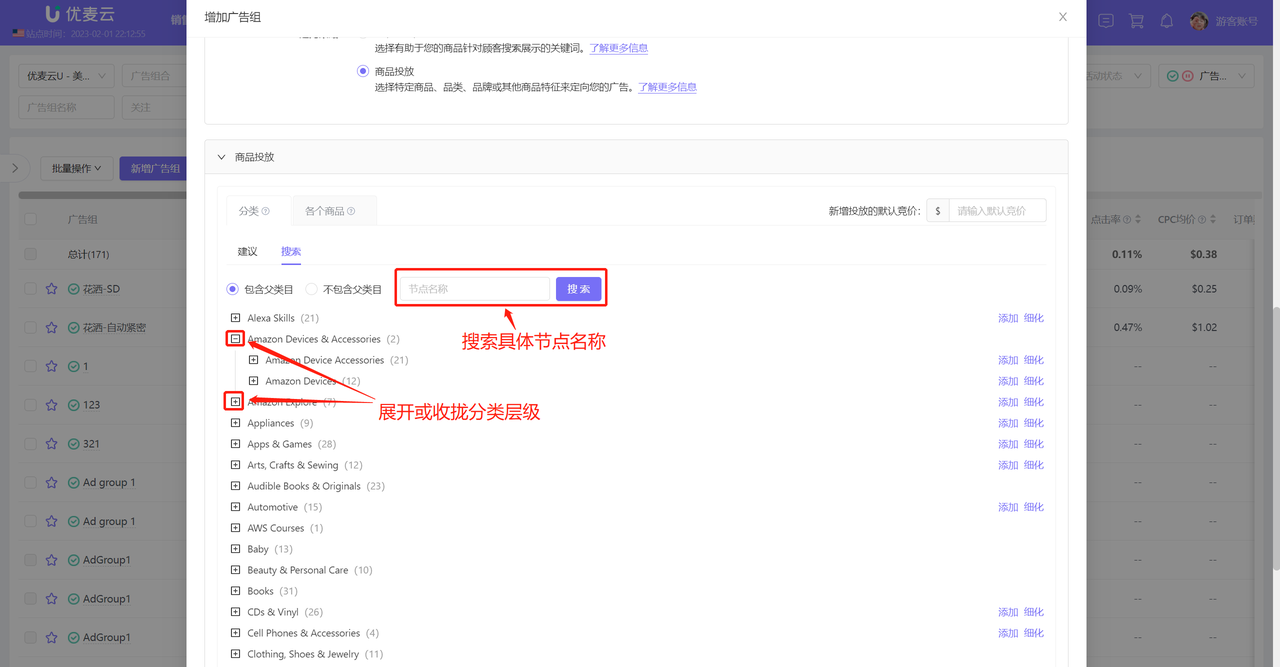
Search to Add a Category: When you have a target category to target, you can directly search for the category and add it with one click.
Select 【Search】 to directly search and add your target category.
 +
+
Click 【Refine】 to also further refine the targeting scope of the category;
 +
+
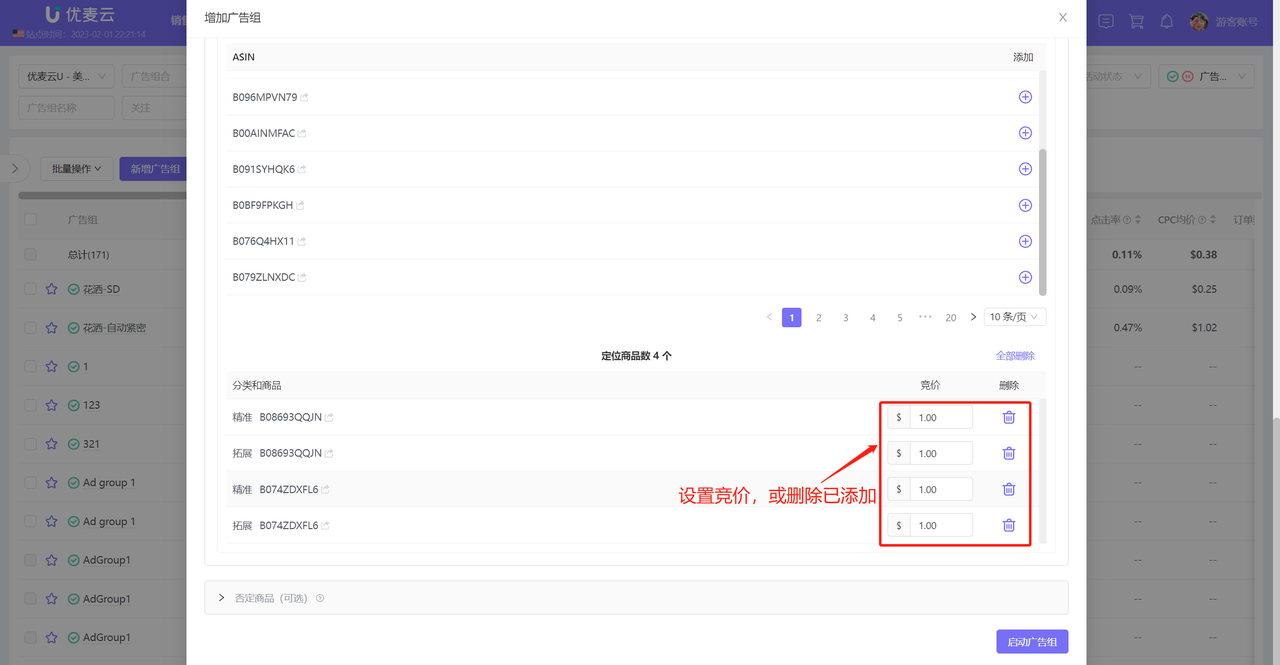
Add ASIN Targeting
There are also two ways to add ASIN targeting: Add Amazon Suggested Products, manually enter ASINs.
Add Amazon Suggested Products: Amazon will intelligently recommend products related to the promoted products you added. When you don't have target products to target, you can choose this option to add targeting.
Select 【Individual products】, enter the 【Suggested】 list, and add Amazon suggested ASINs;
 +
+
If you already have target related products, select 【Manually Enter】 and bulk enter product ASINs to add ASIN targeting.
 +
+
Confirm Targeting Information:
After adding categories and ASINs, you need to make a final confirmation. At this time, you can set bids separately for these targeting options or delete some added targeting objects.
Tips: Bids set separately here have a higher priority than the Ad group's default bid.
 +
+
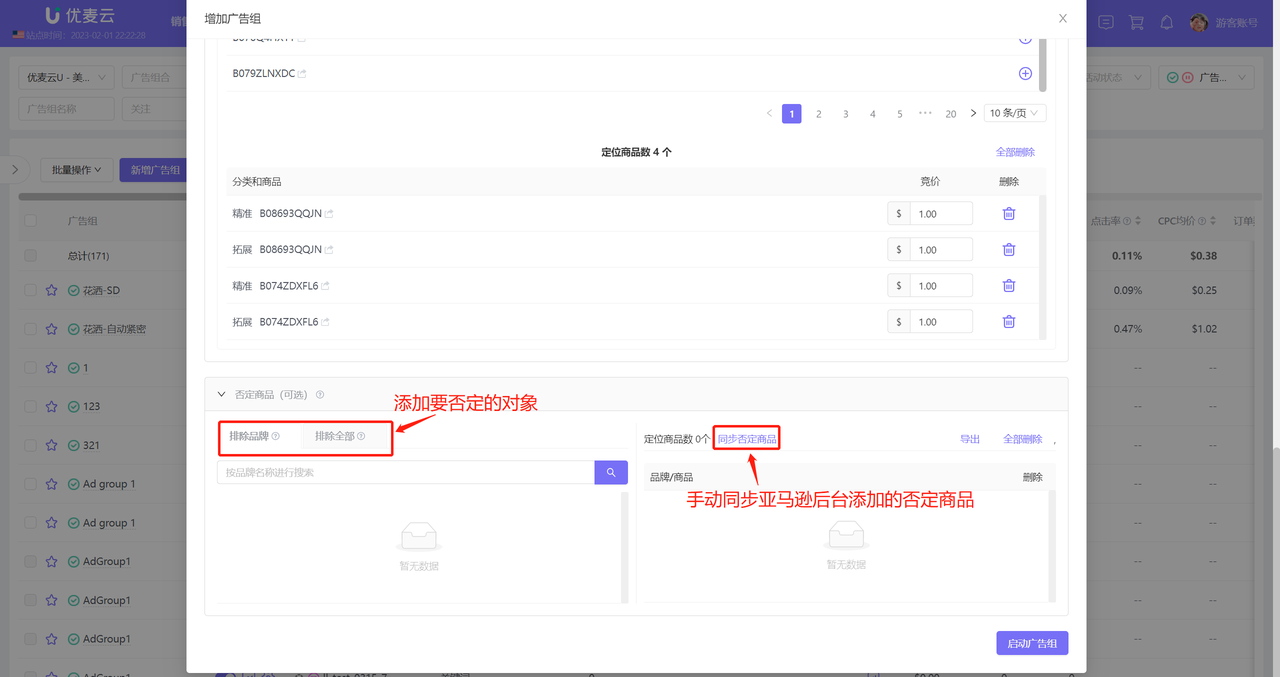
Finally, you can choose whether to add negative products and brands. After successful addition, your products will not appear on the detail pages of these products.
Exclude Brands: Search for brands to add negative products. After adding, your ads will not appear on any pages of these brands;
Exclude All: Bulk enter product ASINs to add negative products. After adding, your ads will not appear on any pages of these ASINs.
 +
+
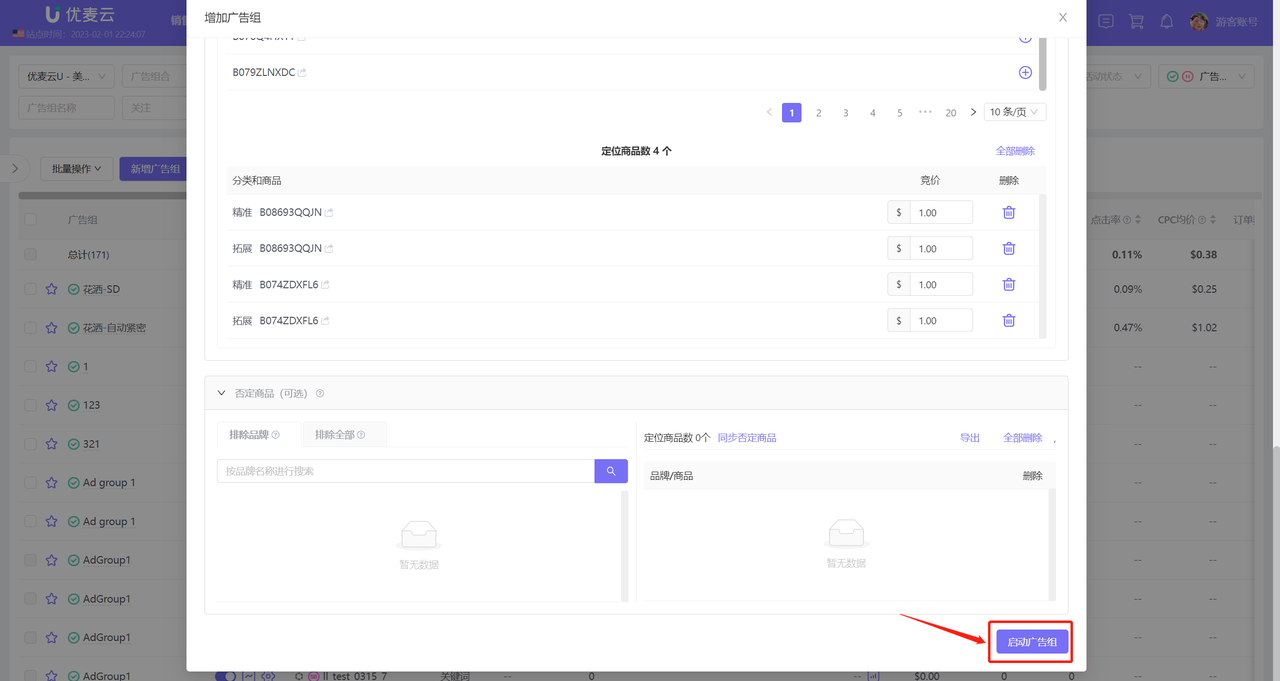
After adding, confirm that all information is correct, and click 【Launch Ad group】 to complete the creation of the Ad group.
 +
+
3.2 Creating a New Ad group - Sponsored Display
Amazon Sponsored Display ads allow your products to reach relevant audiences browsing on and off Amazon.
Click 【Add Ad group】 to enter the new Sponsored Display Ad group;
 +
+
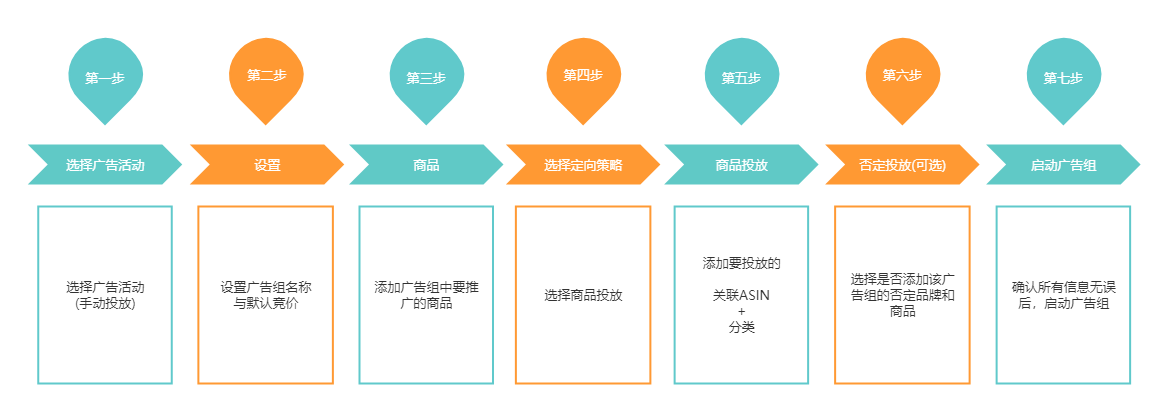
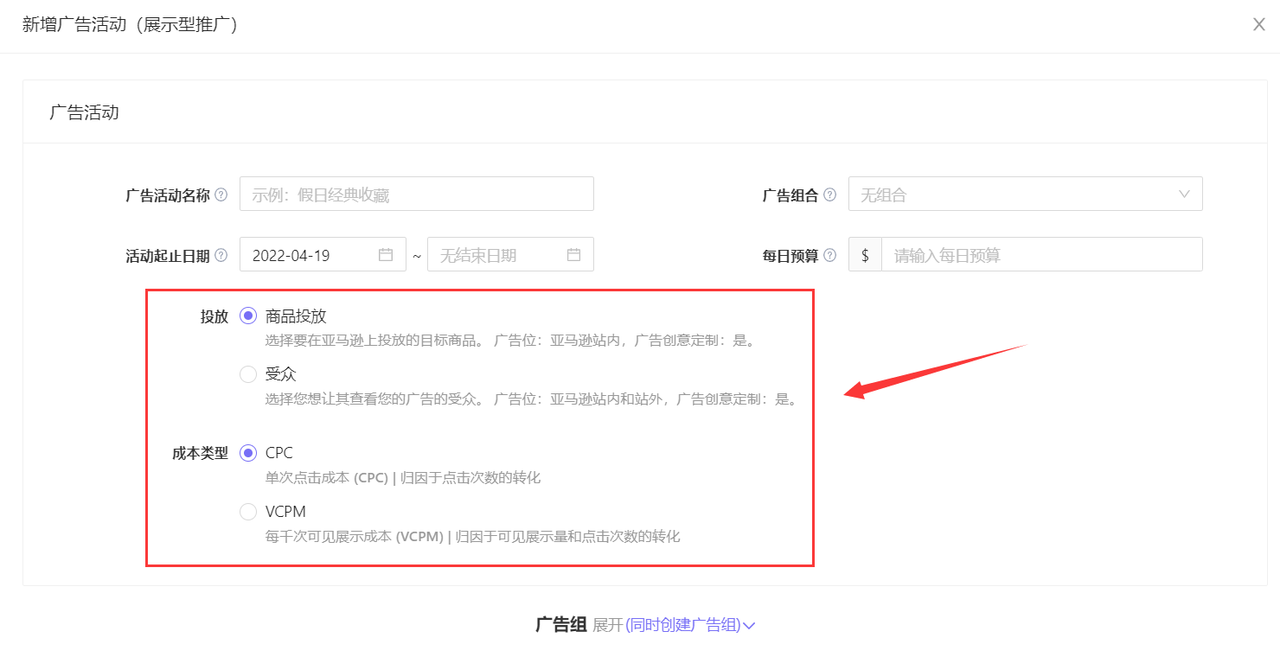
Sponsored Display Ad groups have slightly different setup methods depending on the campaign's targeting type.
Targeting Type: Product Targeting + Audiences
Product Targeting: You can display ads to audiences currently browsing products and categories you select, as well as similar products. Your ads can be placed on Amazon, including product detail pages and search results pages.
Audiences: You can choose the customer audiences you want to target with Sponsored Display ads. Your ads will be placed on and off Amazon, including the Amazon homepage, product detail pages, shopping search results pages, third-party websites, apps, and Twitch.
 +
+
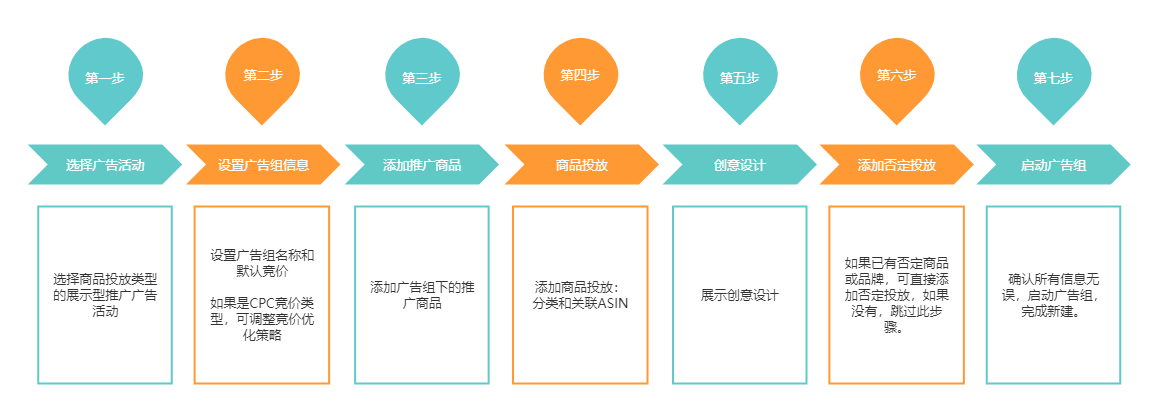
Creating: Sponsored Display Ads - Product Targeting
New creation flowchart:
 +
+
1. Select a Sponsored Display campaign with Product Targeting type;
 +
+
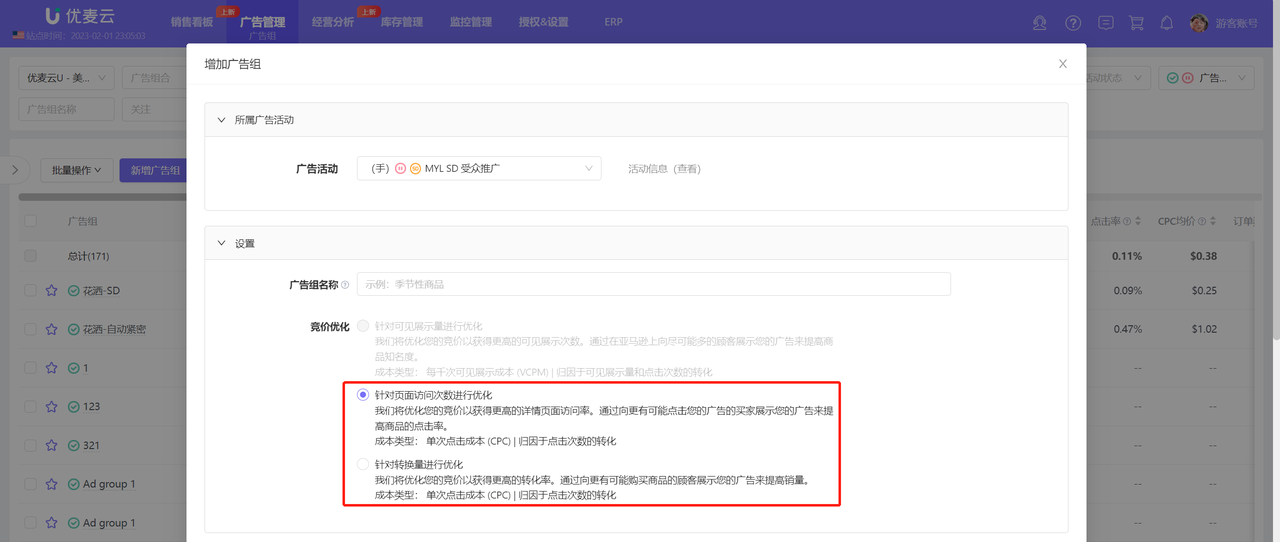
2. Set Ad group Information
Set the Ad group name and default bid.
Tips:
1. If the cost type of the campaign to which this Ad group belongs is CPC, you can also adjust the bidding optimization strategy here. If the cost type is VCPM, it cannot be adjusted.
2. The bid set here is the default bid, applied to all ad objects in the Ad group. You can set bids for individual ad objects later.
 +
+
3. Add Promoted Products
Add products to be promoted in the store by searching or manually entering ASINs.
 +
+
Manually enter ASINs to add:
 +
+
4. Add Product Targeting
After selecting promoted products, you can add corresponding product targeting.
The way to add product targeting is basically the same as SP, divided into category targeting and ASIN targeting.
 +
+
Among them, different from SP, there is a dynamic refined category, mainly: Similar to advertised products targeting, this category is selected for targeting by default.
 +
+
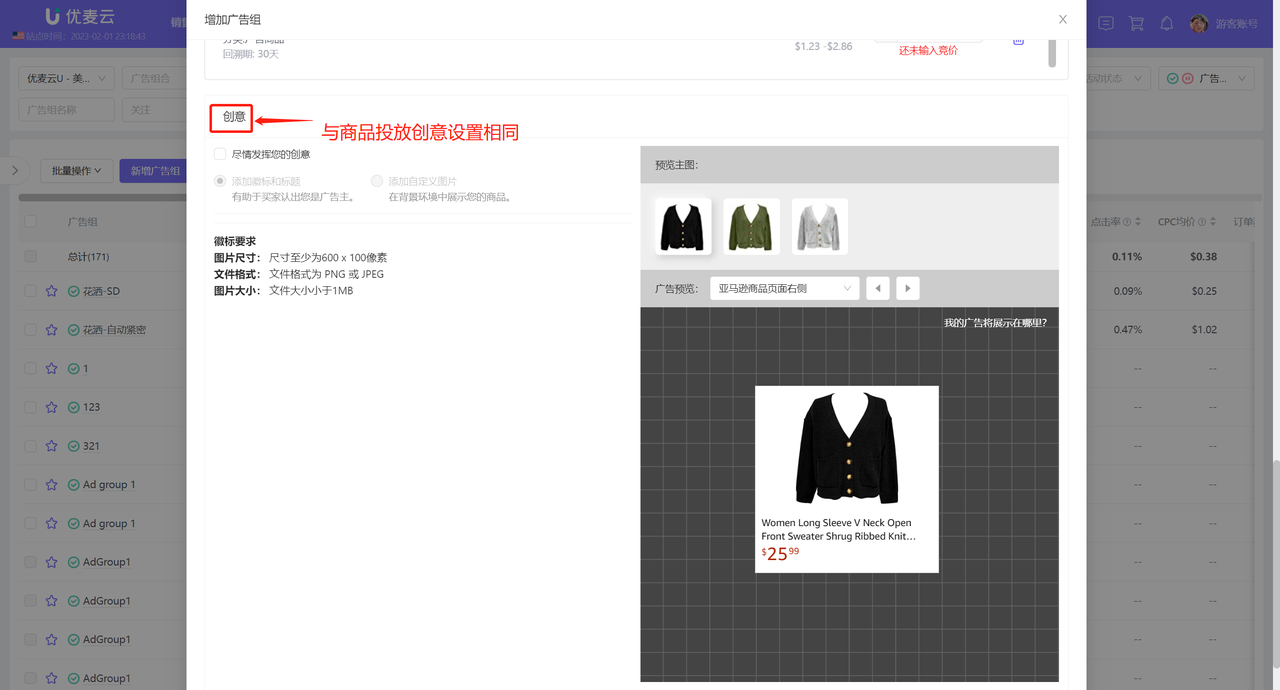
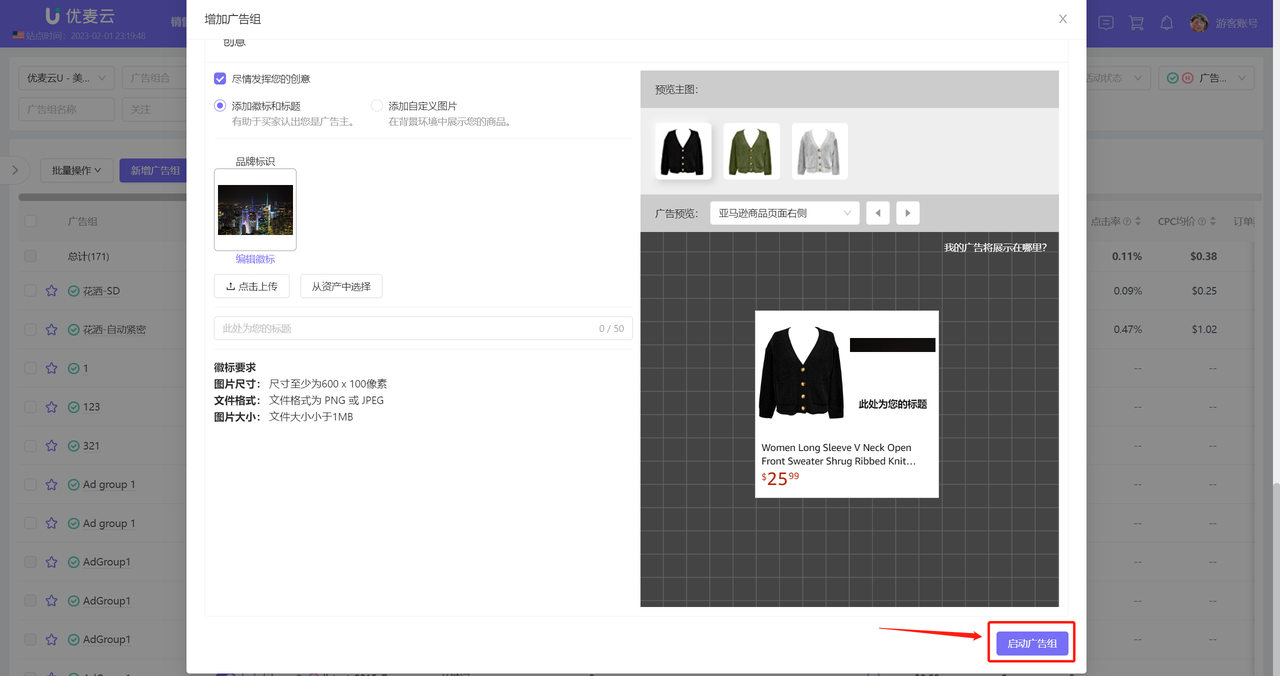
5. Creative Design
You can choose to use creative design to make Sponsored Display ads more attractive.
Check 【Unleash your creativity】 to enter the settings page, and follow the prompts to select settings.
 +
+
We can also preview the ad placement in advance. Select the ad preview object and click 【Where will my ad display?】 to directly view the ad placement.
 +
+
View ad placement:
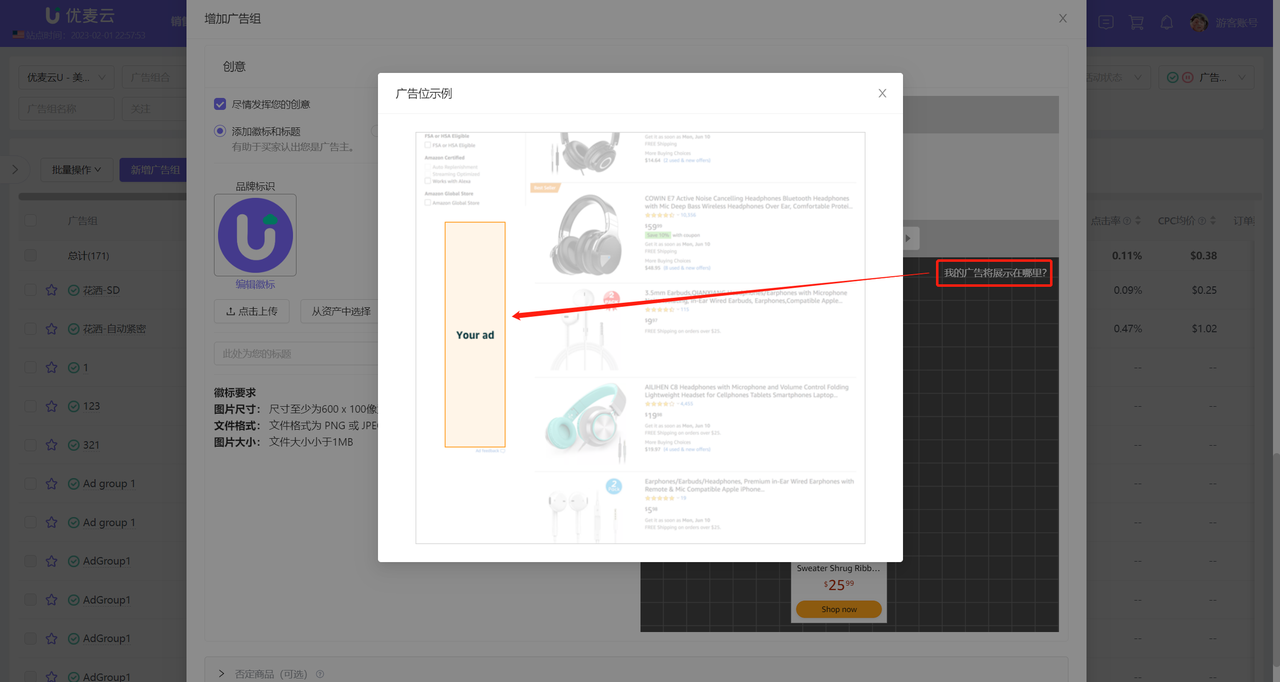 +
+
6. Add Negative Targeting
If you currently have negative products for this Ad group, you can directly add them to negative targeting. If not, skip this step.
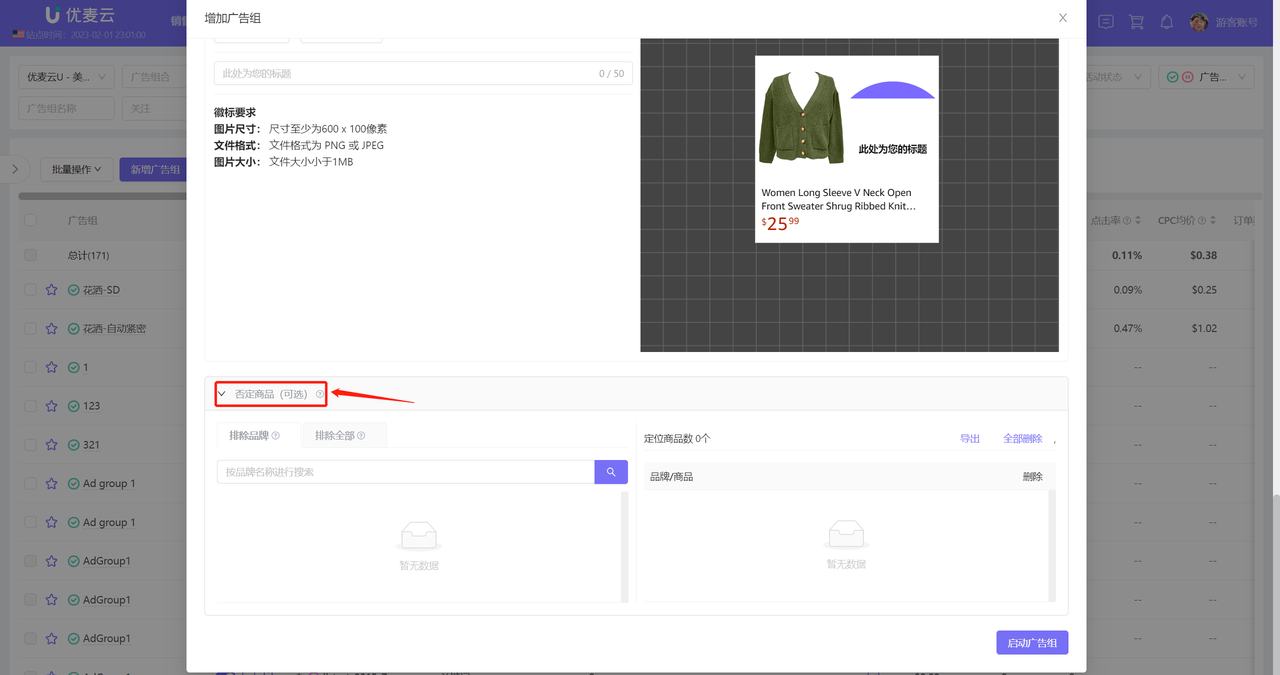 +
+
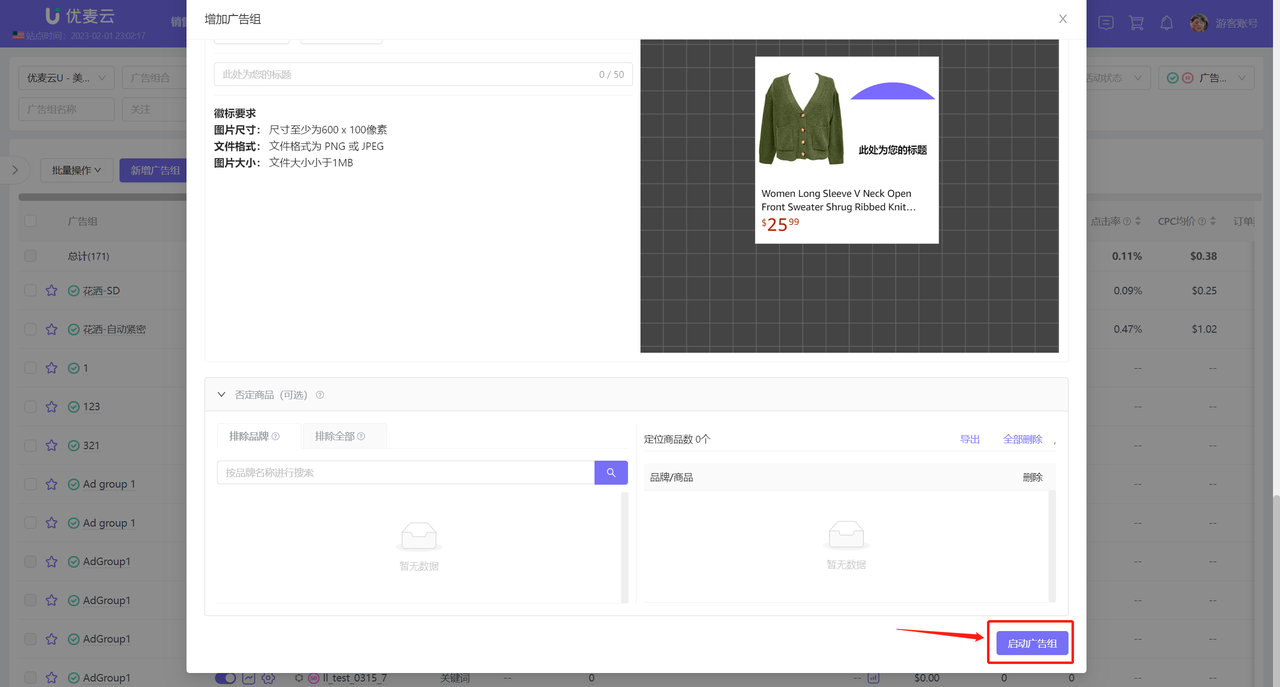
7. Launch Ad group
After confirming that all information is correct, click 【Launch Ad group】 to complete the creation.
 +
+
Creating: Sponsored Display Ads - Audiences
New creation flowchart:
 +
+
1. Select a Sponsored Display campaign with Audience Targeting;
 +
+
2. Set Ad group Information
Set the Ad group name and default bid.
Tips:
1. If the cost type of the campaign to which this Ad group belongs is CPC, you can also adjust the bidding optimization strategy here. If the cost type is VCPM, it cannot be adjusted.
2. The bid set here is the default bid, applied to all ad objects in the Ad group. You can set bids for individual ad objects later.
 +
+
3. Add Promoted Products
Add products to be promoted in the store by searching or manually entering ASINs.
 +
+
Manually enter ASINs to add:
 +
+
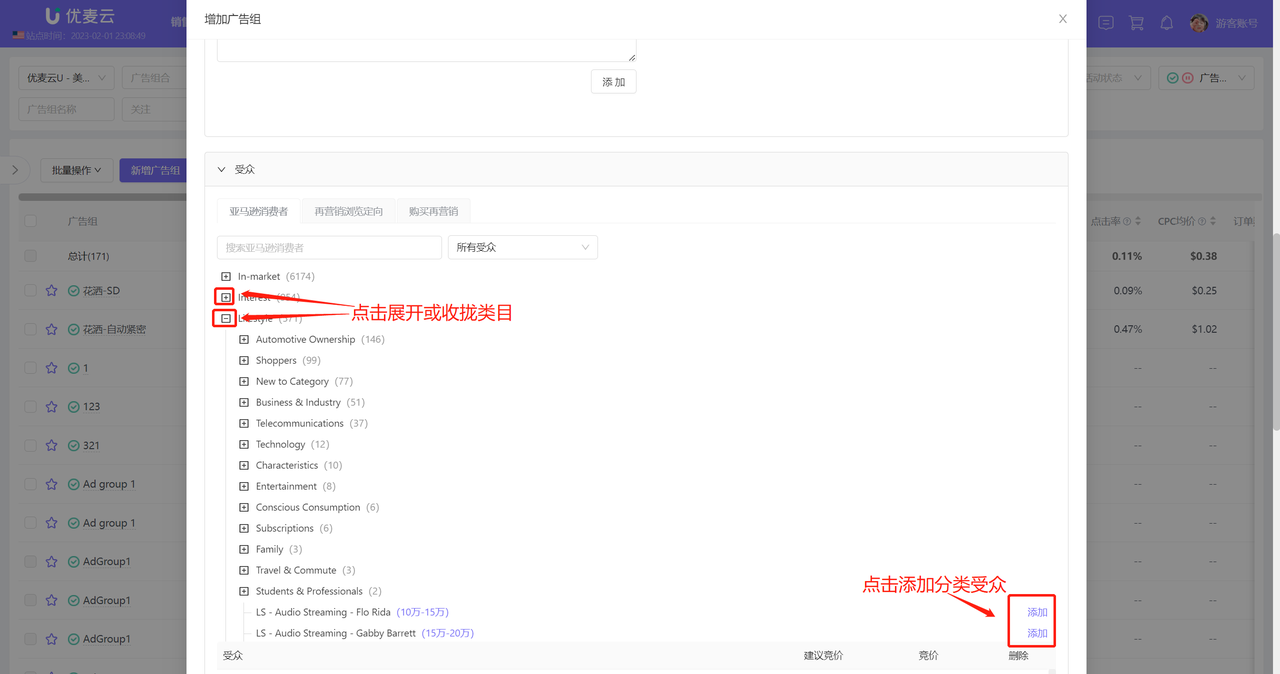
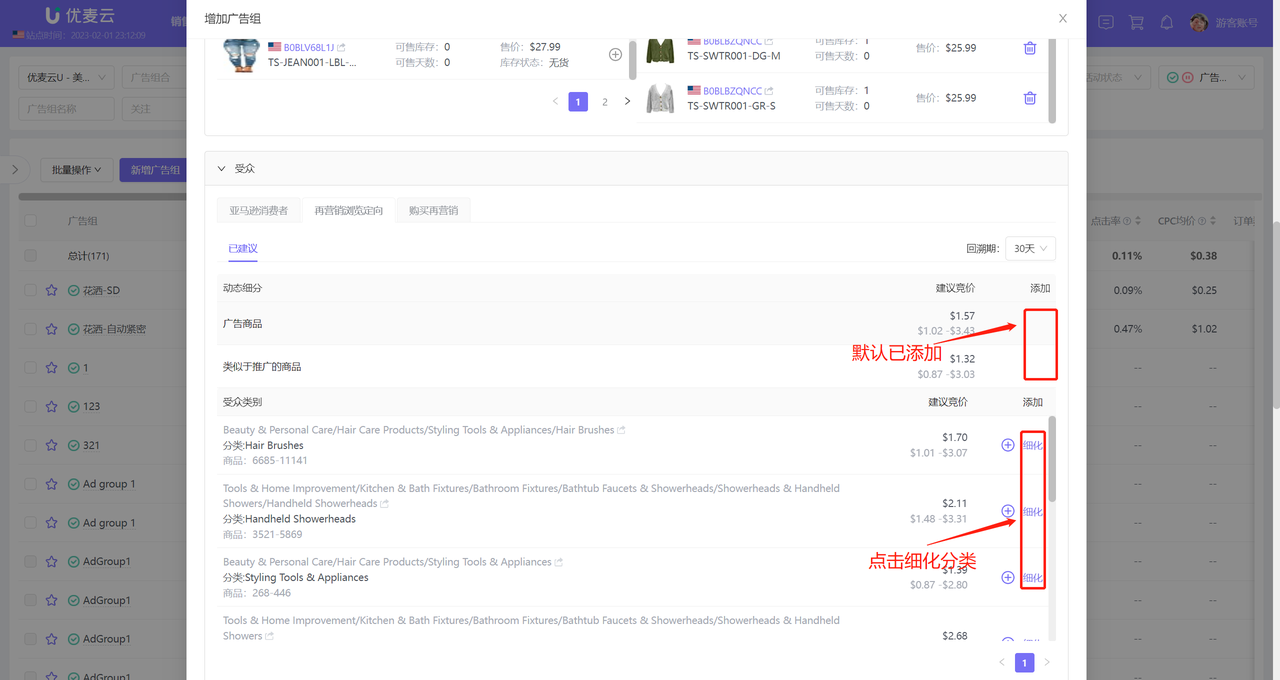
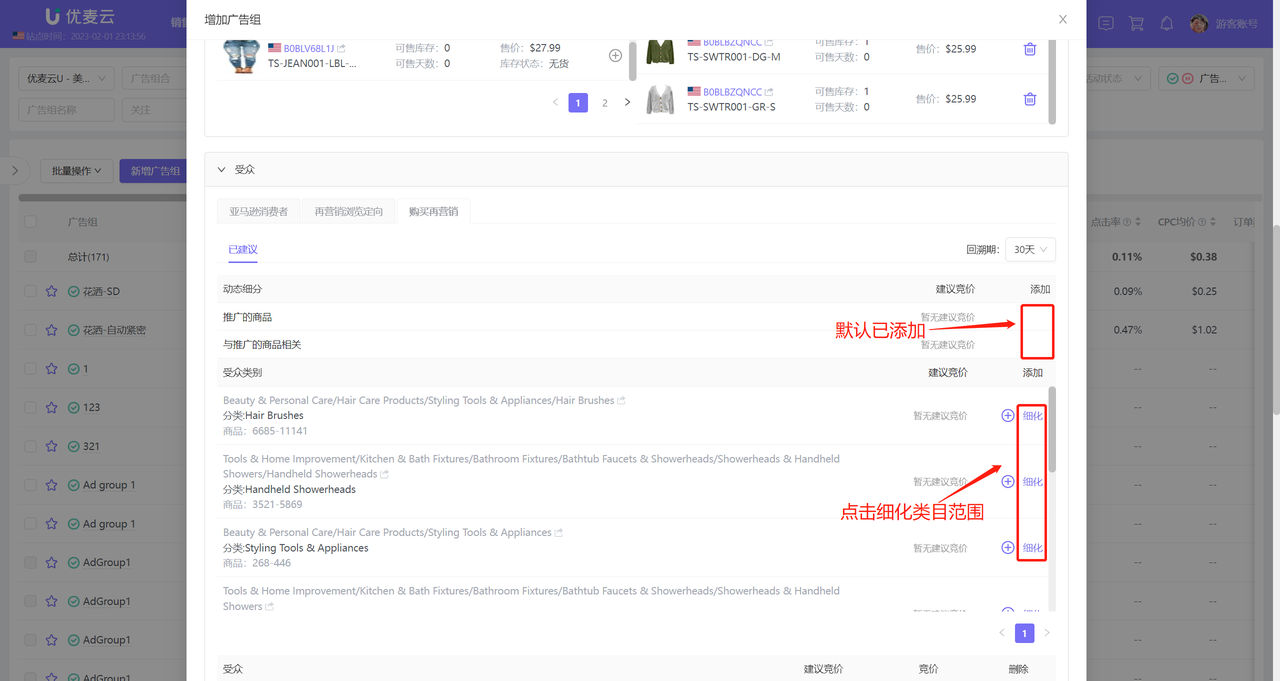
4. Add Audience Targeting
There are three directions for audiences: Amazon Audiences, Views Remarketing, and Purchases Remarketing.
Amazon Audiences:
“Amazon Audiences” provides thousands of pre-built audience segments to help us reach new potential audiences through campaigns designed to increase awareness and purchase intent.
 +
+
Views Remarketing Audiences:
With views remarketing targeting, you can engage Amazon customer audiences who have viewed specific product detail pages within a historical lookback period you can specify.
 +
+
Purchases Remarketing Audiences:
Purchases remarketing strategies enable you to engage audiences based on their historical purchase behavior within a lookback period you can specify.
 +
+
After adding, confirm the added targeting information and set bids separately for them (priority is higher than the Ad group default bid).
 +
+
5. Creative Design
 +
+
6. Launch Ad group
After confirming that all information is correct, click 【Launch Ad group】 to complete the creation.
 +
+
IV. Ad group - Data Analysis
SellerSpace's advertising system automatically synchronizes all Ad group data. You don't need to download data reports from Amazon Seller Central; you can directly analyze all Ad group data for your store in the system.
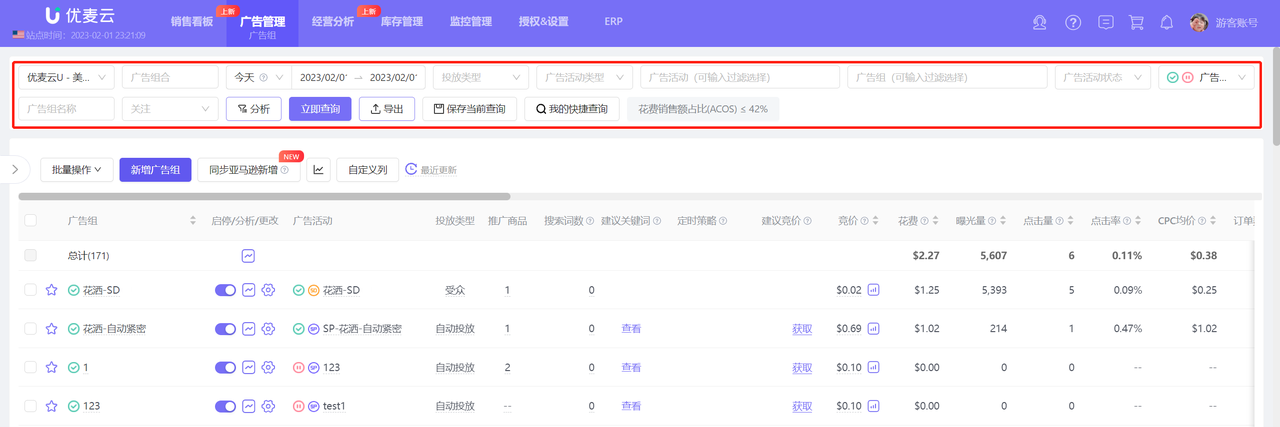
4.1 Find Ad groups
You can use the query bar above to view and analyze data for corresponding Ad groups from different dimensions, such as: Ad Portfolio, Campaign Type, Campaign, Targeting Type, Watchlist, etc. It also supports multi-selecting Ad Portfolios, Campaigns, and Ad groups for comparative analysis.
 +
+
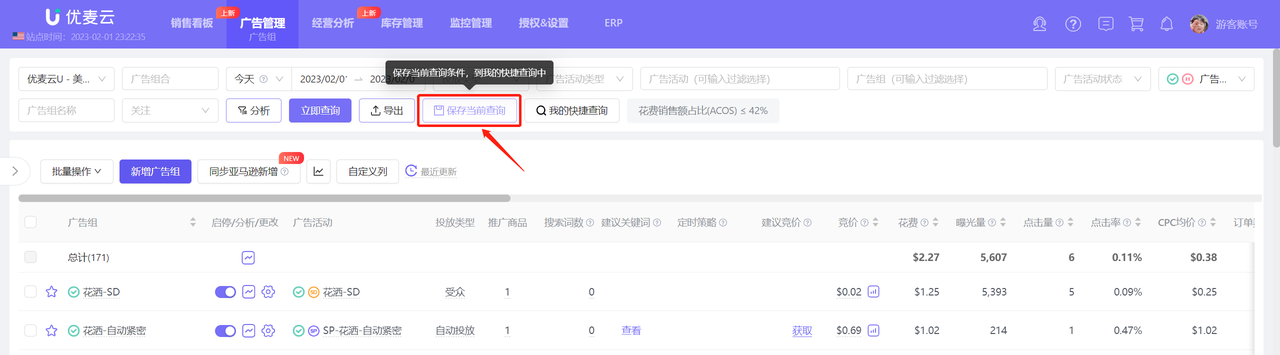
Tips: 1. Click "Save Current Query" to save the query conditions currently set in the query bar to My Quick Queries.
 +
+
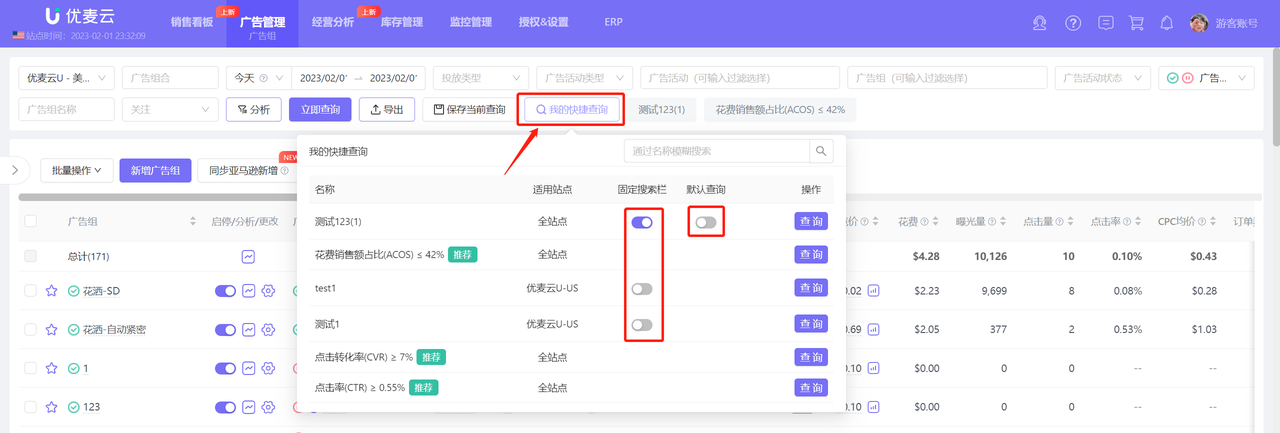
2. In "My Quick Queries," you can pin your quick query conditions to the search bar, and you can also set the quick query conditions as the default query. After that, every time you enter the campaign page, it will automatically display with the set query conditions.
 +
+
In addition to the above query conditions, it also supports viewing by ad data range, such as: Ad groups with clicks between 100-300 times, and spend between \$1-10, etc.
Click the funnel analysis icon to enter the data range settings;
 +
+
Filter data in different ranges for analysis according to your needs.
 +
+
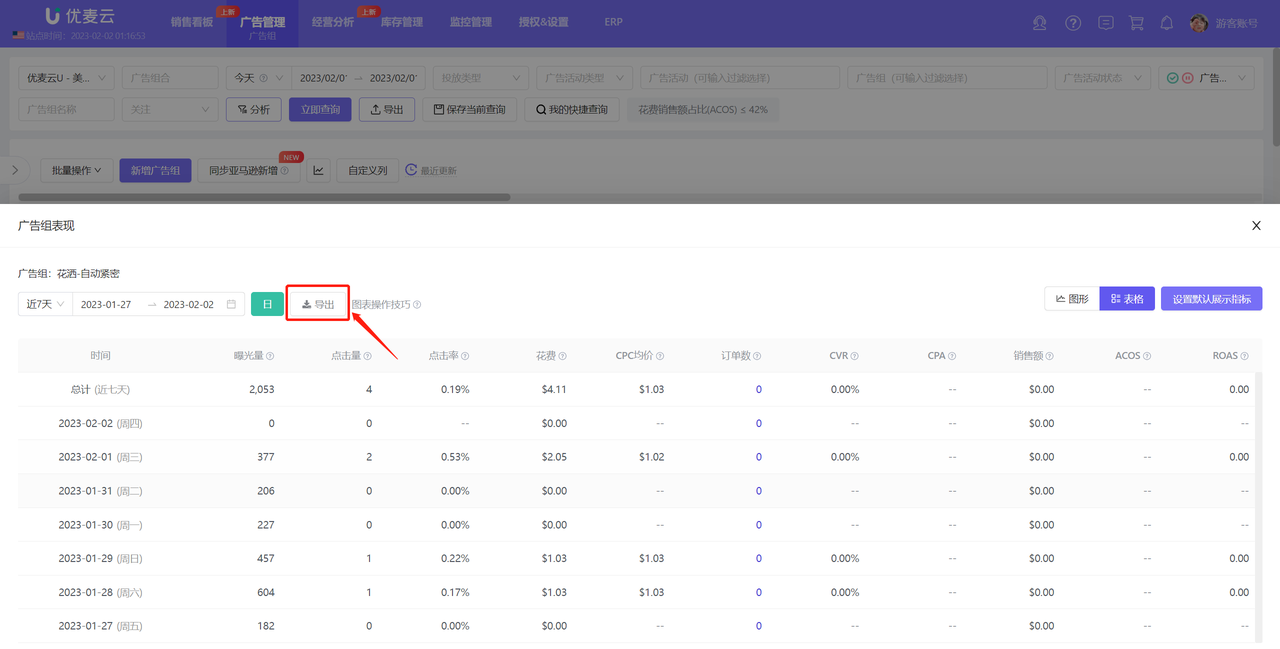
Click the "Export" button to export all data on the campaign page with one click.
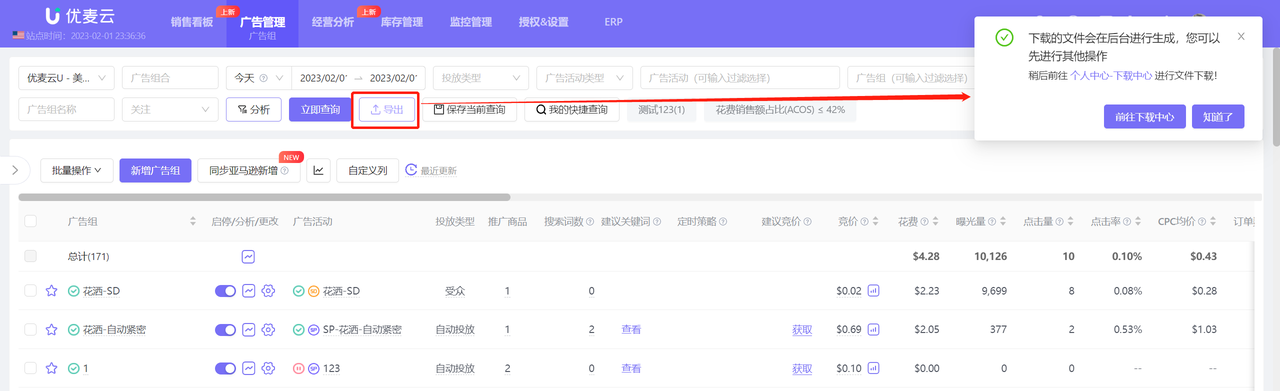 +
+
The exported campaign data can be downloaded to your local computer for saving in the download center.
 +
+
4.2 Sort by Different Metrics
Like campaigns, Ad group data is also sorted in descending order by ad spend by default.
After finding the Ad group you want to view, click the title with the sorting icon to sort and analyze the campaign's performance from the corresponding metric dimension.
 +
+
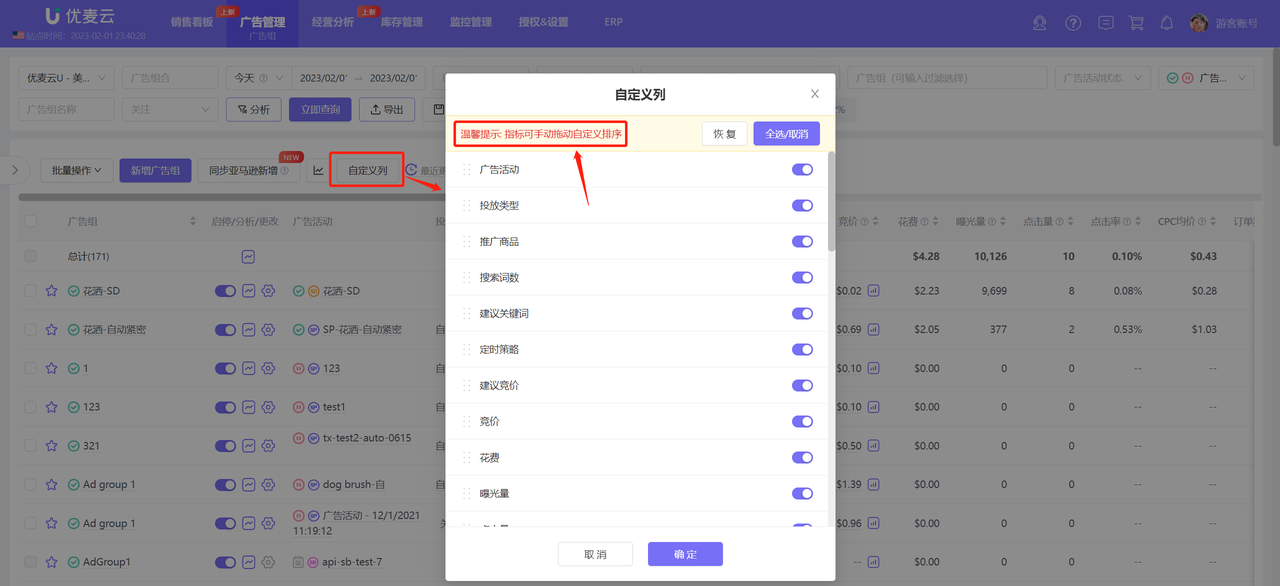
4.3 Customize Display Metrics
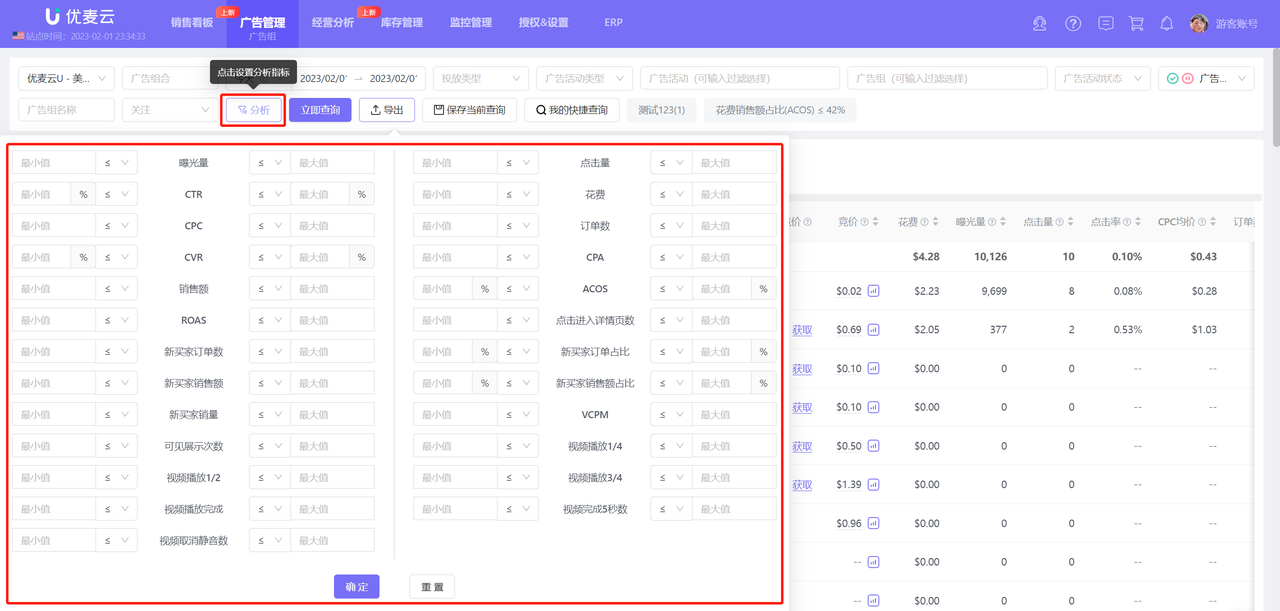
Ad groups also support freely selecting the metrics to be displayed.
If you have a fixed analysis mode, click 【Custom Columns】 to enter the settings for default display metrics,
Long press and drag metrics to further set the display order of metrics.
 +
+
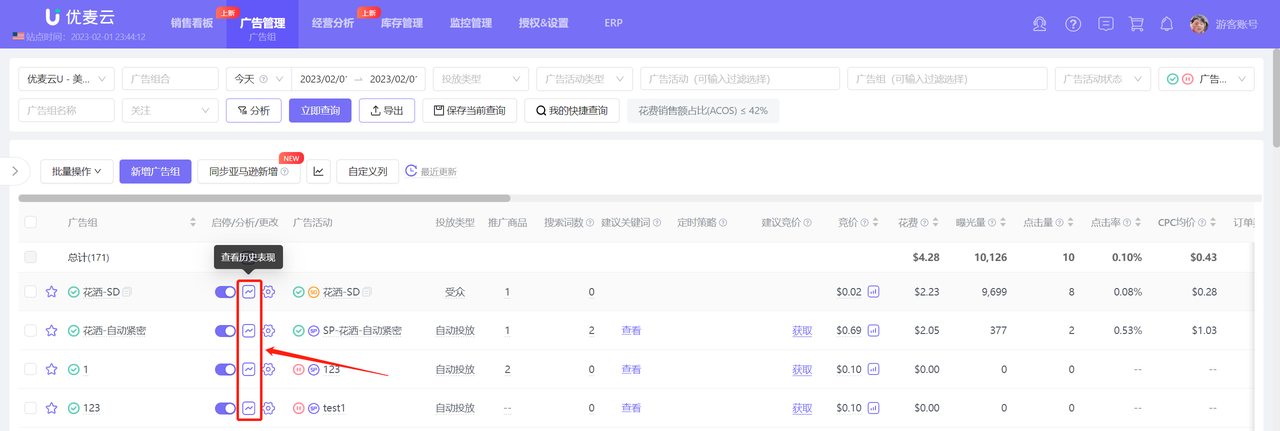
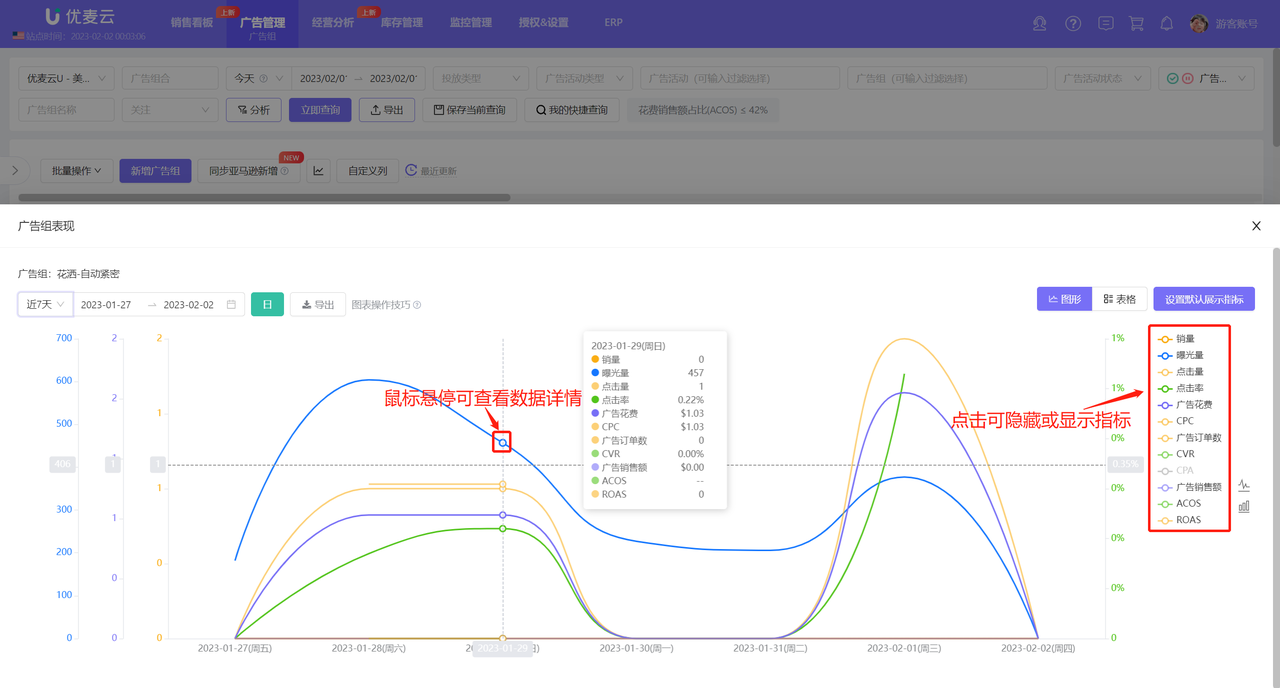
4.4 Analyze Historical Trends
Click the historical trend icon next to the Ad group to enter the analysis of the Ad group's historical targeting trends, helping us further optimize targeting;
 +
+
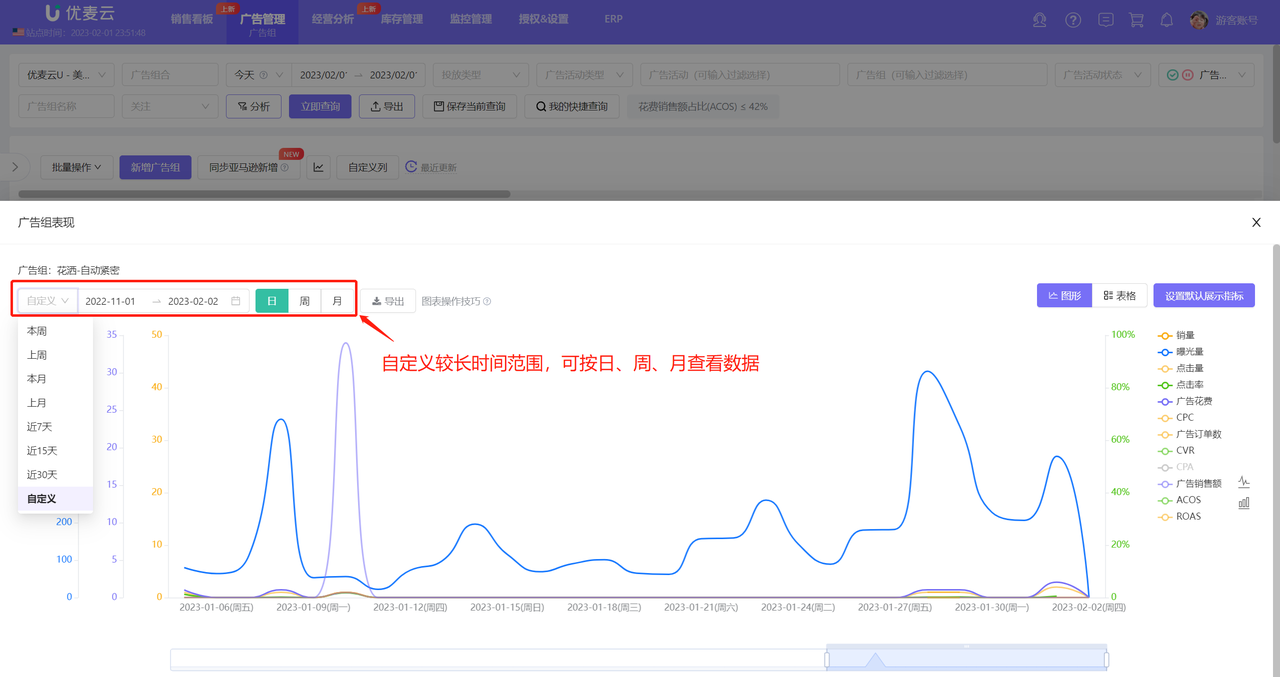
Enter the historical trend page,
The historical trend of Ad groups includes a total of 11 data points including: Impressions, Clicks, CTR, Ad Spend, CPC, CVR, CPA, etc.
By default, data for the last 7 days is displayed by day, and you can also choose other time ranges for viewing and analysis.
 +
+
Trend data has two presentation forms: graph + table.
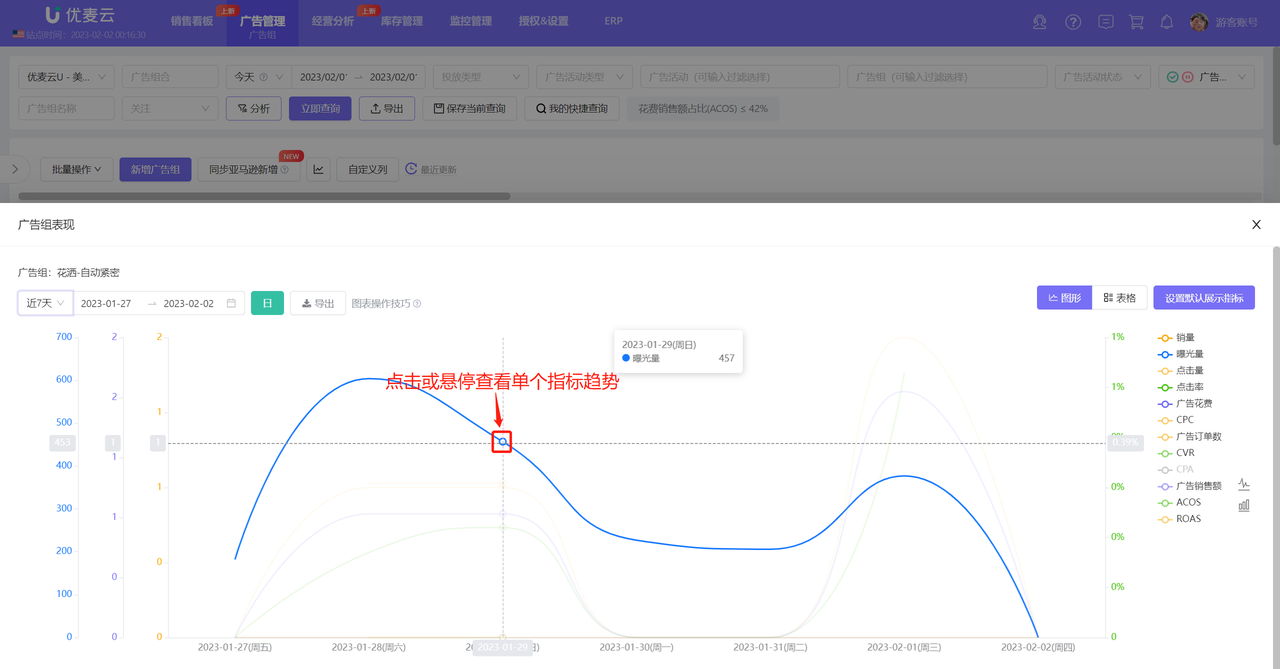
By default, it is displayed in graphs. Click the metric name on the right side of the graph to show or hide the metric data, making it convenient for you to compare and analyze data;
At the same time, hovering the mouse over the nodes in the graph will also show the detailed data of the node.
 +
+
Hovering the mouse over a curve allows you to view the data of that curve individually;
 +
+
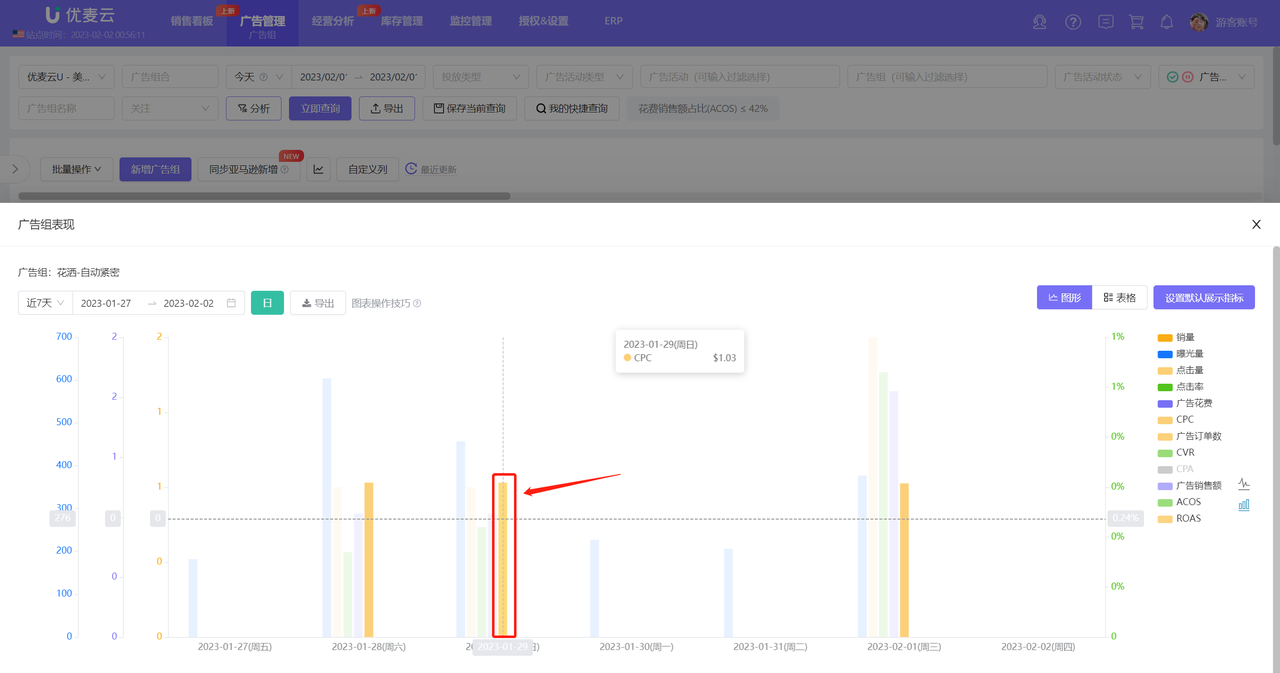
In addition to line charts, bar charts are also supported to analyze historical targeting trends from different chart modes;
 +
+
Hovering also highlights for easy analysis;
 +
+
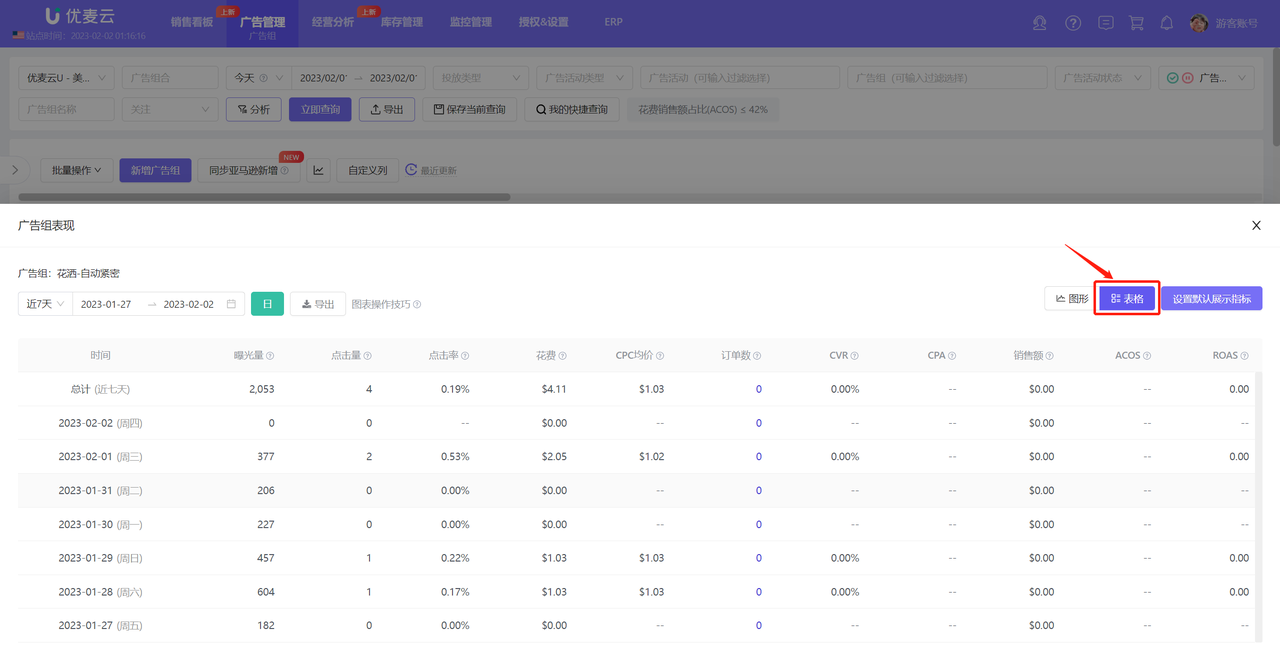
In addition to charts, table mode is also supported to view and analyze the historical targeting data of Ad groups, which is equivalent to a concise and clear trend report.
Click 【Table】 in the upper right corner to switch to view.
 +
+
The table data supports exporting to Excel spreadsheets for your further organization and analysis.
After determining the data to be analyzed, click 【Export】.
 +
+
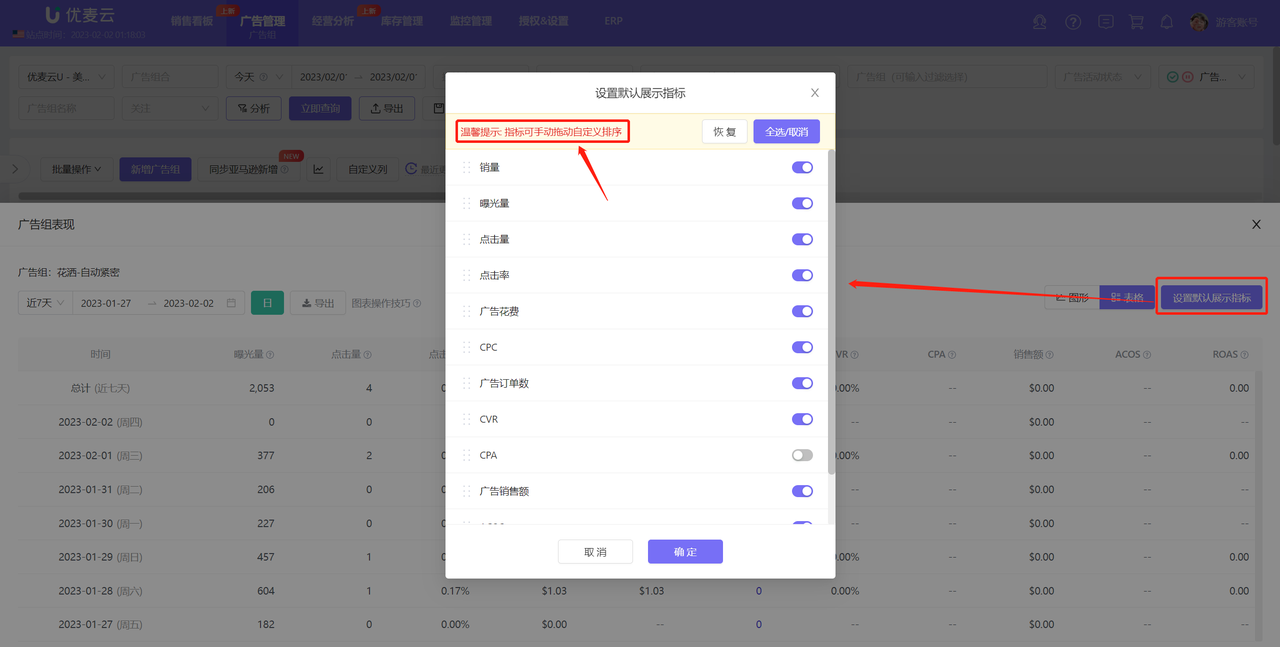
If you have fixed analysis metrics, you can set default display metrics, and you can also set the display order of metrics. After setting, the default metrics and sorting will be displayed first each time you enter.
Click 【Set Default Display Metrics】 to enter and check the default display metrics, and save.
 +
+
4.5 Analyze Hourly Trends
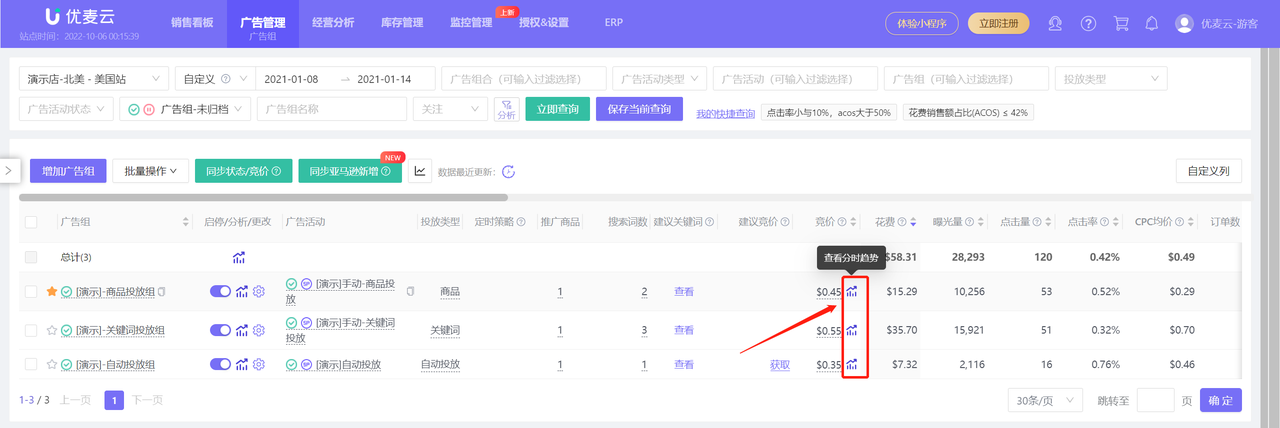
Each Ad group supports viewing its hourly targeting data for each day in the last 15 days, helping you understand the hourly budget, impressions, clicks, ad sales, ad orders, and ad spend of the Ad group. By analyzing its trends, you can better adjust ad targeting.
Click the trend button next to the budget to enter the hourly trend analysis of the Ad group;
 +
+
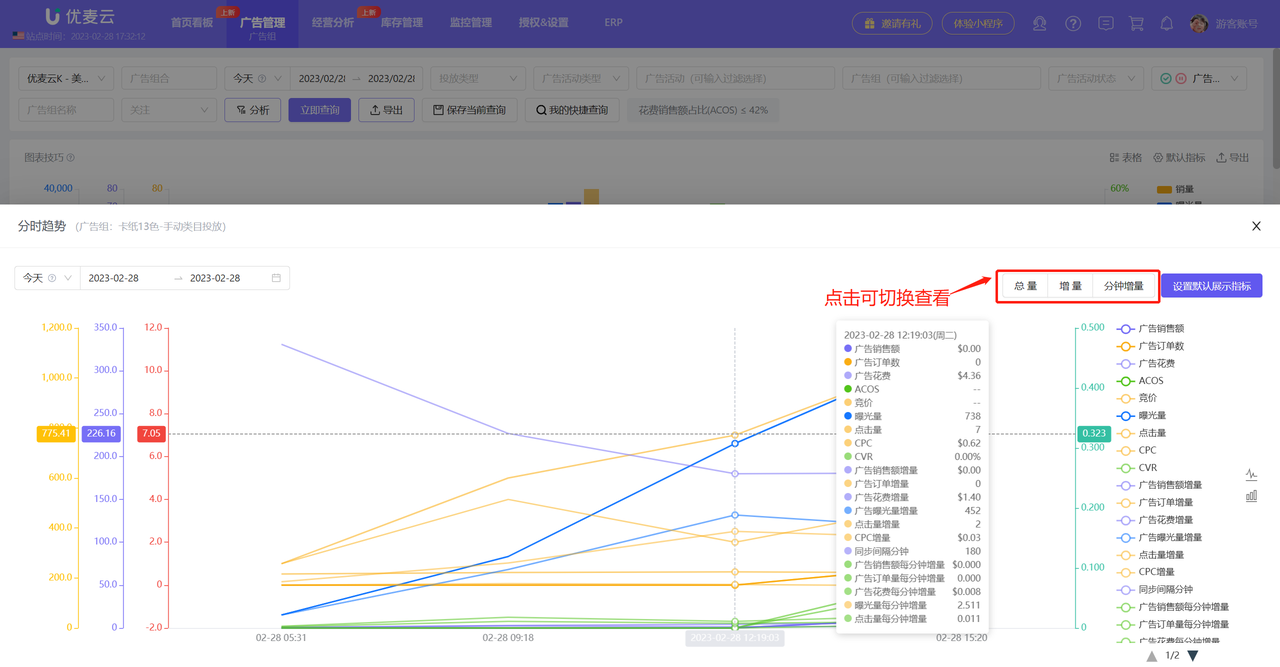
Enter the hourly trend page of the Ad group,
Hourly trend data includes 7 metrics: Ad Sales, Ad Orders, Ad Spend, Bid, Impressions, Clicks, CPC;
Three dimensions: Total Trend, Incremental Trend, Minute Incremental Trend
By default, all dimension data is displayed. Click the dimension title in the upper right corner to switch views;
Other analysis operation methods are consistent with historical trends.
 +
+
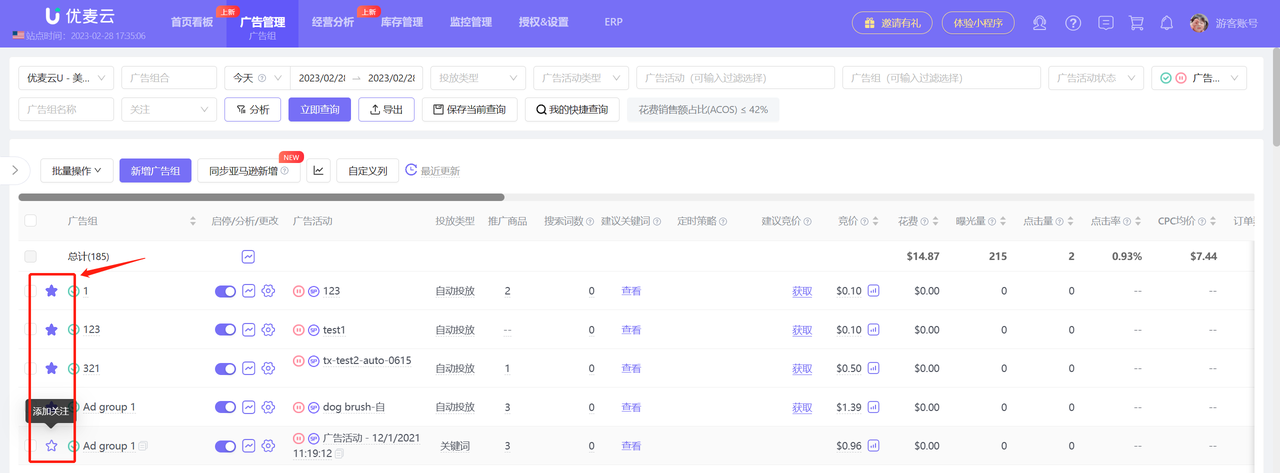
4.6 Add to Watchlist
If you have Ad groups that you need to pay special attention to, you can add them to your watchlist. After adding to the watchlist, the Ad group will be displayed at the front by default, making it convenient for you to quickly find their data.
Click the watchlist icon in front of the Ad group name to add to the watchlist.
 +
+
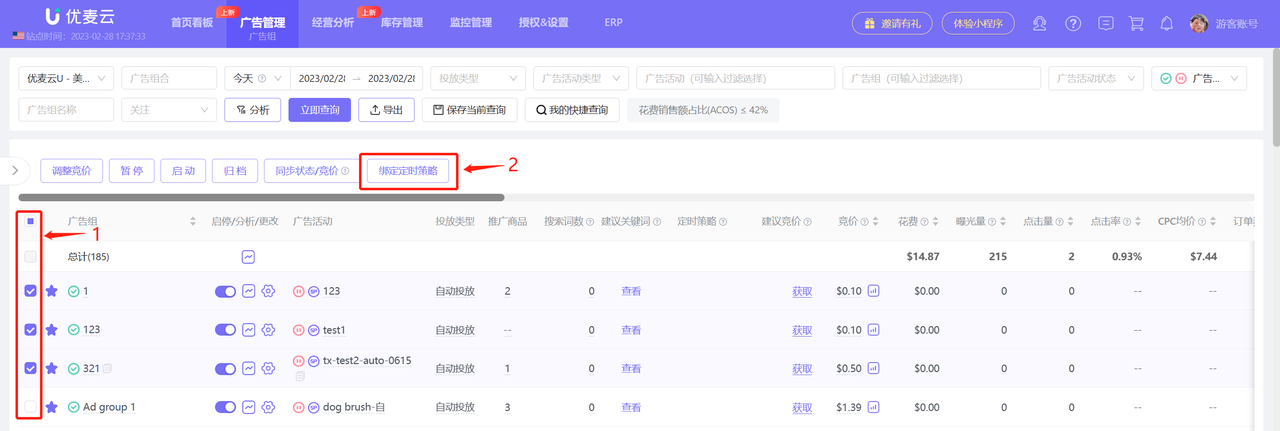
4.7 Scheduled Strategy
Each type of Ad group supports adding a Scheduled Strategy for targeted advertising.
Select a single Ad group, click Bind Scheduled Strategy, and you can directly bind Scheduled Strategies to single or multiple Ad groups.
 +
+
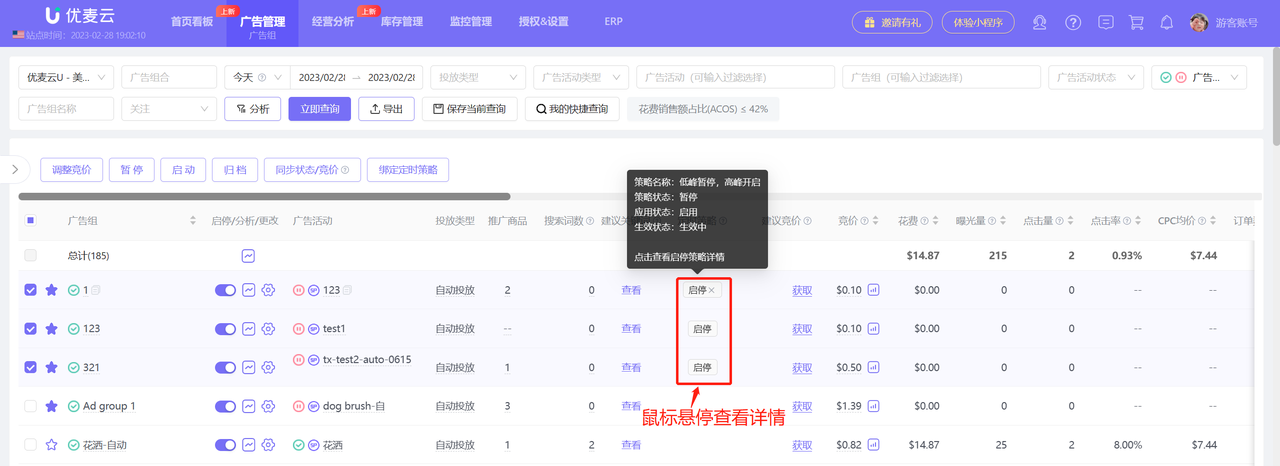
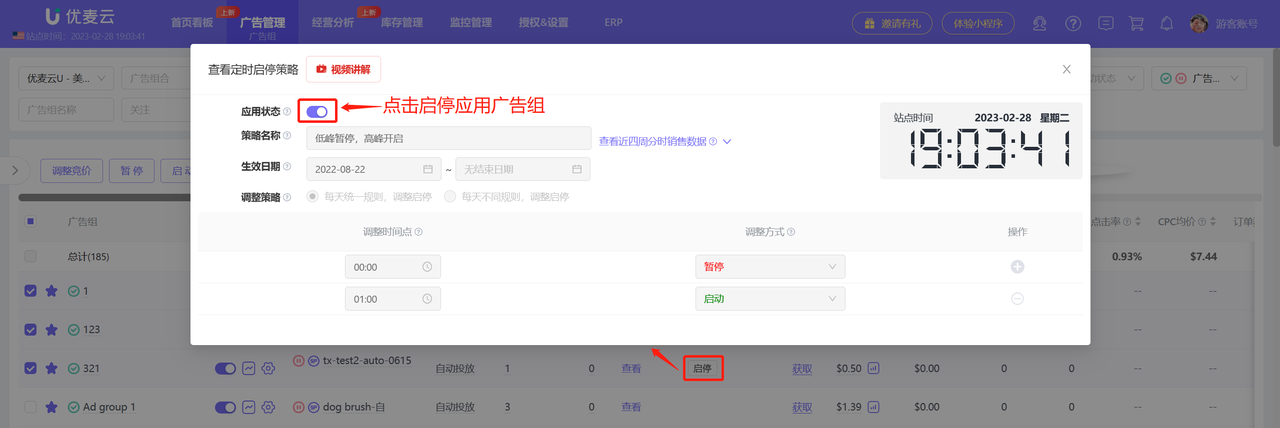
Ad groups can add: Scheduled Enable/Pause Strategy. Adjust Ad group Enable/Pause by time segment.
 +
+
You can also view the Scheduled Strategies bound to Ad groups and their details on the Ad group function page, and adjust the Enable/Pause and binding of strategies.
Hover the mouse over the corresponding Scheduled Strategy name to see the status details of the Scheduled Strategy;
 +
+
Click the Scheduled Strategy name to enter and view the adjustment rules of the strategy, such as when it will be automatically adjusted, etc.
 +
+
4.8 View Associated Hierarchical Ad Data and Support Copying Ad Names
Different Ad groups can perform different targeting, such as: keyword, product, and category ad targeting, multi-dimensionally exposing ad products to obtain greater traffic and sales.
Click the Ad group name, campaign name, and targeting type name to directly enter and view their corresponding ad targeting details.
 +
+
All Ad group names support copying for easy search and analysis,
Point the mouse to the Ad group, click the copy button on the right side of the Ad group name to copy and paste with one click;
 +
+
V. Ad group - Adjust Targeting
SellerSpace's advertising system, in addition to directly analyzing all Ad group data, also supports directly adjusting Ad group targeting. Adjusted data is synchronized to the Amazon backend in real-time, making it safe and reliable.
5.1 Adjust Default Bid
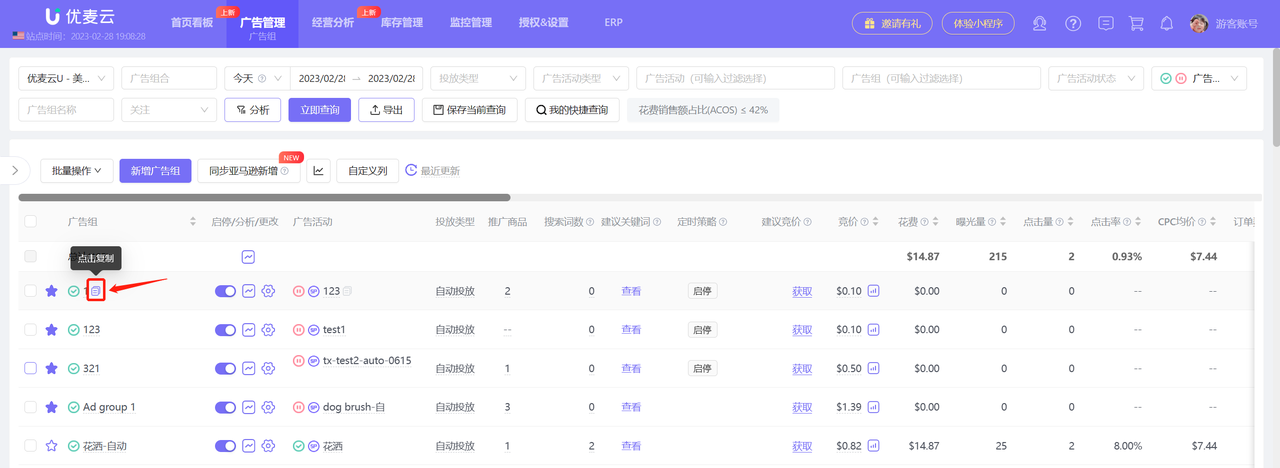
Click the bid amount to directly adjust the default bid of the Ad group.
Tips: The system will also automatically obtain Amazon's Suggested Bid as a reference for default bid adjustments. If individual keywords or product targeting in the Ad group have separately set bids, their bid priority will be higher than the default bid.
 +
+
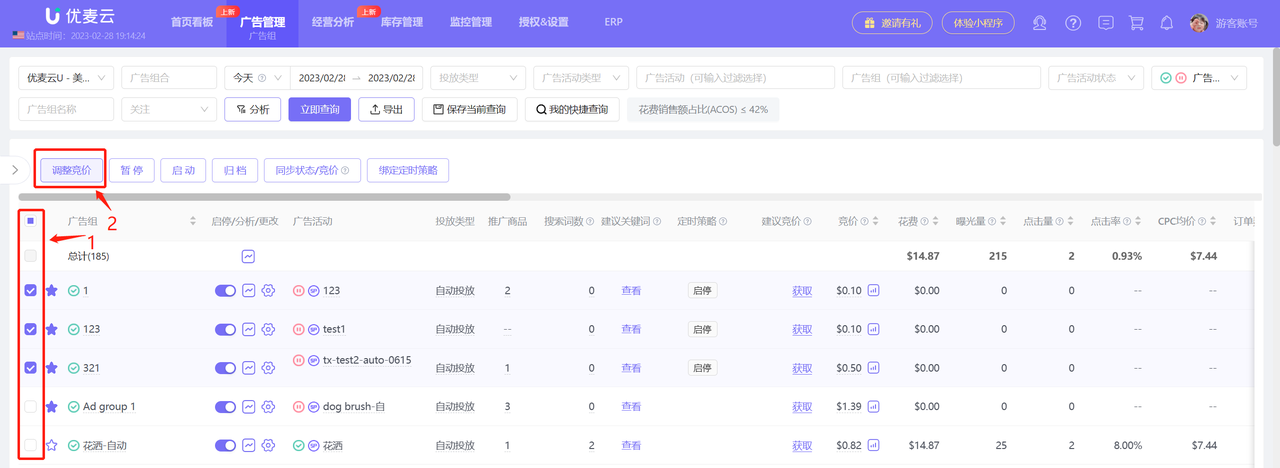
You can also bulk adjust the default bids of Ad groups,
Select the Ad groups to be adjusted, click Bulk Actions, and enter bulk adjustment;
 +
+
Adjustment rules:
 +
+
5.2 Enable/Pause and Archive
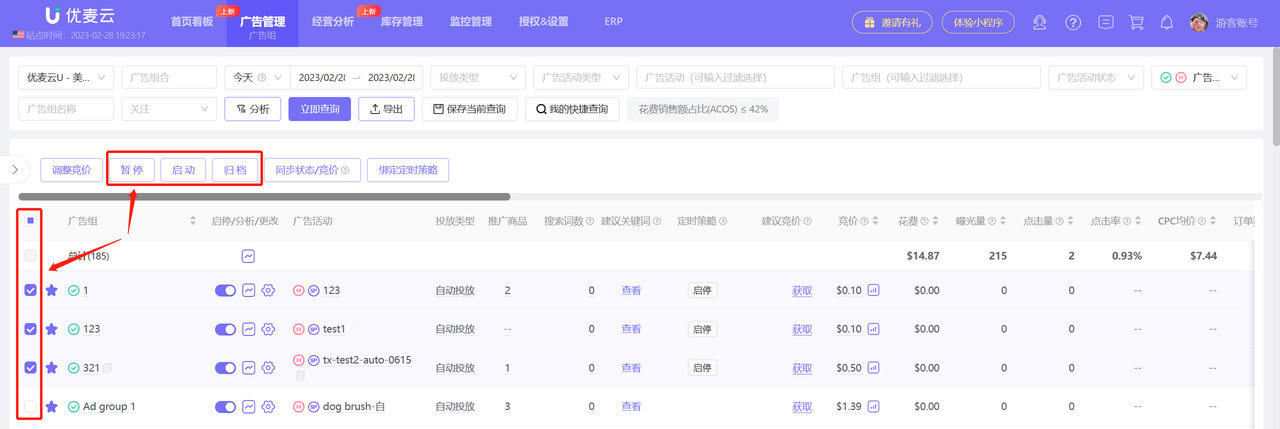
You can individually or in bulk set to Enable or Pause certain Ad groups. Archiving operations can only be performed in bulk.
 +
+
Bulk Enable/Pause or archive Ad groups:
 +
+
5.3 Change Ad group Settings + Add Negative Targeting
You can directly modify Ad group information in the SellerSpace system, such as: Ad group name, targeting end time, add negative targeting, and change creative design.
The content to be modified varies depending on the ad type.
Sponsored Products: Change Ad group basic information + Negative Targeting
Sponsored Brands: Change Ad group basic information + Negative Targeting
Sponsored Display: Change Ad group basic information + Negative Targeting + Creative Design
All types of Ad group setting changes are consistent with the operations when creating them. You can modify them according to your needs.
 +
+
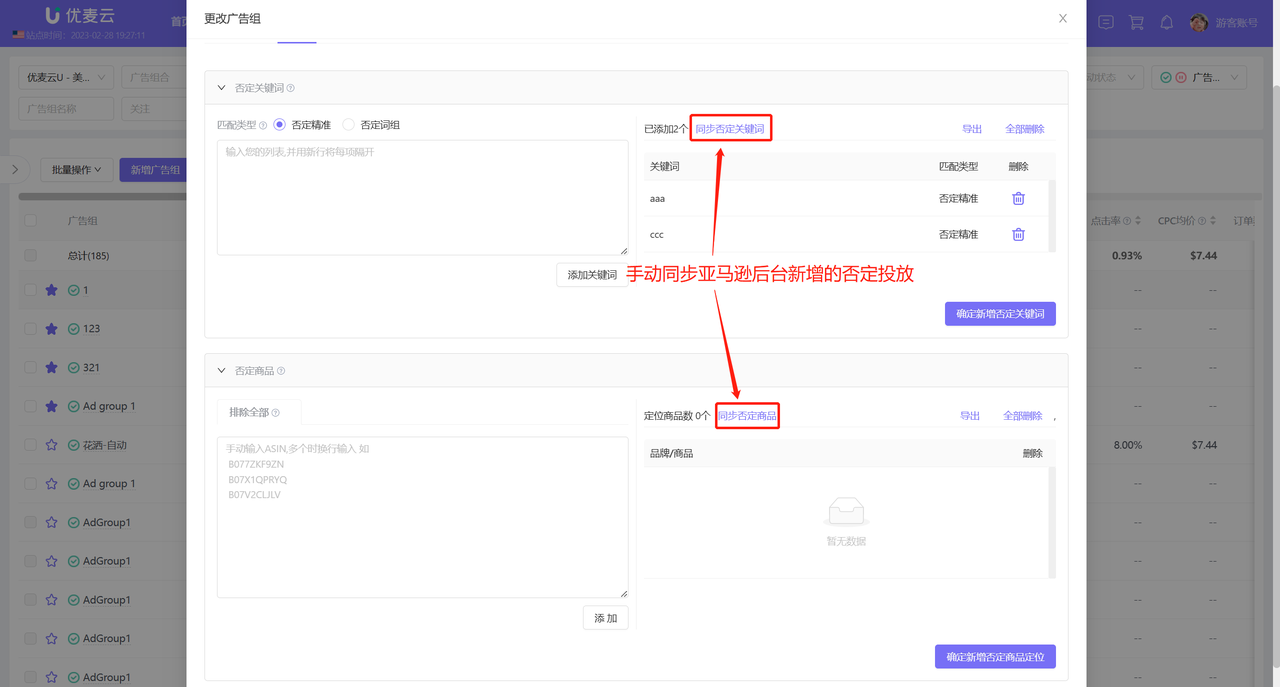
Add Negative Targeting:
If negative targeting is added in the Amazon backend, the system cannot automatically synchronize it temporarily. We need to manually synchronize it.
 +
+